

hugogo
-
Posts
102 -
Joined
-
Last visited


hugogo's Achievements
")
New Member (2/9)
408
Reputation
-
It has been some time since a last update. This was because this build stage is not the most interesting. It involved a lot of hole drilling. I bought a display case from Trumpeter lately, this was meant as a museum diorama for a tank, therefore I needed to mare the surface even again with some PS triangles. After this I glued the base plate onto a thick plate of pliewood to act as a strong base for the tailhook to go into and support the whole model. as top layer I drilled holes into a PS sheet in the pattern of the tie down holes in a carrier deck, holes of 3.5 mm each. I roughened up the top surface of the base by rubbing some rough sanding paper in the longitudinal direction of the flight deck. After cleaning up the holes, the result looks like this: having glued in the tie down points, my base plate is starting to look like a flight deck! next step: finishing touches of the outer rims and then a nice layer of black primer. The end is neigh!
-
No glue needed here, they slotted right in. Should i ever want to take the model somewhere then it is better to be able to take them off i guess
-
thanks for your response! It sounds like this setting is already becoming quite convincing. Once the extension of the tailhook is set completely in a base plate, I hope the suspended aircraft will made a good impression. More photo's on the making of the carrier deck soon to follow.
-
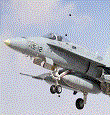
during the last few days, the final steps of this build have come. Some light wear and tear has been applied on the movable wing roots. I wiped off some small dots of oil paint with a slightly moist cotton bud in an arc around the wings rotation point. all smaller parts have now been prepared for the final assembly: and after having added them, all of a sudden this build is finished! I will still make a piece of flight deck during the coming week but at least the aircraft itself has now been completed. Here already a flavour of the result. more photo's to come still:
-
Hi Alan, for some time I have wandered around in the forums to find a build of this beast, it looks to me like you are the first one to attempt the F version! I see that you are also making an in-flight model, Having built the E version from VF-31, I can say that it is a good alternative to having the heavy model stand on these flimsy legs. Have you given a thought how you are going to dispay it? I drilled a 10 mm hole in the bottom to keep the model up, but with as far as you got I am wondering where you will attach it now? All best of luck with this build! hugo
-
some time ago I read "one can never have too many Tomcats", I guess that is also the truth here. In the mean time the washing has been applied, after a final layer of gloss varnish to seal the decals. Though trial and error I have learned to eliminate any shine difference between the decal and background by an extra layer of varnish. Because the Flory Models wash sticks much better to a matt surface, it leaves so much residue on the decal behind that in the end you see exactly where the decal film is. Dark grey wash applied with a large brush over the entire model except wheel bays and speed brake housing. after some 20 mins all is dry so that I could wipe everything off with a damp kitchen towel cloth and the smaller area's with cotton buds. What is left behind is just dark grey panel lines. the Wheel bays were washed with oil paint, this works much better for the small nooks and crannies. now it's time for the final semi-gloss coat and then the end assembly can start!
-
hi Jonathan, last year I also built the F-14D from Hasegawa, and converted the Academy F-14A into an F-14D. My Hasegawa build was not so good, the molds have been very worn out by the kazillion rereleases that they did over the years. Intake trunks do not fit so well and one of the exhausts was short-shot. The academy kit was really great, too bad that there was no open canopy nor stepladder included. added quite some aftermarket to that one! See how that went on: cheers
-
hi Jonathan,I got the GWH kit with VF-31 last cruise tomcats in the box. To my surprise it was considerably cheaper than the initial release with VF-2. It did not matter to me because I was going for aftermarket decals anyway, but when I saw the included decals from the box I was wondering how they wil behave. In the mean time I also got GWH's F-14A tomcat from VF-1 and was planning to use those decals but thanks for the warning about how they settle, might go for aftermarket in the end. The blue that I used cannot be bought in any can. I used in this case the assembly instructions from Tamiya (downloadable at scalemates) because the decal and paint instructions that came with the Modelkasten decals were rubbish. Tamiya advises to mix 5 parts of medium blue with 1 part of dark blue, must say that works quite well having compared with reference photo's. Those photo's also show how impeccably clean this bird stayed during its last cruise, I guess the gloss paint was much easier to wash and keep clean than the matt paint on the other aircraft! so there will hardly any post shading or dirtying-up necessary for my build, just a panel line wash will do. I hope to get the last gloss coat on this morning in prep for the panel lines.
-
hi Zhou, I have read your thread with a lot of interest when you were doing doth the AMK and Tamiya build. Wow those builds are spectacular! The fact that nowadays we have kits also in 1:72 with flaps and slats and speed brakes as separate parts, creates a whole new opportunity to build them with everything hanging out! I have also discovered that the mass of the amount of plastic needed for an aircraft on twice the scale, will increase around 8 times (length x width x height, 2x2x2). so making the arrestor hook carry the model in 1:72 is a nice challenge, but nearly impossible to do on scale in 1:48 or 1:32. hugo
-
Great Wall Hobby 1/72 F-14A - Now Bandwagon 202
hugogo replied to Jon020's topic in Work in Progress - Aircraft
hi Jonathan, that is good progress that you are making. the pre- and post shading looks impressive! being busy with a GWH tomcat project myself I am very impressed with the fit as well. I wonder how you will like the decals. Good luck! hugo -
Hi Hi Bill, thank you for your encouragement, I am very curious myself, not the least to see if the arrestor hook is going to carry all the load in the end. Good eye for detail by the way, you noticed that I have not extended the nose gear! I concluded that extending it would be too risky considering the small parts, and looking at the nearly extended oleo, it would only make a difference of maybe 0.5 mm anyway. So I decided to use my artistic license here and gamble on the hope that it will not be visible. It's all a bit of an experiment!
-
Hi Zhou, thanks for your support! indeed I am planning to have the aircraft suspended on the arrestor hook that I will stick into the base plate. So the wheels will be right off the deck. I am not sure myself what the effect will be in the end!
-
hi Shalako, indeed the quality of this kit is very good, fits well overall and has all moving surfaces to be positioned open, in which it is unique in this scale. Sometimes a bit overcomplicated like e.g. the air intakes and decals are not printed as sharply as could be, but for the rest a really good kit. for the missing decals I have looked up some pictures from the internet and pasted them into Paint, then scaled them back to fit my model: Now at least the name of the carrier is mentioned on the aircraft: And modex numbers on the wheel doors: Next step: another layer of gloss and then it's time for a panel line wash!
-
Hi Andre, indeed Hasegawa is the only manufacturer I know that would have the complete kit with this particular model. However the Hasegawa plastic is not nearly as good as GWH, and to buy the kit just for the decals is a bit an overpriced solution I think. in the mean time I have nearly finished making the decals that are missing so in hte end I will make it work. more to follow!
-
at this moment I have finished painting and added decals: the decals behaved fine, but the designer of the brand of Modelkasten has forgotten to design some decals (like the name of the carrier USS Theodore Roosevelt, not entirely unimportant), also the manual does not provide color schemes and contains many errors. But if you want to make this scheme then there simply is no other choice! the black stripe on the lower fins is a bit short but I am leaving it this way. Also on the nose all decals fit quite well. Notice the orange separation line between the grey and blue: too bad that the white of the roundel is a bit transparent: I will design these missing details myself with Paint and print it on decal paper. What is missing is the numbers on the nose wheel doors, the text Theodore Roosevelt in a special font and the lion symbols on the fuel tanks. more news will come after the weekend!

