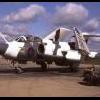
gareth Posted August 16, 2010 Posted August 16, 2010 (edited) I now realise how stupid the choice of subject for the group build is as I know of only these two photo's of If anyone has more photos id be glad to see them This aircraft Ended its Life in the Mediterenean sea after an engine failure, both crew members survived but a sad end for a glorious aircraft Anyway onto the build I have began to detait the cockpit and wingfold and thus so far have finished the pilots intsruments and cokpit sides and have began on the navigators compartment. I have also finished one of the wingfolds. I will upload photo's of this work once I get back from my holidays Cheers Gareth Edited September 2, 2010 by gareth
Mark M Posted August 16, 2010 Posted August 16, 2010 sorry i cant help but im looking forward to this one
gareth Posted August 28, 2010 Author Posted August 28, 2010 Right then the Groupbuild has started so on with the show the show. The cockpit has been completed and installed in the fuselage and i have finished detailing and painting one of the wingfolds. This work is show in the two Photos below And the Wingfold To test the airframe colours I have assembled and finished the airbrake Thats all for now should get more done later Cheers Gareth
gareth Posted August 28, 2010 Author Posted August 28, 2010 (edited) Terrible just terrible Edited August 28, 2010 by gareth
gareth Posted August 30, 2010 Author Posted August 30, 2010 Right then Next sub update: First of the slipper tanks build and filled The sink mark in the port wing has also been filled I have also done some not too accurate detailing in the wheel wells and the fuselage has also been colsed up and posed next to my my other current airfix kit the tornado which is now just awaiting final painting and decals Cheers Gareth
wadeocu Posted August 30, 2010 Posted August 30, 2010 Nice start Gareth! You seem (seam ) to have the fuselage together already - great progress my friend! I beg to differ with your opening thought though - I think this was a great choice and look forward to the painting stage! - Jack
gareth Posted September 2, 2010 Author Posted September 2, 2010 Right Quite a bit has been done but i thought better than boring you with multiple posts saying i glued ithsi ther so, all of the building has been finished and the sanding has been completed (I think) Right then two pictures showing both sides of the airframe Cheers Gareth
ollieholmes Posted September 2, 2010 Posted September 2, 2010 Thats almost how my Buccaneer looks at the moment. Its nice to see your making good process and i agree with your sentiment on posting every time you stick a few new bits on. Maybe thats why i dont do many WIP threads here.
redfoxy Posted September 2, 2010 Posted September 2, 2010 (edited) Gareth, I came across this on a Google search, Don't know if you have seen it before, I haven't. It was on Hannant's site with a decal sheet no ML48177 by Model Alliance. Obviously not my picture so if its a problem I will remove it. Regards Paul. Edited September 2, 2010 by redfoxy
gareth Posted September 3, 2010 Author Posted September 3, 2010 Hi red Yes i have seen that before as it's what ill use to to apply the camoflague, asi if im not mistaken that is the painting guide from the model allaince decal sheet Cheers Gareth
redfoxy Posted September 3, 2010 Posted September 3, 2010 Hi redYes i have seen that before as it's what ill use to to apply the camoflague, asi if im not mistaken that is the painting guide from the model allaince decal sheet Cheers Gareth Yes it is, I only posted it as you said you only had the two views of the aircraft at the beginning of your post. Regards Paul.
gareth Posted September 3, 2010 Author Posted September 3, 2010 (edited) thanks for posting anyway Cheers Gareth Edited September 3, 2010 by gareth
wadeocu Posted September 3, 2010 Posted September 3, 2010 Note the naff with the underwing roundels in the four view -
gareth Posted September 3, 2010 Author Posted September 3, 2010 Note the naff with the underwing roundels in the four view - i Hadn't noticed it to be honest so well done for spotting that and saving my blushes Cheers Gareth
Metallicus Posted September 5, 2010 Posted September 5, 2010 Never seen a winter camo scheme on a bucc before, it looks really good!!
lansen73 Posted September 23, 2010 Posted September 23, 2010 looking good,its a belter of a scheme,I missed out the under wing codes on mine though,lack of research!!,looking forward to seeing it all done!!
gareth Posted February 26, 2011 Author Posted February 26, 2011 (edited) Its Done Here Are The Photos, i hope you enjoy them Cheers Gareth Edited February 26, 2011 by gareth
Jabba Posted February 26, 2011 Posted February 26, 2011 Looks rather good with the white. I have got this to do in 1/72 one day. Well done.
Recommended Posts