
Cratecruncher
-
Posts
79 -
Joined
-
Last visited
Recent Profile Visitors
1,075 profile views


Cratecruncher's Achievements
")
New Member (2/9)
111
Reputation
-
 Amazing work Putty. I'm currently drowning in the middle of my first scratch build. What did you end up using for spoke wire? Did you go back to copper? What material and size did you use for that rigging? The scale is spot on.
 -
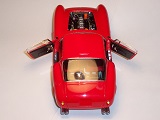
1/20 MFH Ferrari 156 Sharknose
Cratecruncher replied to Schummie's topic in Work In Progress - Vehicles
Ahh, takes me back. I built this kit several years ago and found it a delight. I only recall one issue where the body was too thick near the shock towers. It was remedied with some liberal carving to the body shell in the affected areas. Most MFH kits arrive with a few bent parts. Their white metal is ductile enough that the parts are easily bent back to proper shape. Heating the part in hot water before straightening a severe bend in gradual steps will prevent cracking. I like to use needle files and #0000 steel wool to clean up metal parts but it will clog your files and turn your hands black. Be especially CAREFUL cutting out the windscreen. You only get one chance. That was the most nerve wracking part of the build for me. The rivet photoetch in the kit looks good on the model so don't be afraid to use it. The odd screen intakes will mold nicely without annealing, but like the windscreen, you only get one chance so be careful. I added some bolt and nut detail to chassis and suspension and a few engine details that were missing. Good luck! -
Model Airways Amati and Artesania Latina 1/16th scale kits
Cratecruncher replied to Noel Smith's topic in Aircraft WWI
The Model Airways kits can be had for much less on eBay than the Artesania and Amati kits because so many have been sold over the last 25 years. They all suffer from ambiguous casting quality that makes the finished model look "chunky" unless a good deal of carving, sanding lightening is done. But they are technically quite accurate and can be built into impressive models... eventually. I'm still working on my DVa (on and off for 15 years) and echo almost word for word the experience Ebf2k had with his. I have the Jenny kit and the casting quality are superior to the rest of the series. It's also twice as complicated! From looking at parts and built-ups on the internet it looks like the Artesania kits of the Camel and Fokker Dr.1 appear more to scale than the Airways version. The Airways Camel is so "big boned" it hardly looks like it would fly. -
Hasegawa SE5a 1/8 scale Scale Museum Model Series value?
Cratecruncher replied to Torbogdan's topic in Aircraft WWI
They are huge in that scale. I had all three in the series at various times. I even built the Dr.1. Being the rarest, the SE5a will bring the highest price even though there is no sweet Suiza engine block (just the heads poking out of the fuse). Best to check eBay's completed sales for an idea of Buy it Now price bearing in mind it may take months before someone comes along that must have one NOW. Good luck. -
A fellow I know who flew them explained to me one had to control throttle which added another variable that's normally automated in most helicopters. It was the one thing he remembered vividly! Thanks for the suggestions on that big canopy. You mentioned the plexiglass was held in place with aluminum extrusions. I was thinking about sanding off that strip detail and replacing it with embossed stove pipe tape. Just cut a strip the correct width, flip it over and press a dulled strait pin in to replicate rivet heads. I'm a car modeler that loves using the thing that the thing was made of. I'm going to try and have my Osage finished for a big contest in August. The IPMS Nationals are going to be held 40 miles away in San Marcos, Texas. I know August is a long way away but I have some other things to finish and plan to enter a lot of older models I haven't shown in years.
-
First off, thank you for taking the time to share your build CMSCHLOM! I was looking at my parts last night and also noticed that rotor mast (part 31C). I'm pretty sure that part caused a severe forehead slap when the testers went to assemble the first model. It's surely the reason for the last minute resin piece. Unfortunately, my resin mast was already in three pieces when I opened the box. I managed to glue it back together but there are cracks and weak spots all over it. I'm going the plastic route for sure. Thanks for the heads up on the blades. The most visible part of the model are those two GIANT clear plastic canopy halves. My set has some minor cracking very close to the edges that butt up to the door parts. (Sticking in the mold?) It should be hidden by paint but I'm worried chunks might start chipping off if I try to polish it. Most of my Osage work to date has been part fitting. I agree strongly with your assessment. It's a detailed model of a rare interesting subject that IS GOING TO tick YOU OFF at first because nothing seems to fit together. But then something exciting comes over you as you realize the magical secret to AMP wacky part fit. Heck, I'm having so much fun I might just throw the instructions away on my next kit. (The TH-55 engine detail is pretty good!) Edit: Also, I noticed that 16944 is a decal in the kit and that very chopper is all over the net (unrestored) so adding some little unique details should be fun. But for some reason AMP didn't include the big vertical yellow numbers for the canopy.
-
I guess I'm a little confused about how Nick is doing his production. I assumed he's doing a 3D print as a prototype. Then after cleaning up the surfaces of the final 3D part it's used as a pattern to make a rubber mold. If he's 3D printing every part he sells that would leave consumers cleaning up every part and Nicks expensive printer tied up printing parts constantly using expensive boutique resin. Heck, I'd spin cast that Bugatti engine in white metal so the builder can do the scraped pattern directly into the metal. Ettore and his team often get a low grade for their engineering innovation but they did come up with some manufacturing processes that are still impressive today. The forged front axle looks like it would bend or break where the springs go through(!) but the part never had issues and became iconic for the brand. The wheels afaik, were just sand castings that were stacked in multiple layers and the dividers removed. Once the casting cooled the sand was knocked out from the internal structure and on to the lathe for machining. Never heard of one breaking.
-
A shout out for a great company, Copper State Models
Cratecruncher replied to europapete's topic in Aircraft WWI
I love Caudrons and 1/48 so add me to that list. The Copper State GIV in 1/48 is such an impressive airplane kit. The photoetch heat shielding, boom connections and hardware is even beyond WNW stuff in my view. The rigging diagrams are excellent. No easy feat with a string bag like the GIV! I would love to also have a 1/48 GIII to display next to mine. But market forces appear to be pushing everything toward bigger scales (and higher prices). Meng is testing the waters with 1/24 likely based on the success of all the WWII stuff that seems to be selling well. The smaller size of the average WWI scout makes it ideal for scaling up. But these planes weren't that complicated. Bigger scales than 1/48 seem unnecessary to me. -
I'm also starting work on this kit and building up the model with Elmer's school glue so I can figure out how it goes together. I already found a BIG error in the instructions that can create a herd of fit issues! There is a stiffener panel on the top of the back wall ( part 1A ) that fits between the back wall and the canopy. It is incorrectly shown being glued to the back wall after the canopy is glued. That part was apparently redesigned and instructions never updated. But leaving it out means nothing lines up, floors slope, door parts don't fit, etc. There is a 3D cast resin rotor head included in the kit that looks too fragile to support rotor blades (the way I pack, haha). Looks like they were having problems getting the assembly to full shot or fit together because all the major pieces for a plastic rotor assembly appear to be molded on the sprue. Since the assembly of a rotor head isn't in the instructions I want to try and use the plastic parts with brass wire to make a more durable assembly using the resin part as an instruction guide. @CMSCHLOM I just met another Ft. Rucker grad from '87 while working on this kit. Did you use the 3D resin part for the rotor?
-
I haven't built a ship since I was about 8 years old. Which is why I just had to have the super detailed version of the 1/700 Bismarck by FlyHawk. Not sure if it was the stack of microscopic photoetch or the brass needles supplied for gun barrels and masts. But I got a nervous feeling every time I looked through the instructions. Lucky that I also acquired the USS Ward destroyer by the same aforementioned brand in the hopes it will become a stepping stone toward the big ol' battleship with all those tiny parts. If I were a REAL ship modeler I'd build everything FlyHawk make. The kits are brilliant and an amazing value.
-
Sorry if I confused thing. But I've studied the heritage drawings in reference to both my 1/12 and 1/20 scale MFH kits and know where the mistakes are so that I can correct them when I get ready to build. Though I don't have an example of the Italeri offering I have seen most of the parts up close which is why the gearbox mistake caught my eye. My rule of thumb is that 90% of what I pay for when buying an MFH kit is development time (research, CAD time, 3D printing, tool development, writing instructions, and so on). The material the kit is made out of is less than $50. But when you only release 500 kits the tens of thousands of dollars in development makes the kit price huge. Then Italeri comes along and upsets the apple cart so to speak. Now with steel tools of a 1/12 Bugatti 35B Italeri will want to get back their hundreds of thousands in investment. We'll see how disciplined they are with releases. But even at $200 the Italeri kit is a no-brainer compared to the MFH at three times the price. On that last point I think Nick has some headroom to make a pretty fancy detail set. Frankly, I'm amazed there is so much love for a Bugatti suddenly in the model community. But once you dive in, the cars become so captivating because of their jewel-like design. Their like a Swiss watch you could drive!
-
My bottle of Polly Scale "oily black" will be missed...
Cratecruncher replied to Cratecruncher's topic in Vehicle Discussion
I'll take a look at the Humbrol tins. You reminded me about what I love about that old Polly Scale Oily Black color. Straight from the bottle it was greyish black but as it was thinned out It acquired blue and brown highlights that made it so convincing as a shadowing wash on engines. -
Just glanced at the instructions to the Italeri !/12 Bugatti. SURPRISE! They copied every part of the MFH offering including the transmission sump orientation at a right angle to the driveline. Pattern makers are like musicians. They're all thieves, haha. I recall ejector pin marks on the MFH Ferrari 330P4 they stole from the 1/24 Fujimi kit.
-
After a way too long hiatus from the building bench I was checking my paint stash for dead soldiers. Oh, say it isn't so! My favorite bottle of paint is rock hard with no chance of recovery. Since Polly Scale is no longer made I need a replacement. What is everyone using to bring out details and give a "daily use" vibe to an engine. I recently bought a set of colors from Mig called Civil Vehicles Weathering Set but it contains rusty or muddy colors only.
-
Still no builds? I just bought one of these from a retailer in Ukraine. I have wanted to build this model for some time. The 1/32 scale allows some super detailing and maybe even LEDs, hinged doors, all kinds of fun stuff. I'll do a thread here when I get my hands on it. I really like the AMP helicopter series and love that it supports the Ukraine economy.


