
shood23
-
Posts
2,367 -
Joined
-
Last visited

.thumb.jpg.76f12b87ce9ca9929c9aabdcf8f9d2dd.jpg)


shood23's Achievements
")
Very Obsessed Member (5/9)
1.7k
Reputation
-
Looking at it To fix would not be too hard. the front wing peices are all easy fix, the floor pan/diffuser a little harder but all could be done with the correct thickness plasticard. It was the first year of new regs in 09 so all bits are very basic shapes compared with the following year. The steering wheel again not to hard it would just be a time consuming job to get right. All the decals are again very easily printable to replace on damaged parts. Shaun
-
Séan it was for a race car but with all the info I got from here and a little more digging using different search words I have finally managed to get the job done. Just need someone who can print them now. Shaun
-
Can anyone point me to a person who can print decals with white ink? I've tried emailing parkes on here but have got no reply as of yet so if anyone knows of anybody else who can print good quality decals that would be great. Shaun
-
Thanks séan. I know of white decal paper in looking more into making a sheet to send to an actual person to print with the white with no outline. Shaun
-
Hi guys I call on the wisdom of the group. I need a quick/ over simplified explanation of how to use one or all of the tagged applications above on how to make white decals with no background so i can send the file straight to a print maker. I have only recently started using these apps so am very overwhelmed in the functions (many swear words have come out). All i want to make is around 10 decals that are word logos for a certain car but all have to be white and I can't seem to 1) find away to import the logos I want to use and 2) find away to change the back ground colour to nothing. I've watch many YouTube videos but nothing has come up that closely resembles what I am trying to do. The thing is I get it's probably going to be something super easy but I'm thick when it comes to new programs. Shaun
-
Hi Paul, I have a friend over on another forum who is wanting decals to be printed. He would normally do them himself but this set has white decals to be printed. If possible for you to help him do you have an email address I can give him so he can contact you directly. Thanks Shaun
-
It's not bad but like you say not as good of a shine as 2k but with a little work can be made to shine quite well. Over a full body it works well as i used it on a tamiya mp4/4 McLaren a few years back and that's held the shine really well compared to how I thought it would. Shaun
-
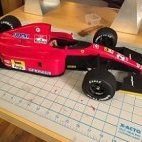
Another of the builds ive been working on recently. Fujimis McLaren MP4-12C GT3. Overall its a pretty nice kit, lots of scope to improve as youll see with some of the things in doing to my build. So the obligatory box picture. All packaged in with plenty of room to spare. The standard kit livery is nice but there are plenty of options for this kit to make loads of different cars. Ive gone for these, a 2012? Seb loeb car. How it should look once done. There are issues with the instuctions that i have noticed but are all easily fixable. The body does come out of the box and looks a little weird with what looks like huge skirts down the side. Alot of wasted plastic if you ask me. With the side body parts glued on. The body and intake parts are now ready for some primer. The one area i want to change is the engine area as it is very basic. Some thing needs to be done about this. Luckily mclaren have used the same basic plug and play engine in all the cars from the p1 all tge way down to the 570s. Revell make a pretty well detailed 570s with near full engine, so the 570s and gt3 have the same engine although the gt3 engine is slightly detuned but the basic layout is exactly the same. One thing that does need modifying is the rear wheel attachments. The whole middle section needs cutting out and the upper "suspension" parts need gluing into the wheel arches. Finally for the engine how it all fits with tge changes. Rather luckily the exhaust off the fujimi kit fits exactly where the revell kits exhaust goes, it even uses the same mounting holes. Actually ome more quick picture of the engine. With the body on you dont see much of it but even what you do see makes a massive difference. The floor needed some mounting points for the framework of the revell engine. The frame and floor have both been sprayed and some minor detail painting done. One problem i did run into was how to mount the wheels on the hubs due to the kit just having a metal bar going from wheel to wheel. An old set of fujimi f1 wheel pins worked perfectly, glued them in from behind and the wheels mount on the rear now just as the do the front. Rims have been painted with alclad steel. Tyres and decals added. And finally for this first big update the body and little parts have been put in a coat of white primer. More soon. Shaun.
- 1 reply
-
- 1
-

-
So on to part 2 of the build bringing it up to date. So the nosecone needed a small strip of plastic card added at the top to replace the material lost when cutting it off the main body part. As seen here there would have been a .5 mm too much gap so this small plastic was very much needed. Staying at the front and these little wing flow conditioners are a slight pain. As you can see there will be a rather visible white section one added if i followed the instuctions. So i cut the little tab off the white bit, glued it into the wing and filled the gaps around it minus where the original part will go. Now going to the rear of the car and the exhaust. I didnt like how the tip looked as it would always have that join line visible on the inside, so i cut the end off and added a bit of plastic tube. The floor pan had a lot of injection marks all on the top surface of it and all in obvious places. It took a good hour just to buff them all out. After this a couple of coats of gloss black were sprayed, this is just after the tack coat. Also the engine cover has been sprayed in primer just to check the filler line between the 2 parts. The main body section has also been put in a primer coat. Mainly just because its now progressed enough to do it but also to check the join lines on the top of the monocoque. The rims have been sprayed with alclad white aluminium. After a coat of alclad aqua gloss the decals were applied and then one more coat of aqua gloss added and i must admit i am really happy with how these have turned out. Tyres have been scrubbed with a dremmel. Finished tyre on the left compared to one thats only had a dremmel run over it. At this scale 17' spec tyres (top) compared to 16' spec (bottom) isnt that different especially when you do the same comparion in 1/12. The floor has had some of the tamiya carbon decals added. Soon i am expecting a company like acu-station or s27 to do a full carbon set but tamiyas decals are really nice. Some tamiya smoke will be added also to tone the decals down as they are quite out there and loud. And finally the exhaust has been sparyed up in alclad pale burnt gold. More soon Shaun
-
Thanks for the comment monsjmse. This one will be a seb vettel car with only a few changes compared to an out the box build. I have one more that will have as much as i can possibly change done to it once maybe some more options come out from tabu decals and studio 27. Shaun
-
Been a while since i last properly posted on here so i though this would be a good way to come back to the forum. So this will be my build thread for tamiyas newest kit, from what ive seen so far its a nice kit with some parts i dont like but others i do. So i am going to be honest i am quite a bit into the build so i will break up the thread into a couple of comments. To properly start lets get the obligatory box picture out of the way. Basic tamiya offering from previous kits with a picture of the subject and sprues at the bottom. The inners are packed quite tight but not overly so. Decals are very nice and also include quite a bit of carbon effect decals So on to some plastic cutting. The main front parts of the body are a depature from the normal way but as you will see later its not actually a bad way. So the lower portion of the monocoque has had all the little suspension holders and support beam added then the 2 halves glued together. So about 5 parts in and already im changing the car to suit my needs. The nosecone was cut off. This is why. The lower flow conditioners would be insanely tricky to paint if left as tamiya made it. The engine (less) cover had the inner peices glued on and after the picture was joined together. So a quick mock up of the tamiya car next to my mfh car. Checking how those iconic stormtrooper style side pods fit after the issues i had with the mfh car. Gearbox halves have been glued together. Front wing checked for fit. And the same for the rear wing. So that's it for update 1, due to the time of me finishing this i will post the next few pictures tomorrow now instead of tonight. More soon Shaun
-

What CAR/BIKE kits have you recently bought 2?
shood23 replied to shood23's topic in Vehicle Discussion
Finally!!! I got my hands on a protar lancia lc2 with a little help with a freind of mine. Shaun -
Fantastic work. That shine on the black, as many here know, is incredibly hard to get as good as that. Shaun
-
What CAR/BIKE kits have you recently bought 2?
shood23 replied to shood23's topic in Vehicle Discussion
Just picked this up from hlj for just over £20. Ver.2 of the LB GT-R Shaun -
Personally i never spray anything on the spurs no matter now little. Great kit aswell by the way, always loved these old escort wrc kits As for attaching parts before it's entirely up to you. Small bits sometimes attached before paint pose the risk of being knocked off later on in the build but things like bonnet vents and wings are again up to how confident you are in your own abilities and if on the rear car the joins between these parts are flush or there is a visible line. And any mark that has been put on the body in pencil needs to be removed before you do any painting as if you don't these areas will not paint properly with reactions or peeling and it would be a shame to have this happen to such great car. And your line about doing it wrong, like myself in this hobby you will always find better ways of doing things through trial and error and ways that work for me may not be the best way for you. And as you said you mainly work with rattle cans so anything you do if it doesn't work out how you would like is easy to correct by putting the painted parts in a bath of ipa 91% or above for a day or 2 as this will pull any paint off the body without harming the plastic. Shaun