Search the Community
Showing results for tags 'Vinyl'.
Found 23 results
-
 Brothers a huge Spidey fan so did this for him for a significant Birthday, for an old model its a great dynamic pose, and I was seriously thinking of keeping it all to my myself
 -
Star Ace big vinyl Gwangi kit, part of the Ray Harryhausen collection, lovely kit that required minimal fettling to build up, Couldn't really resist it, its a bloody big Dinosaur fighting cowboys, and an Elephant, and a little horse, and a sprinkling of Harryhausen magic. All primed and ready Home made base, using polystyrene, VA soaked kitchen roll and sharp sand and gravel Spare Dawn Horse from the Aurora Prehistoric scenes Swamp kit The big fella himself, supposedly an Allosaurus The nameplate was a pre coloured item I picked from E-Bay Having a bit of a scrap with my Aurora Styracosaurus Ready for his close up Proper old school Dinosaur based fun
-
Hi folks! During my ED-209 Build i had to realize that Vallejos Acrylic Primers do not bond so well on Vinyl Surfaces (the kit was washed, rinsed and dried before application). Up to now i have not tried out laqued based primers on Vinyl because i have seen several comments that those should be avoided as the agressive solvent attacks the already soft Vinyl. Has anybody here found a primer that works well with Vinyl? Any type of feedback is welcome, positive as well as negative!
-
After giving myself serious eye-strain on the Aliens mini figures,I went to the other extreme with a re-paint of my nearly 30 year old T2 figure as he was looking a bit battered and worn,a pretty large figure coming in at about 35cm. Looks like hes back........................................again Cheers.
-
Hi folks, I've been messing around not doing much recently - we had our club compo and the requisite rush to get something finished, then the model railway show, and then the PS4 came out. Plus Micky talked me into doing the couch to 5K running thing (4.9K as of today ) which has been taking up some of my spare time. Anyway... I popped into my local model shop the other day for no particular reason and came out with a couple of vinyl figure kits (half price!). I bought a Halcyon Judge Anderson off eBay earlier this year and was hoping to try something a little less precious as my first vinyl kit. I ended up with "Iria" and "Sara" - both by Elfin. It took quite a bit of searching to discover that Iria is from the Japanese sci-fi movie "Zeiram" and is a re-cast of a Takeya Takayuki sculpt which was produced as both resin and vinyl kits at the end of the '90s. I wasn't able to discover the provenance of Sara - she's the chainmail-clad (unclad?) barbarian lady built by Kallisiti in the big scale group build last year. So she might not be a recast. So I'm on questionable moral ground, but since I bought old stock I doubt I'm doing Elfin any favours and not building it or throwing it away on a point of principle seems dumb. I hope no-one is offended by this. With that out of the way, I trimmed the vinyl parts with a scalpel after heating them in hot water. A bit scary to start with and I did manage to draw some blood, but it's quite fun once you get into the swing of it. Fit seemed pretty good, but not perfect - I reshaped a few parts, again with heat, to get better connections. So far I've built up her legs with a thin brass rod running up each one, and packed the ankles and a small area above the knees with Miliput to locate the wire and allow it to support the vinyl. I was a bit wary of the "fill with plaster" method plus I don't have any plaster on hand. I used Araldite to stick things together, and held them with masking tape while the glue went off. Seems OK so far! The smaller joins like the rear hair part to the head were done with thick superglue. I'm thinking that I'd like to build Iria as a Fremen - maybe Chani, maybe someone else like Harah? I think the suit is close enough to a stillsuit that it would work as-is with the right paint job, and the connection would be made by some suitable scratchbuilt accessories - nose tube, maybe a maker hook, or Gurney Halleck's pistol which is seriously cool. I do need to decide which head to use though - the kit has two heads, one built into Iria's cloak, and one to use without: I think the high forehead of the cloaked head is better, but the cloak is a bit too big. I do like that it disguises the rather coquettish pose which seems to be intended to balance the ridiculous gun she comes with as well as provide some additional curviness. I think maybe cutting out the front panel of the cloak would be the best of both worlds? Be interested to hear what people thing. Also, should I add blue LEDs behind the eyes for that inner glow, or just paint them? The brass rods would make excellent wiring Cheers, Will
-
Needed a "mojo" restorer,had tried a revell 1/48th FW190D9,half completed,then a Tamiya 1/48th Stug,nearly finished,but couldnt really whip up any enthusiasm ,my fault,not the models,then this popped up on e-bay. The seller has started it,and filled it with resin,and had an add-on pack with the pulse rifle,barrel and white metal facehugger,had even primed it,so all ready to paint. Knocked up a quick simple base And started slapping some paint on her. Mojo restored Cheers
-
Another repaint of an old model,Given the subject matter I decided to go "full gore" on the scratch built base,body parts will be present,but not in the right order! This is a big figure,about 18 ins,came with a packet of pins to stick in his head,which was weirdly theraputic. "No supper until you tidy your room,The floors a disgrace"
-
Cellar Dwellers for the last 15 years,These kits date back to the early 90's The Prince and the bat just got a clean up and some washes,additional detail work and varnish,the wolf was a complete e-paint. Worst boyband..................Ever
-
Another repaint from under the stairs,Horizons fairly large and chunky ED 209,Was never very happy with my initial paint job,and actually found it boring at the time,However I have learnt to be patient and not rush these things,So nearly 28 years later its back on display.:) U Used some spares from the decal bank to add a bit of detail,dont look to closely its mainly in German! The OCP logo is a fridge magnet off E-Bay Drama shot Cheers Andy
-
This is a re-paint of my first ever vinyl kit,Bought it from Thunderbooks in Blackpool in 88,I can remember how weird it seemed,a model that needed a hairdryer,superglue and no enamel paints! I was well out of my comfort zone! The original pose was rather static so I have repositioned the right arm and leg to try to give Murphy a more dynamic pose,The base is a home made job. I enjoyed re-visiting this Vintage figure. And remember "Stay out of trouble"
-
Heres my pretty ancient Horizon T2 kit,gave him a bit of a clean up due to few years of dust and neglect.
-
Having recently re-watched Batman on Blu ray,and throughly enjoyed it I scored a couple of Far-east Billiken copies of the Joker and Batman figures,Went together resonably well and all prepped for painting. Joker comes with two heads. Started blocking out some of the colours,Batman fairly straightforwards,Joker less so. Cheers Andy
-
My final 1-1 scale Halcyon Vinyl kit(actually thats not strictly true,I do have the alien queen foetus knocking about somewhere ) The Dog buster from Alien 3 . Handsome little fella isnt it the base is a homemade job with extra added fleshy bits. Right,Back to Batman and the Joker ! Cheers Andy
- 13 replies
-
- 17
-

-

-

-
Apologies to Mikemc,But it would appear Alien Queen Chestbursters are like Buses,You wait ages for one,then two turn up Another 2 decade + stash lurker finally completed. I am contemplating "bloodying" her up,but not sure as I quiet like how she looks at the moment
-
Halcyon Vinyl kits from the early 90's May not be SFW Worst Modelling day..............................................Ever Its a boy!
- 15 replies
-
- 22
-

-
-
-
After my Frankenstein based detour I'm back on familiar ground Dating from 1991 this is an original Halcyon Face-hugger undergoing a restoration due to less than stellar paint job(by me) and general "sagginess" and wear and tear. The original box art(Which I no longer have) Dissection Crude,but effective wire armature added to tail and fingers. Trying to run away! Bits of the chestburster in the background.
-
"How can I describe my emotions at this catastrophe, or how delineate the wretch whom with such infinite pains and care I had endeavored to form? His limbs were in proportion, and I had selected his features as beautiful. Beautiful! Great God! His yellow skin scarcely covered the work of muscles and arteries beneath; his hair was of a lustrous black, and flowing; his teeth of a pearly whiteness; but these luxuriance's only formed a more horrid contrast with his watery eyes, that seemed almost of the same colour as the dun-white sockets in which they were set, his shrivelled complexion and straight black lips." Mary Shelley Frankenstein Build thread here Glad to have finally got this vintage kit done,Been equal parts frustration and fun. Andy
-
On the first of January 1818 "Frankenstein,or the modern Prometheus" was published ,and with it,one could argue the birth of the science fiction era,In 1983 acclaimed American illustrator Bernie Wrightson,with Marvel comics, released the novel with his beautiful illustrations ,a hardback version was released in 1983 and 2008. In 1995 Sideshow released a vinyl model of the creature and its creator,a kit that these days commands an extremely high price(usually about £500.00)and even at the time was prohibitively expensive ,So imagine my surprise when in Morecambe market (of all places) I came across a bagged version with no box or instructions for sale for £75.00,Not having been born yesterday,my suspicion was aroused to the legitimacy of the kit,the dealer claimed he had bought it as part of a job lot,and had no idea of its Provence ,My cynicism got £25.00 knocked off the price,so home it came. Initial inspection seemed to confirm my fears that this was a knock off with badly warped pieces,especially the base(however further research showed that this was a problem with the original kit as well) So into the cupboard it went. Five long years passed before I plucked up the courage to have a go at this vinyl monstrosity. Having wrestled with what to do about the base,and having tried various ways to strengthen it (all dismal failures) I decided to go for the nuclear option,that was to replace the base with a real wooden one and cut out all the features from the vinyl base and re-site on the new base. Having gone better than anticipated I began building up the figures and features(which went surprisingly well,So once again unsure on the models legitimacy) One of the spurs to get me building this kit was the awareness that Bernie Wrightson died last year,i had always greatly admired his skills as an artist,not only on Frankenstein,but Swamp Thing,and the Stephen King short story "Cycle of the Werewolf"
-
Not the prettiest Ship in the Galaxy,but one of the most iconic,The Halcyon vinyl and injected plastic Nostromo. Been a bit of a chore,but really happy to have it in the collection. Cheers Andy
- 12 replies
-
- 23
-
-
Hi chaps. I've decided it's high time I started a sci-fi build. I'm not going to reveal straight away what it is yet, but I'm going to give you lot a chance to guess what it is. It's rather iconic, I think, and harks from the 80's. I'll give you a clue..... Hope I haven't made it too easy. Feel free to have as many guesses as you like. Matt
-
So for something different for a change, I looked for a figure of everyone's favourite Great Old one, Cthulhu! Reaper Miniatures came up trumps with a 6" tall vinyl figure: The main body is cast in solid cream-coloured vinyl and there are 8 pieces in all: body, tail, 2 x arms, 2 x wing wings, head and base. The detail is superb and the mould lines are minimal. The tail and arms fit together very well - the arm sockets are keyed so they only fit in the correct orientation and the tail has a well formed plug that fits into the socket at the rear (ooerr!). I had to use only a very small amount of Mr Dissolved Putty to fill some small gaps in the joints and when that was all set, a sharp scalpel was used to pare down any overlap on the joint and any spare putty. From there, the next stage was to was in soapy water and then prime, which is when I remembered to take the next photos! This is the body with tail and arms attached The head with some well detailed tentacles, which have tiny suckers moulded undernath each one The wings, one side has a sort of pebble-dashed texture while the other is smooth with veiny ridges That showed me that the joints were well covered and so we could move onto the first stage of painting. For this I wanted a "diseased" yellow sort of colour for the undersides so chose XF4- Yellow-green. Next for the uppser surfaces I wanted a base coat of a sickly green, so mixed XF-4 with XF-5 Matt Green and some XF-21 Sky to get a sort of pale snotty green In the background you can see the base - it has a depression for the right foot and a raised plinth for the left which has some eldritch writing carved into the surface. I'll use a wash to bring those out later... I accept no responsibility for insanity caused by viewing a Great Old One
- 39 replies
-
- 12
-
-
- Reaper Miniatures
- vinyl
- (and 1 more)
-
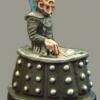
1374 This is my very first WIP post I've ever attempted so please forgive any and all errors. Also I can't seem to get Flickr working here so I've opened a photobucket account as the instructions are very clear (they need to be for me!) in the FAQ section. I've had this vinyl figure sitting in its box for ages but as I've just seen Ep VII and I don't have any of the nice shiny new Bandai kits I thought I give him a go. Now I've never worked with vinyl before but I jumped straight in and after a bath (for him) I started trimming the excess away. Using heat (a hair dryer) really softens the material and speeds up the cutting, in fact there is so little resistance when its hot I found I had to be ever so careful so I didn't go crazy and chop the entire arm off! Here he is taped together (without the capes) just to see how he looks The level of detail has really blown me away. The only blemish in the entire kit is that the cape chain and lightsaber have done a runner Now the chain should be a straight forward replacement but it looks like I may have to scratch build the lightsaber and I've never done anything like that before. The idea is a bit intimidating but I am looking forward to the challenge That's all for this evening, I hope you all had a splendid Christmas Davros aka Mechanised Dwarf
-
Weighted Road Wheels for BRDM-2 (Trumpeter) 1:35 ET Models ER35-051 This set of four resin tyres and four hubs are designed as direct replacements for the vinyl tyres I the kit, which although looking of, they do take paint that well and have been known to perish over time. The set comes in the standard carded thick poly sleeve with the tyres and hubs held in separate poly bags. The resin appears to be quite hard so they should sag over time. Each tyre has its moulding block positioned on the realistically flattened area that gives the visual effect of there being some weight to the vehicle, so will not be visible on the completed model. Although for use on the early version, the tread on the tyres looks to be accurate for both the BRDM-2 , BRDM-2UM and even the BRDM-2 with Spigot or Spandrel ATM’s, as are the hubs. The hubs moulding block is on the side of each hub. The connecting point is quite small and should be easy to remove, leaving just a small mark that a couple of swipes with a sanding stick would sort out. Since the mark is on the outside of the hub it will not be seen as it will be inside the tyre. CA or 5 minute epoxy glues should be used to connect the parts together which should also eliminate any gaps around the hub. Conclusion This set of tyres and hubs are beautifully moulded to ET Models usual standard with no sign of air bubbles or flaws. They will make a marked difference on the completed models by being easier to paint and a lot better looking than the kit tyres. They apper to be able to used on other manufacures models as well, which may be handy, Highly recommended. Available soon from White Ensign Models in the UK Review Sample courtesy of