Search the Community
Showing results for tags '1/24'.
-
Hi, Has anyone ever replaced revell kit supplied wheels with aftermarket wheel sets like those made by hobby design or aoshima/fujimi? I know there would be a decent amount of modding to make them compatable given the unique way revell make their wheels, but I just wonder if anyone has successfully done it before. I've been thinking that it may be possible to glue the brake pieces on, and then once they are set drill a 2mm hole through the centre for a tamiya style pin fitting. I think this might work, but I can't seem to find anything on here or the internet that supports this idea. If anyone has ever had any experience with this I would appreciate any input. Thanks, Rich
-
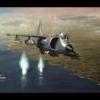
Well, finally got this finished. Except now looking at the pictures, need to do a little work around the front windows. I believe as I am getting older my eyes are getting worse, what a shock!. Made this a tired old bird that had seen better days. The kit was almost no problem to put together. Two issues, one the undercarriage is way too weak to support this kit's weight. I am crafting a new one out of metal. The second issue is the nylon representations for the ammo versus the miniscule attachment points for the machine guns. I need to figure out a more permanent way to secure the guns since there is continuous pressure to distort them from the ammo. Still working on that. During the shoot one of the machine guns popped loose from the tension. Would recommend this kit to anyone of any level. Just wish they would reissue it as the phantom model. It is very large when finished. This is taken in front of my office door and it almost spans the width of the entryway. Comments welcome. Now back to the Mosquito and the obsolete group build.
- 21 replies
-
- 16
-

-
 This is a restoration of a kit purchased from a charity shop. The Merit kits are very long in the tooth now but definately worth updating with some thoughtful addition. WIP is here http://www.britmodeller.com/forums/index.php?/topic/234944561-brm-p25-in-124-updating-the-old-merit-kit/ Paint is from Zero purchased through Hiroboy. The decals are Pattos, the race number for Mike Hawthorns car should actually be 23 but this was as close as I could get. I've since found some general race numbers sold in individual packs (damn it!) Very enjoyable resto with almost all the added detail scratchbuilt or parts box bits. The wheels and tyres came from SEF, just a shame the tread on the tyres is not better but I feel it adds to the period charm of this model. I am gradually working my way through a collection of these little beauties. The Connaught B type campaigned by Rob Walker is next. So, here she is in all her splendour. Thanks for looking, Steve.
 -
First post here (yay!) , so why not start off with a bang? And by bang, I mean gigantic helicopter. I'm not especially far along, I really just started: (if the photos don't work, lemme know) The painted passenger seats, right after I glued 'em on Front seats, painted grey. It's kind of hard to see, since the tape is clear, but I've masked the seat cushion to paint olive drab later. Instrument panel, slightly shiny from being semi-wet. I've yet to put the decal on it, but my local crafts store didn't have any decal setting solution, so I'm gonna apply it with water and prayers. The nicely painted (if I do say so myself) pitch sticks, drying on a Testors cap. I'd like to say that the scratch-marks and weathering on the silver parts were intentional, but it was really just my ineptitude at painting. Anndd the control sticks. I left the handle unpainted, I like it in OD green...(who knows why) Err...this photo came out a little blurry..oops..... That's it for now, more progress soon
-
My particular field of interest in racing cars is predominately vintage and classic. Unfortunately there are very few reasonably priced kits available in my favourite scale. Many of you will be aware of the old Merit Grand Prix car kits. They had quite a range including the D type Jaguar (one of my all time favourites) Maserati 250F, Talbot Lago and Alfa Romeo 158, to name just a few. The kits are really quite ancient now and I believe they were first manufactured at the dawn of the plastic kit era. That having been said, they are fair representations of the original subjects and with a bit of re-work and a few additions, can be made into reasonable looking models. I've managed to acquire a number of these kits over the years as prices for unbuilt examples in good condition can get quite interesting. My most recent irresistible find was in a local charity shop. There were four kits with a sticker price of £2.25 each. I handed over £20 for them as that was all I had in my wallet, it felt like the right thing to do. Haul was, Ferrari D50, Vanwall, BRM P25 and Cooper 500. So, I am slowly working my way through them. All were built examples but definitely not 'glue bombs'. I have completed the Vanwall and have been slowly working on the BRM P25. This years model club Christmas competition is themed, an annual event, this years theme is 'Lincolnshire' i.e. anything built or used in Lincolnshire. The BRM, being built in Bourne, fits the bill nicely (I'm also doing a 1/32 Red Arrow) so I have to crack on with this. The pics that follow show the basic kit, a built out of the box example (these pics are from the net) followed by my progress pics of the build so far. Also, you need to know that the Merit kit was of the early P25 prototype. This was before Colin Chapman suggested a re-think on the suspension and the transverse leaf spring was dropped. So there will be no pretty red springs peeping out above the rear wheels. Work starts with the body. Removing the moulded in radiator grilles and rescribing the panel lines, these are raised on all Merit car kits. The tyres and wheels are from South Eastern Finecast. They sell kit parts separately and these come from their BRM P57 white metal kit. The castings have been improved by drilling through and adding the smaller holes. The rims have also been smoothed slightly. A new floor has been added together with transmission tunnel. Reference for the cockpit has come from my own pics taken at vintage race meets. They are all of the later P25 but I am hoping not too much changed in this respect. I could find no detail pics of the early car. The pinky white blob at the rear of the cockpit is the front of the fuel tank, this was un covered right behind the drivers seat! This was made with body filler applied over the top of the flat kit part. The real fuel tank was, of course, rounded in profile. It was common for cars of this era to have tubular chassis covered with a metal skin. The tube chassis could be seen running down the sides of the cockpit so this has to be represented. I make some measurements and draw a jig. The two sides of the frame are joined together under the instrument panel, this also makes it easier to handle and attach as a single piece on final assembly. A quick mock up of how it looks. Instrument panel will have details added and I need to scratch a gear lever up. Finally, couldn't resist a quick mock up of the car. Now thinking about how to scratch up an exhaust system, probably with 2mm solder. Thanks for looking. As usual, I am open to suggestions or improvements, etc. Cheers, Steve.
-
Well, I finally managed to wrestle this one to completion. Honestly? it hasn't been a 100% success. The chassis never fully went home despite my best efforts but it doesn't show too badly (a bit of matt black hides many sins) If you have the Scale Production trans-kit make sure you grind plenty of resin away from the inner door tops, just under the window channels. The body looks very thin but in truth there is a lot more meat on there than the kit body. On final assembly it was clear to me that the interior side panels were never going to fit right up inside the body. I managed to grind some resin out and thin the side panels but still got left with a 2mm 'underhang' in the floor. It is difficult to do much grinding with a dremel on a finished body shell. The design of the kit also makes it tricky to mock up the interior for a full dry fit. In addition to the side walls, I also had to take 3mm from the front edge of the dash panel to fit it under the screen panel. Really enjoyed the build though and I am pleased with the end result. The Scale Production trans-kit is well produced and comes with seat belt material and P/E, a fire extinguisher, ally inlet trumpets and even those rubber bonnet straps made of real rubber. In fact, all you see here is Scale Production and Tamiya, I only added glue and paint. Have a look and see what you think. Cheers, Steve. And the final pic of the Rally and Road cars together...
- 9 replies
-
- 1
-
-
- tamiya
- scale production
- (and 1 more)
-
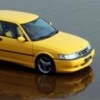
Just finished this one this afternoon. I had the kit for an age but only got round to stripping the (very thick) chrome plating. After getting into it I must say it was very enjoyable. The parts that were stripped of chrome were painted in Alclad Chrome after a base coat of Humbrol gloss Black. Body was painted in Tamiya Pearl Blue and glossed with 2K. The front indicators, fuel filler and rear view mirror are aftermarket replacements but the rest of the build is pretty much OOB. Only wiring added to the engine bay was plug wires, it is pretty well detailed and there is not much room to put very much more. I can recommend this kit. It does take a bit of cleaning up and whilst not being Tamiya quality, a good looking model can be had from it. Revell include a full screen with the kit parts so, if building one of the two Championship cars catered for on the decal sheet is not your thing, you could build the ultimate street Cobra and let imagination run riot. I will buy another one of these if the opportunity arises. Thanks for looking in, Steve.
-
I'm in with this one please Original decals are a bit off-white so have ordered some replacements, may also get the Tamiya detail set
-
Hello, does anyone know when the Italeri Stralis kit is being released? Any idea on price? Thanks, Andrew (Vehicle Modelling Newbie)
-
I'm after getting one of these VVV I can then make a model of my girfriends beloved Micra I can get one from Japan for around £20 (would that sneak through customs?) but would rather source one closer to home. It also has to be this AK11 boxing, there's a cheaper Tommy Kaira tuned version on ebay but this is an older model. Anybody ever seen one anywhere? Cheers Chris
-
 Slow beginnings, but I wanted to get the body shells painted so that they can cure properly before final polishing while other work gets under way. The Daytona is Zero's "Blu Dino"; the 599GTO is "Rosso Scuderia", and a matt (ish) black (ish) homebrew for the roof. These will go slowly while I work on some stuff for SMW 2012, but at least I've started! bestest, M.