Search the Community
Showing results for tags '1/1000'.
Found 12 results
-
One of my favourite songs and semi relevant 😃 Just to get into the vibe properly So I’m going to get one build over the line even if it kills me😃 a quick assessment of the kits and I reckon this is the easiest. And I can paint it predominantly with rattlecans. The main supper structure with the bogie supports attached. This really is a wonderful kit, pin sharp molding and well engineered. Top and sides attached undersides assembled but of course I forgot to attack the spice vacuum thingies.., Center section prised off and said thingies added. Hull completed 16 ( now 15 damn you carpet monster) bogies assembled. Everything’s ready for paint rattlecan grey for the hull and bogie side plates metallic grey for the tracks.
-
 Hi all, starting a build log for my 1/1000 Enterprise model as depicted in Star Trek: Discovery. I know people have strong feelings (positive and negative) about the show, but I think most people agree this re-imagining of the original series Constitution class was firmly on the plus side. This kit was released from Polar Lights earlier this year and I think I grabbed the first one available at my local model store, along with the lighting kit. First thing first - the combo was pricey, and doesn't even include Aztec decals (which were released a couple months later for another $25). As I have no experience with lighting models or creating lighting circuits, it made sense to me to start with the lighting kit. Obviously you could put together a similar lighting setup for much cheaper if you know what you are doing. The difficult part would be sourcing motors that fit into the nacelle cavities for the spinning part of the bussard collects. For someone who just wants a lit Enterprise and doesn't want to deal with doing the math and designing circuits, soldering wires, or sourcing all the different materials, I think the lighting kit is reasonably priced. Either way I finally had time to start this thing last week, and I'm very excited with what I've already seen. It is a much different beast than the 1/1000 Enterprise Refit I built (as well as being much larger due to producers of the show changing the in-universe size of the ship). Some first pics: Not pictured is the round black base and brass rod to connect the base to the ship. Wonderful details, clear parts for all the windows, and as the kit is designed for lighting, wiring channels are built in. Another cool feature is that the pylons holding the warp engines are tabbed in such a way that there is low chance for misalignment of the pylons or engines, a common issue with other Star Trek kits from what I understand. The lighting kit has LEDS for the windows, bridge/sensor domes, warp and impulse engines. Through the use of clear parts, the "landing pad" of the shuttle bay back can also be lit up. Also included are small motors to spin the bussard collectors in the nacelles, and clear blue/red parts for the warp engines that replace the clear parts from the main box. Lastly is a circuit board for all the electronics to clip into, and that runs down the rod to a battery box that takes 3AAs. Sorry I didn't take photos inside this box, but you'll see them all during the build. Also pictured is the Aztec decal sheets as well as the photoetch set from Paragrafix. There are 3D printed bridges and other aftermarket resin parts available if you really want to pimp it out. I'm passing on the bridge because in theory the top dome is not a window that looks into the bridge, and not a detail I cared enough for. We begin! The instructions start with the nacelles and I started playing with the electronics in there, but a very important part when putting lights in models - light blocking! The idea being you don't want a hot spot of the light showing through the hull of your ship (unless you want to, which is an effect called Raytheon lighting which mimics the lighting of an area that can't physically be lit by a light source on the exterior of the model) Sprayed the insides with black, then white. I'm using a flat white instead of a glossy white or silver because I read it diffuses the light better inside, lessening the chance of hot spots. You can see the standoffs inside the saucer where the LEDs from the lighting kit are designed to be attached. And the inside of the warp nacelles - didn't need to spray white in the front end because that's where the motor housing will go: Think that's enough for a first post! Next I'll go into the work I've done on the engines, and my thought process on deciding to supplement the lighting kit with more LEDs. Thanks for reading! I'm still a relatively new modeler and would appreciate any feedback, comments, critiques, or questions as this project goes along.
- 15 replies
-
- 11
-

-
- Polar Lights
- Star Trek
- (and 1 more)
-

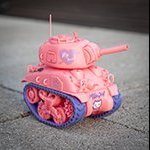
Polar Lights 1/1000 NX-01 Enterprise
72nders posted a topic in Ready for Inspection - SF & RealSpace
Hello all, It’s been a long road, but, after only a month into the build I finally finished my Polar lights 1/1000 NX-01 Enterprise from the Star Trek tv series Enterprise, this is my favourite Star Trek ship after the NCC-1701 Enterprise from the original series (I have the Revell 1/600 kit). This was the hardest kit I have ever built yet, the main problem with the kit was the fitting, though it didn’t require a large amount of putty I had to use a lot of clamps and plastic putty filler to fill in the gaps between the pieces (though there were some gaps I just couldn't fill without destroying too much detail), the nacelles were the hardest to build, they came in halves that when put together with the clear parts and buzzards, they don’t really fit correctly, and when gluing the nacelles to the main body, I had to cut of the pins which disrupted the assembly completely. On the other hand, the kits detailing is quite good; the decals are from Aztec and are also good though some of them are a little large and tend to break. This was my first ever attempt at a metal finish, I used Vallejo metal acrylic paint (duraluminum) with Vallejo black primer as a base coat and, for the gold parts I used Green Stuff acrylic metal colour (antique gold). The clear parts were painted with Tamiya and AK acrylic clear paints. I had a lot of ups and downs building this kit, but ultimately, I had fun and was pleased with how my metal finish turned out. I hope you like it, comments welcome!- 4 replies
-
- 18
-
-
- Star Trek
- NX-01 Enterprise
- (and 1 more)
-
Been a bit since I built a sci-fi model, which I think was also a Star Trek model, the USS Saber. This one is going to be a kitbash between two /2500 scale Star Trek Discovery models, the Shenzhou and the Enterprise. 1/2500 is not my scale, so bashing them into another ship fitting 1/1000 is the goal here. I'll be using the Shenzhou as the basis for the ship, trading its nacelles in favor of the Enterprise's, which look more era-correct than the Shen's more futuristic ones. First off, I'm going to cut a pen in half... No, it's not a start to a bad magic trick but the beginning of a new deflector, using the Enterprise's in place of the Shenzhou's, agan because the Shen's just looks too futuristic. I cut then cut the base of the deflector dish away from the Enterprise part and glued it onto the new housing. With that done I cut out the molded detail on the Shenzhou and test fitted the new deflector housing into the gaping hole behind. The bottom shows a bit of fitting will be needed to close some gaps. I skipped from there to the nacelles. I snipped the tops off the Enterprise struts and glued them into their slots in the nacelles to close those up. They will be sanded smooth and then holes drilled for when they are pinned to the Shen's struts. 3. While that was going on, I glued the hull together, after gluing in the clear parts. The ventral bridge will remain in place, though I will be filling in and smoothing over the big windows, since they are too large for the smaller size of the ship. Then thin styrene was glued into the bow to cover that hole. While that was drying, I decided to move the struts outward from their original positions. I wanted the new nacelles to be a little outward of the rim of the saucer. They'll need to be adjusted, as they follow the upward curve of the lower hull too much. Left as is and the rear of the nacelles will be up to high, rather than riding even with the rest of the hull. And a test to see how the new nacelles will look compared to the rest of the ship. You can see I also cut and sanded down the insert in the bow, before cutting the hole for the new deflector housing. And the last bit of work today was to add some shims into the bottom, to fill some gaps alongside the deflector housing. They'll have to be sanded down some but will close those little gaps up. And that's where she is at the moment. I'll clean that up a little more and glue the new deflector housing in place, then set the struts in place. And also add the shuttle bay from the Enterprise to the back of the Shenzhou. Though it'll be widened to give the Sprite a larger shuttle deck. Til next time, model on! Thom
-
 Kit Manufacturer: Polar Lights Scale: 1/1000 Paints Used: Tamiya LP/Vallejo Paragraphix Photo Etch sets Polar Lights Aztec decals sheet for Reliant Hi guys, this is the final reveal of my Wrath of Khan diorama, I wanted to try and mimic the blue and pink colours that were present in the movie when the Enterprise entered the Mutara Nebula. I used some plastic right angle strip to create a frame and glued some 12v neon LED strip lights to the inside of the frames. The Enterprise and Reliant are powered by a pp3 9v battery under each base. I made up a Perspex shelf to hold the models and fixed a jack plug under the frame to power the strip lighting from a 12v wall socket power supply. The camera does not really give a true representation of how the colours look, but in person, I am very pleased with the results. You could say it's my first wall mounted diorama. These are snap together kits and overall, well-engineered. I did have to cut off some fixing pegs to add the lighting and used glue in the final assembly. I can't say I used much of the photo etch sets as I found the brass was way too thick for the scale of these kits. I like adding decals, but avoid these kits if that's not your thing as there are loads of them to cut out and fit. I hope you all enjoy the pictures. "Live long and prosper!"
- 11 replies
-
- 24
-
-

-
Quite frankly, I'm disappointed at the lack of Star Trek representation in a sci-fi group build. We have a nearly a dozen X-Wings, a couple Battlestar Galactica, and even something from Space Above and Beyond for heaven's sake! This must be rectified. I started my first 1/48 jet after finishing the YF-21 for this group build, but I think I'll put that on quick hold while I put in another GB entry purely to represent some Trek. My choice will be the Polar Lights 1/1000 Klingon Bird of Prey released last year as part of a two pack with the USS Grissom as seen in Star Trek III: The Search for Spock. I've had this in my stash since it was released and this seems like a great reason to crack it open. It's advertised as a snap-fit kit, so it should go together pretty quickly. Due to the size I foresee handpainting a lot of the accents instead of masking and airbrush, so we'll see how that works out. The box is actually really cool, with the decal callouts and color painting guide on the inside sides of the box, allowing them to be printed in color. Two green and one small clear runners contain the entire ship. You can build it with wings up or down in "attack" position. The details look great, but as you can see there's a bit of flash on the sprue, if not much on the actual parts. Included is an extensive decal sheet of which 90% of are for the Grissom. Small black two-piece stands are included. Thanks for reading! (Also in case it doesn't come across via text, my first paragraph is dripping with sarcasm. I'm enjoying looking at all the group builds and have a TIE Fighter finished on my shelf and an A-Wing in the stash.)
- 16 replies
-
- 5
-
-
- Star Trek
- Polar Lights
- (and 1 more)
-
With the Defiant done and off terrorizing the Dominion, I've brought another ship into the yard. This one being the Sentinel class USS Saber, designed by Admiral Buck on RI and made by Ugh Models - before the CnD blew apart the shipyard... I already did some work on her before she was shifted to Shelf o'limbo for a time. Saucer is in place and the struts are in. Now, I'm just smoothing the joins and using PPP to fill in the window cavities. I'll use some window decals to replace them. And the decal sheet. I've decided not to use the options provided, but print the name SABER in Airborn font on some clear decal sheet. And just a bit of trivia, she is not being named after the edged weapon, but the character of Saber from the anime Fate/Stay Knight.😉
-
Hi folks, I've been running around like a mad thing organising Scale Models Expo and haven't really had the mental energy to finish any of my ongoing projects, but I did want to build something new for the show. So I started these on Wednesday night and finished them before midnight on Friday. For me that's unspeakably quick I would have waited to take proper pictures but that didn't seem to be in the spirit of the adventure so here in all their awful glory are my mobile 'phone shots of the models on the table at Expo. (Kelkavia class High Speed Astro Battle Cruiser) (Destoria class Heavy Astro Battle Cruiser) No, they didn't win anything and nor did they deserve to! But they're big and green and they give my Cosmo Fleet something to shoot at. I will produce some studio pictures on Monday hopefully. Here are the promised pics of the Kelkapia (or is it Kelkavia?) class, unfortunately I broke something on the bigger one while trying to get the guns on the side better aligned. I've mended it but need to touch up the paint, and I'll fix a couple of other haste-induced mistakes at the same time. (click for more/bigger) There's a lot of dust on the surfaces, I think the varnish probably hadn't had time to cure before being introduced to the busy atmosphere of the show - I don't usually have quite this many problems. I cleaned them up as best I could and removed the rest in Lightroom like the dirty cheat I am Cheers, Will
- 9 replies
-
- 13
-
-
- 2 day build
- Bandai
- (and 1 more)
-
 Hi all, I finished dusting and photographing my Cosmo Fleet ships, they're still pretty dusty and even after removing some more digitally I think I'm going to have to draw a line under. I also managed to knock off one of the torpedoes from the destroyer and spent a while getting it attached again and fixing the chipped paint. I think I need to clean my office from top to bottom and remove the dust from the environment before doing any more painting! Anyway... These are half of a Bandai 1/1000 scale kit of the UN Cosmo Navy from Space Battleship Yamato. I have another of each to finish building and painting at some point in the future. Fairly easy to build but difficult to build cleanly owing to the dense snap fit construction. I found a new way to do the cutting out in Photoshop (Quick Select tool is awesome!) so they're all on white backgrounds again (click for bigger pictures & more angles) This is what the stands look like - modified kit stands using brass tube for the pin instead of the provided plastic fin: And this is for scale - the little one has 42 parts in a really tiny space: I have a baddie ship in pieces at the moment, I'm hoping to finish the Guntank I'm working on and do some preparation on that before too long. Oh yes, I almost forgot. I did a Photoshopped picture of the two ships in their natural environment: Which I am rather pleased with to be honest. Time consuming but fun, I will try and do more of these when I have spacey things to show. Cheers and thanks for looking, especially to those who helped with suggestions and such on the WIP thread. Will
- 13 replies
-
- 13
-
-
 This little model was build by André Schulz and is one of the best I have ever seen: LZ 127 Graf Zeppelin was a rigid airship made by Zeppelin, which was put into service on September 18 in 1928 to 21 months of construction. The airship is considered the most successful passenger airship that era. Originally built as an experimental ship, LZ 127 proved so reliable that it soon became famous through numerous spectacular rides. These include the world trip and the polar flight. And scoring records as the longest drive of an airship with 6384.50 km and the longest journey time of an airship in 71 hours. Graf Zeppelin was filed on July 19, 1937 decommissioned. After discharge of the hydrogen gas it served only as a tourist attraction, which could be visited for an entrance fee, the population made use of this good use. With the outbreak of World War II the ship 1940, even though it was still fully operational, scrapped together with LZ 130 in Frankfurt am Main. More pictures in our Blog: http://petesmancave.blogspot.de/2016/03/petes-mancave-news-92016.html
 -
Hi all, I couldn't paint the Guntank the other evening as it was too hot in the office, so I thought I'd get on with some cutting and sticking instead: It is surprising how many sprues are in the box - with a lot of doubles in different colours. This is all to allow the ships to be built in various approximations to the colour schemes of the anime. What's really surprising is how the big pile of plastic boils down into four tiny ships. The cruiser above (which doesn't have all the details yet) is about 150mm long, and the destroyer is only 80mm: It all fits moderately well, but the snap-together construction makes for wide seams in places. I think these will mostly look OK under paint, but the edges of the strakes are naff and will need to be filled to unite all the little bits. I might fill the waist seams as well. You also get two of these minute little buggers: which are going to need a steady hand to clean up and paint. Cheers, Will
- 43 replies
-
- 4
-
-
- 1/1000
- Space Battleship Yamato
- (and 1 more)
-
Hi guys and girls Yes, I know I'm supposed to be building the BR52, but I just couldn't contain my excitement of building this ship any longer! I just love the shape and menacing appearance of this Battleship., According to my sources, this was the latest variant of battleship to come out and to make things even better, it comes in any color you like. However, in the main story, there are 3 particular schemes of note. One is Blue and that belongs to the head honcho's royal guard another one is the intelligence Chief's flagship which is gray and the third variant is green and that seems to be the most common one out there. I'm going to do the Gray scheme because so far, of all the one's I've seen online, no one has done the gray one yet and I kind of like the idea of this ship being a flagship - even though the super dreadnought makes it look small in comparison. Also inside this set, there is a troop transporter which is in splinter colors (on the box art, it's the one on the bottom right next to the Bandai logo) but also this wicked looking unmanned drone. I think with some extra detailing, I can maybe make it look even better. That's a big maybe mind you. I've been thinking of ways to light this and I'll admit, parts of it will be incredibly tricky. Most of all is the scoop like things on the bottom. On the battleship, they are molded in clear yellow, which is fine - that can be adjusted with the right color LEDs, but the ones on the drone are solidly molded on and I have no idea on how A) I'm going to get the detail out of there and what material I'll use to replace them.: If you have any ideas, feel free to share them! So, enough intro, onto the build! I've had this out of the box now for about an hour or so and I have mutilated it already, getting ready for the installation of lighting. I'm waiting on the arrival of some orange, pink and green LED's which I ordered a while ago and should be here this week! The good thing about this ship is there isn't much lighting to do, so it should be quick and easy.....famous last words! It's a decent length too - just on 39cm. I love the way Bandai have engineered these kits with all these little compartments that make lighting life so much easier. Well, that's enough for tonight - it's late here and I need to go to bed, but I'll continue on with this tomorrow night and post an update soon. Sorry to those who were watching the 52, but rest assured, I'll get back to it again soon Thanks for looking MH

