

colossusfr
-
Posts
132 -
Joined
-
Last visited


colossusfr's Achievements
")
New Member (2/9)
664
Reputation
-
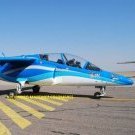
 Let me introduce you to this original machine. An UAV drone known as the “Beast of Kandahar.” However, this drone has since evolved somewhat and is now fully operational. It was even spotted over Caracas during the US intervention. An AMC 3D-printed kit. Semi-handcrafted, but the base is very good. A bit of work is required to achieve a clean result, especially around the landing gear. A first batch of “indoor” photos. I hope you will like it. And since it’s trendy, a little staged setup. I hope you will like it. Alain.
 -
RQ-170 Sentinel - AMC 3D Print - 1/72
colossusfr replied to colossusfr's topic in Work in Progress - Aircraft
Back on shelf. A few necessary tasks: Painting the inside of the gear bay doors in white (I had forgotten to do it during the landing gear bay session). Painting white decal stripes in cream, very light gray Gunze H311. The pure white of the decals looked too contrasting to me, so I wanted to tone it down a bit. A light mist coat of Gunze H306 over the lighter areas (control surfaces, panels). After thinking about it, the contrast there also seemed a bit too strong. A light coat of H306 helped soften it. The exhaust nozzle outlet brush-painted with Vallejo Metal Color 77.723 Jet Exhaust. Decals applied. Here, I went with what felt right. No kit decals. Very few reference photos. So I ended up mixing the decal layout of an Northrop Grumman X-47B with the few photos available. And this is the result. Note: in the photos, you can see a bit of silvering, which I have since fixed. More to come soon. Surprisingly, I can see the finish line ahead. Alain. -
RQ-170 Sentinel - AMC 3D Print - 1/72
colossusfr replied to colossusfr's topic in Work in Progress - Aircraft
We repainted, attempting to create a marbled effect (not sure we succeeded), using a standard Gunze H306. Then we moved on to masking the areas. The areas are then painted with a lighter gray, Gunze H308 (still a US gray). And finally, the masking is removed. We'll have to keep going afterwards... it's hard to stop now! Alain. -
Nürnberg Spielwarenmesse 2026 / Nuremberg Toy Fair 2026
colossusfr replied to Homebee's topic in The Rumourmonger
1/48... https://www.scalemates.com/kits/special-hobby-sh48123-f-86k-sabre-dog--245164- 27 replies
-
- 2
-

-

-
- Nuremberg
- Spielwarenmesse
- (and 1 more)
-
HobbyBoss 2026-2027 - catalogue & programme
colossusfr replied to Homebee's topic in The Rumourmonger
With an add-on for Transformers. Alain. -
RQ-170 Sentinel - AMC 3D Print - 1/72
colossusfr replied to colossusfr's topic in Work in Progress - Aircraft
I'm finishing up the work on the landing gear. First, a white Gunze H1 paint job. Then a wash using MIG Neutral Wash. Assembly of the main landing gear. It's fun with the rod that assembles itself to form the shock absorber – beautiful mechanics! Next, assembly of the front landing gear, adding the much-needed mudguard. It took a few choice words to get it done. The final result isn't bad. Then, preparation for the main paint. Masking of the wheel wells. Then, painting with Tamiya XF-83 gray. Not convinced by the shade. I think I'll go over it again. Probably with Gunze H-306. See you soon ! Alain. -
RQ-170 Sentinel - AMC 3D Print - 1/72
colossusfr replied to colossusfr's topic in Work in Progress - Aircraft
Here is the progress made over the last three months (with quite a few interruptions). After fairly intensive sanding of the wing/fuselage joint, I sprayed a first light coat, just to check the surface condition. Application of Surfacer on all areas and imperfections (quite a few fairly deep scratches), as well as on the wing joints. All that’s left now is sanding. A few important steps: first, I sanded all this filler to carefully refine the surface finish. Then, a water wash to remove the dust. I also took the opportunity to scribe a few access panels on the wing, just to add a bit of depth to this large surface. Then a light coat of Mr. Surfacer 1200, sprayed with the Green Stuff airbrush using a 0.5 mm nozzle, thinned with Leveling Thinner. No particular issues: not too grainy, less so than last time. I have the feeling it gets grainy when I thin it too much. Once dry, I sand with 1500 grit to remove the little bit of remaining texture. And here, I’m really happy because the surface is truly smooth. Just one or two small flaws to correct, but nothing serious at all. Not a huge amount of progress, but I went back to the panel lines, did a bit of sanding, and added a few details. Ready for paint. Work on the landing gear, especially the nose gear. Quite a lot of work. I started from the AMC landing gear leg. Well… that really wasn’t good at all. The diameter and dimensions of the nose wheel were far too flimsy. The front fork was ridiculous. And the leg itself wasn’t massive enough. Since I didn’t like the main gear legs either, and on the advice of François-Régis, I decided to go with F-14 gear legs, which look the closest—at least for the main gear. So I bought a ROCKIT Studio F-14 landing gear kit. Unmatched finesse, and the actuators are included. For a proper kit, it’s a real pleasure. Here, it will serve as a base. For the nose gear, that doesn’t work, as the F-14 has twin wheels, whereas the RQ-170 has a single, massive wheel. So I butchered and rebuilt this leg. The base is the AMC leg. I removed the wheel and its fork, then rebuilt the fork to fit a main wheel from an A-10—it does the job. Small bits of Evergreen and Plastruct. And the first test gives this: I kept working on it, refining and sanding to give it a more rounded look. Then I cut the AMC leg at the actuator level and also cut the ROCKIT leg. I took the rebuilt lower part from the AMC leg and glued on the upper part from the ROCKIT kit. At the same time, I glued on the shock absorber triangle. It creates a convincing illusion and gives that massive look to the landing gear leg seen in photos. The only regret is that the fork is a bit too thin, but oh well—it’ll do, I don’t have the energy to go any further. Here’s the result. Since I was at it, I kept going. First choice: instead of using lead foil, I decided to use plastic sheet and heat-form it over a wheel to get the shape of the mudguard. I started with a sheet of plastic from some random packaging. Then I made a base with the wheel, sturdy enough to withstand the forming process. After that, I heated the plastic sheet with a hair dryer while placing it over the wheel, and it eventually took the shape. Not easy, but I only needed about a quarter of a wheel. The base: Then the plastic sheet after forming: I cut it out and quickly painted it (with an AK marker) to see things better (transparent plastic isn’t easy). Then I test-fit it on the landing gear leg. It works really well!! Finally, I made the two small arms that hold the mudguard to the hub. For now, it’s just dry-fitted to check that everything works and for the photo!! Now we can move on to painting. Alain. -
Hello everyone, An unusual build: the RQ-170 Sentinel, revealed to the general public in 2011 after its crash in Kandahar, which earned it the nickname “Beast of Kandahar.” So, a drone. AMC kit (3D resin). And here we go (This WIP has been ongoing for several months now). The fuselage, the main body of the aircraft. Well, I needed new wings supplied by AMC, as the first ones were not really suitable. These ones are perfect. Wing assembly After thoroughly sanding the edges of the wings and the fuselage, I glued a whole series of tabs which will both strengthen the assembly and regulate the thickness between the fuselage and the wings. Unlike the black wings, these new grey wings are slightly thinner than the fuselage. As a result, these tabs will correctly reposition them. Alain
-
This year, no plane, no UAV/Drone. But a lot of fun with different things. Alain.
-
Two new vessels. A lot of fun to build but il takes on looooong time to set all the decals. Alain
- 3 replies
-
- 11
-
-

-
Hi Second set of my Transformers Collection from Trumpeter kits. (first one is there : https://www.britmodeller.com/forums/index.php?/topic/235153983-transformers-bumblebee-blitzwing-mirage-trumpeter/#comment-5218778) Introducing : - Cliffjumper : Another Autobot, one of the youngest and most reckless. - Bumblebee "Camaro" : The 2016 Chevrolet Camaro version of one of the most well-known Autobots. Seen in "The Last Knight". - Soundwave : One of the most famous Decepticons, accompanied by Ravage, one of his mini-cassettes. Alain
- 2 replies
-
- 12
-
-
Hi. For the Mirage kit, the lightning is inside the body, you have nothing to do. It's a Blockees kit, not a Trumpeter. Alain.
-
A Mirage, but not the well-known Dassault fighter, rather the mischievous one from Transformers, joined by the ever-popular Bumblebee and the “almost-a-plane” Blitzwing. High-quality kits from Trumpeter (great engineering, molding, detail, and fit), and Blockees for Mirage. Heavily upgraded with lots of weathering, panel touch-ups, a bit of painting and varnish. Pretty much everything went into it: markers, pencils, washes, powders, varnishes… In short, pure fun. Here’s the result. Bumblebee Blitzwing Mirage (Blockees) And a few group shots, joined by Optimus Prime, which I built a few months ago. Hope you will like it. Alain.
- 3 replies
-
- 13
-
-
Here’s something I completed at the end of last year. It’s not very big — about the size of my RQ-7 — but it still counts as one for the 2025 yearbook !! Alain.
-
- 9
-
-
Hi No planes but some flying machines..... and a little more!! Not a so bad year. I hope you like it. Alain.
- 3 replies
-
- 17
-
