pbhawkin
-
Posts
127 -
Joined
-
Last visited

pbhawkin's Achievements
")
New Member (2/9)
129
Reputation
-
Hi, the colours are NOT chips (unlike my paint comparison charts) these are just example of the colour. The charts are taken from here: http://www.plasticmodelsworld.com/node/1337 where you can download the whole table. It was complied by W.S. Marshall SA Colours & Marking. These are part of a excel spreadsheet I had made, taking from the internet every source I could find, where people or paint makers had stated that a certain RLM colour was matched by this or that mix or brand. It really is a hot potch of recipes that need to be made up and painted out to see what they actually look like. I can't comment on the RGB or CMYK values.
-
My website is offline (too expensive to keep going!). What Nations CMYK values are you after and I could perhaps take a picture of them and upload that here.
-
Hi Mike, Dont forget you can also do a flat bed semi-trailer with Albion 463 as the tractor, see: https://www.kampfgruppe144.com/phpBB3/viewtopic.php?f=45&t=5517&start=80
-
I have also got the British Real Colors from Ak and wonder why they are SO different from the Tamiya mixes Mike Starmer has compiled? In the picture below you can see the AK real Colors painted in the top left of each mixing well and the Tamiya mixes to the bottom right (if you look closely you can also see the ratio of the mix (IE 8 62 = 8 parts XF62) SCC14 and SCC15 are very close between the Tamiya mix and the AK paint but the others are very different.
-
Hi JWM, If you look at the post immediately above yours (post #9 dated June 2017), you will note that I have included the new Humbrol paints such as 240 and 242 as you mention in your post. Remember that THESE suggestions are NOT mine but those claimed by the paint maker (either from their website or brochure or book (Humbrol colour system) as in the case of Humbrol).
-
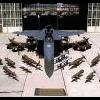
After some days of fiddling with touch-ups, weathering etc I have got the guns to this stage (the red covers are small strips of decal): And the other side (prior to landing lights being made):
-
I can't believe it is almost a month since I last updated this! Anyway, here are some pictures taken during the masking and spraying: Dark Earth (second coat): Result: Masking for Dark Green: Result: close up of the flaps:
-
Hi Horatio, Thanks for the compliment and the invite. Yes it would be great to catch up with some fellow sprue gluers! A trip to Bathurst is always refreshing. My email is : pbhawkin at optusnet dot com dot au
-
The undercarriage is quite basic, but is in keeping with the wheel well. So I couldn't resist making them look something like the real thing. So from the 3 plastic parts supplied with the kit and one PE with the Marabu PE set I added another 10 PE/Brass pieces and 4 plastic pieces to produce this: And with regard to the cowlings I just received the aftermarket resin pair from RetroWings (RW44133) and as you can see they have a nice correct curved profile to the front outer edge of the collector ring and also a correct looking front to cowling (they obviously also thought the shape of the kit's cowlings were wrong) :
-
Vinnie, check out this thread here: Ok it should now be updated with new Humbrol acrylic colours as well as Mr. Hobby color at the bottom of the above thread.
-
The clear parts supplied by Mark1 are absolutely the best injection castings I have seen. Extremely clear. Here I have used a number 76 (bloody small) drill bit to drill a navigation light and a formation light bulb into the clear wingtip pieces: And here they are attached to the wing tips after having placed a small dab of paint into each bulb (white for the formation bulb): I decided to let the tailplane elevators droop and so cut them off using a scalpel and after some tidying up (although with this magnification it looks like I haven't done any!) reglued them on: The plane was then sealed with tape and maskol and the panel lines were pre-shaded: First few sprays of Sky (model master enamel):
-
So after a bit of a holiday to Broome I have added some PE cowling vents. These needed to be slightly curved to fit the curve of the cowling and so I gently rolled over them with a paint brush to give them a slight curve as seen in the foreground of this picture: and finished: Then I tried to address the overly large opening at the front of the cowl by adding in the exhaust collector (still needing a little putty and sanding) and of course the two exhausts from each of the cylinders : I used some fine thread painted in a suitable dark Brown colour and glued a small piece on to represent the two exhausts that come from adjacent cylinder heads. Now each engine has a total of 37 parts so far!
-
Wings are on and fit very nicely (maybe a little Perfect Putty in the seam). Painted the reworked interiors of the under carriage which shows it better than the previous pictures of the Yellow and white putty. Masked the wheels: And decided the front of the engine nacelles is wrong. It is far too flat and so had to thin it out: to something a bit better: Although now there seems to be too much 'space' in front of the engine! I am toying with the idea of adding the two exhaust tubes from the front of each cylinder (although the rear ones join into the front ones so that there are only two tubes going into the collector ring per two cylinders) into the collector.