DIO Posted June 5, 2015 Share Posted June 5, 2015 (edited) Hi all,These are some pictures of my new OOB (or not so OOB) project: Thanks for coming by :-) Edited October 8, 2015 by DIO 8 Link to comment Share on other sites More sharing options...
DIO Posted June 7, 2015 Author Share Posted June 7, 2015 The fuselage has closed. Wheel wells ready. Photos will follow :-) Link to comment Share on other sites More sharing options...
JOAN Posted June 9, 2015 Share Posted June 9, 2015 Look great ! nice start. Always been interrested by a Razorback and especially the Tamiya's kit. Your paint of details is really clean. cańt wait to see the next steps ! olivier Link to comment Share on other sites More sharing options...
DIO Posted June 9, 2015 Author Share Posted June 9, 2015 Thank you my friend. More photos will be posted soon :-) Link to comment Share on other sites More sharing options...
Jockster Posted June 10, 2015 Share Posted June 10, 2015 Very nice paintwork there, details beautifully picked out against a nicely shaded background! I like it! Link to comment Share on other sites More sharing options...
Fatboydim Posted June 10, 2015 Share Posted June 10, 2015 Very good start. Nice detail. Joe Link to comment Share on other sites More sharing options...
DIO Posted November 16, 2015 Author Share Posted November 16, 2015 Some more progress: 3 Link to comment Share on other sites More sharing options...
DIO Posted November 16, 2015 Author Share Posted November 16, 2015 (edited) This plane has been the subject of quite a lot of interpretations, regarding the fuselage colour, the wheel bays internal colour, the tail colour and the reg numbers. I have read almost everything related to it and I decided that I will be proceeding based on William Dunham's document. Thanks William. A great document and an amazing research has been done... Edited November 16, 2015 by DIO Link to comment Share on other sites More sharing options...
DIO Posted January 11, 2016 Author Share Posted January 11, 2016 (edited) Some more progress :-) Well, as usually the quality of my photos is **&*(^*%%$&^, but :-( Edited January 11, 2016 by DIO 2 Link to comment Share on other sites More sharing options...
One-Two Posted January 11, 2016 Share Posted January 11, 2016 (edited) Very nice job on this one. Bare metal t-bolts are my favourites...although I have to admit that this bare metal foil technique looks somehow intimidating. Very good cockpit also. It's gonna be a real beauty...I'm looking forward to see it finished. Edited January 11, 2016 by One-Two 1 Link to comment Share on other sites More sharing options...
DIO Posted January 14, 2016 Author Share Posted January 14, 2016 Thanks mate. All missing in reality is just the engine spark plugs and the central tank. Maybe some smoke in the engine exhausts and ready to fly in my cabinet :-) Link to comment Share on other sites More sharing options...
DIO Posted January 16, 2016 Author Share Posted January 16, 2016 Some more photos before the central tank is positioned. Probably all the work done here will not be visible, but i will know :-) Link to comment Share on other sites More sharing options...
AndrewE Posted January 16, 2016 Share Posted January 16, 2016 Shaping up to be a great build, you have chosen a very nice scheme as well. Link to comment Share on other sites More sharing options...
DIO Posted January 17, 2016 Author Share Posted January 17, 2016 Thanks! Yes, I think the scheme is definitely one of the best for razorbacks, although not 100% documented. One of the issues I am still trying to find out, is if the name on the cowling was in both sides or only on the starboard. Actually this is the reason that the engine is still in for service :-) Link to comment Share on other sites More sharing options...
DIO Posted January 22, 2016 Author Share Posted January 22, 2016 Today I found out the hard way why nobody uses the central "flat" type tank in any of the Hasegawa P-47s!!! It simply works as a stand, lifting the model at least 1mm higher than its landing gear!!! I thought it was my mistake, so I googled it. It is no surprise that nobody uses that :-( Anyway, the main thing is done, with just the engine and the cowling on the bench. Photos, once I have something interesting to show... Cheers Link to comment Share on other sites More sharing options...
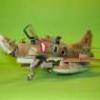
DIO Posted February 22, 2016 Author Share Posted February 22, 2016 (edited) All done! Edited February 22, 2016 by DIO 2 Link to comment Share on other sites More sharing options...
BigMouthStrikesAgain Posted February 23, 2016 Share Posted February 23, 2016 Very nice, love this scheme 1 Link to comment Share on other sites More sharing options...
DIO Posted February 23, 2016 Author Share Posted February 23, 2016 Ta! Link to comment Share on other sites More sharing options...

Recommended Posts
Create an account or sign in to comment
You need to be a member in order to leave a comment
Create an account
Sign up for a new account in our community. It's easy!
Register a new accountSign in
Already have an account? Sign in here.
Sign In Now