

Dereknf
-
Posts
516 -
Joined
-
Last visited
-
Days Won
2
Content Type
Events
Profiles
Forums
Media Demo
Everything posted by Dereknf
-

Monogram 1/72 B-52D Stratofortress
Dereknf replied to R A Ferguson's topic in Ready for Inspection - Aircraft
My dad sent me some more photos of this epic model and I'm sure he won't mind if I post some more. It was my kit but I don't have the space to build something that size. I don't think I could have achieved a brush finish like that either. Anyway, some more photos. -
Many thanks for the replies folks. Might tempted to try the Valiant next.
-
Built for a GB elsewhere. Good fun, a bit ill-fitting in places but nothing a bit fettling doesn't fix. The biggest problem is its sheer size for holding when painting etc. The decal placement instructions are poor though. They may be better in a newer boxing of the kit but the one I had wasn't clear at all. Finished with Xtracrlyix and a brush as XH562 of No.9 Squadron at RAF Waddington, in the Dark Green, Medium Sea Grey, Light Aircraft Grey scheme of the 1970s. For the top grey I used Neutral Grey FS 16270 as a close enough match for Medium Sea grey. Anyway here it is.
-
Could be. The paint must have had at least two days to dry though. I wondered if it was too cold in the garage as well. It was odd that the Tamiya acrylic on the top was much more affected than the Xtracrylix underneath. I used this Tamyia flat coat over Tamiya spray paint a few weeks ago and got a really nice finish. As you say, Who knows?
-
Thanks for the comments folks. I did consider recoating but it was in danger of becoming like Father Ted's car. You just have to know when to stop faffing with it.
-
Built for a GB elsewhere, Didn't turn out too well unfortunately. It was going so well too. The kit itself is fine, the main gear is a bit of a faff and the decal sheet could with a redesign so that the numbers are in some sort of order so that you don't spend most of the time looking for the decal you want.The painting was fine; I used Xtracrylix light Aircraft Grey and Camouflage grey and Tamiya Medium Sea Grey on top. Then came two nights of decalling then I sprayed a coat of Tamiya flat coat and that was when it went wrong. In some places the paint has adopted a crazed look. It's worse on the top (on the Tamiya paint(?)) Here's a close-up of the wing leading edge to show you what I mean. Disappointing. It passes the 6ft test though. :smile: Anyway here it is.
-
Well I bought a copy. I thought it was full of enough pretty pictures to warrant a purchase. Some nice drawings, although some colours seem a bit washed out, and some nice models. One fault would be that it doesn't appear to always say what kits/decals the models are made from although to be fair I haven't had time to give it much more than a quick flick-through since I got it. Nice looking book though.
-
More info here http://www.dvpublishing.co.uk/
-
Interesting. I wonder if that is EDSG and Dark Slate Grey camouflage as well.
-
Many thanks for the kind replies and compliments folks. They are appreciated and inspiration to carry on with some other kits now as well. I might try Maskol next time as it took me a whole evening to mask off the camouflage with Blu-tak and bits of paper and tape.
-
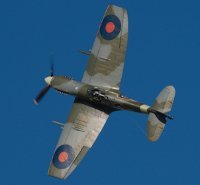
My latest Spitfire. Not the best of kits, the old Matchbox Spitfire, needed a lot of filler, patience, bad language etc. to try and get a decent fit, especially the nose cowls. It has a few inaccuracies but the only thing I changed were the cannons for brass ones. Look good too if a little difficult to fit. Rather than my usual brush piant jobs, I sprayed this one using Tamiya rattle cans. Sadly the jars of the paint don't match particularly well the colour in the spray. For a first attempt, I'm pleased at the outcome and I can see where I can improve.
-
Tamiya 1/48 F-16 Thunderbirds Weathering and Pre-Shading
Dereknf replied to airea's topic in Aircraft Modern
I wouldn't weather at all. These aircraft are by and large immaculate and panel lines are only visible when the light is right. They are certainly nowhere near as accentuated as that linked article about the NASA F-104 would suggest. I have an opinion on that mdelling technique which I will keep to myself. My toylike effort. -
Trumpeter 1/48 Supermarine Spiteful
Dereknf replied to Dereknf's topic in Ready for Inspection - Aircraft
Thanks for the kind comments folks, they are appreciated. Sorry about the slightly naff pics -
The latest in my Spitfire family. Nice kit with the expected decent fit. I wasn't able to open the cockpit as I usually do as it has a very thick transparency which doesn't sit well when open.This one finished with a mixture of Tamiya and Xtracrylix paints. The decals are sourced from spares as the kit's ones are a hideously bright colour. Waiting on the Seafang now. Maybe a Classic Airframe Attacker next.
-
Here is the new Special Hobby 1/48 Seafire XV and is the subject of a build thread here. Build thread
-
Now completed. I have to say that I like the look of the SH Seafire more than the Airfix one. It seems to get the proportions and curves right. It isn't without faults. The instructions are a bit vague at times and the omission of stencils seems odd. Anyway here it is.
-
Latest update. Painting done and ready for decals. Decals on. Not too many but needed careful handling - very thin. The decals in Special Hobby's Seafire LIII were some of the best I've used on a kit. These aren't nearly as good. There are no stencils in the kit. Whether there should be I don't know. The exhausts needed a lot of fettling to fit. I don't whether I fitted the rocker covers a tad too low. Maybe. Should have it completed later today.
-
Some more progress. Some of the major components installed. Then a mistake. I didn't twig that the instructions tell you to remove the fuselage strengthening on the rear fuselage. So that rectified the Sky undersides are done using Xtracrylix and a brush. First coat of Extra Dark Sea Grey top surfaces Some touching up to do then I'll put the landing gear on ; after that it should be ready for decals. There are no stencils in the kit decals so, assuming Seafires had a traditional set of stencils, I'll source them from spares. Paul J, the sheet was Aeromaster sheet 48-698.
-
I tried some (I can't remember the sheet) on a couple of Hobbycraft kits. Seemed like the right thing to do at the time.
-
A bit more progress. Wings on. A decent fit and not much fettling required. They do still have that little lip on the inside edge. The ailerons and tailplanes on. The ailerons are still too shallow in chord - a complaint from previous SH Seafires. I've lined them up on the top surface but they aren't so good underneath More tomorrow hopefully. (like rocker covers )
-
Thanks for that Colin. I still haven't made up my mind. Decision time soon I think. Latest update. The fuselage halves went to together a little easier than previous SH Spitfires/Seafires. Needed a bit clamping though. Ready for a tidy up. A dry fit looks fine at the moment
-
The Scimitar (and the two others) are going here. ESAM
-
A bit of a delay in posting any progress but here it is. So far seems to be very similar to the Seafire LIII . It is still a tricky built and to be honest I haven't done it justice. There are alternative arrestor hook arangements which may be throwback to the previous Seafire variants and I also noticed the two different sizes of rudder are offered as well. A dry fit of the fuselage halves appears to show a marked improvement in fit over previous versions. Time will tell. Started with the cockpit and a few sub assemblies. The instrument panel is a plastic, acetate, brass sandwich and the effect could have been good but for my effort at it. I maybe should have stuck with the decal option. The etched seatblets are good though. Anyway, a couple of pictures for now. Possibly not a lot more progress until next week.
-
Ordered one last night from Wonderland in Edinburgh.
-
Got this kit last week so I thought I'd go for it. I've built the Seafire LIIIc and the Spitfire Vc so I have an idea what to expect. I've also built two Hobbycraft Seafire XVs and used bits of the Kittech version so I'm hoping for improvement over those. I haven't made up m mind about markings yet. Maybe one out the box but I've also got the Freightdog sheet so I might be tempted to go for one of the Seafire XV options on that. Anyway, here's what's in the box. I should be able to post some progress tomorrow.
