
drizzt73
-
Posts
25 -
Joined
-
Last visited


drizzt73's Achievements
")
Newbie (1/9)
61
Reputation
-
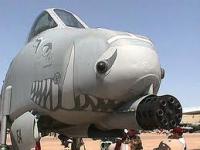
1/48 Hobby boss A-10 Thunderbolt II
drizzt73 replied to drizzt73's topic in Work in Progress - Aircraft
Thanks Calum! Simon, yes I think the A-10 still has a place in today's battlefields and is a troop saver. I hope it is only replaced by a new gen version of the same plane with the same features such as the avenger gun and the payload, it's survivability and low alt capabilities. -
1/48 Hobby boss A-10 Thunderbolt II
drizzt73 replied to drizzt73's topic in Work in Progress - Aircraft
Thanks guys! a couple more pics of the office. I scratched a helmet bag stowage tube for some added detail. thanks for looking -
1/48 Hobby boss A-10 Thunderbolt II
drizzt73 replied to drizzt73's topic in Work in Progress - Aircraft
Hi all, well after real life stuff (work) been really hectic and stressful for the past 6 months, I have finally got back to modelling about 2 weeks ago. Not much to show as I have been deepening the rivets which is time consuming but hopefully worthwhile in the painting stage. I have also been working on the pit. Apologies for the pics, I really need a better camera. I lost a tiny resin piece for the rudder pedals so made some replacements from brass rod The office cheers -
following with interest. I just picked one of these babies up. What markings are you doing?
-
Matchbox1/32 Messerschmitt BF109E.
drizzt73 replied to chuckb1's topic in Work in Progress - Aircraft
good luck -
Looking great mate
-
Tamiya 1/32 Mosquito - not an auspicious start...
drizzt73 replied to TwoSheds's topic in Work in Progress - Aircraft
wow impressive -
keep at it mate, it's lookin good
-
1/48 Hobby boss A-10 Thunderbolt II
drizzt73 replied to drizzt73's topic in Work in Progress - Aircraft
Once again thank you for your support. I haven't done much this week due to real life but only one more day until the weekend and I am hoping to get some paint on the gun bay and pit. Cheers Anthony -
1/48 Hobby boss A-10 Thunderbolt II
drizzt73 replied to drizzt73's topic in Work in Progress - Aircraft
Thanks for the positive comments guys it keeps me motivated. I've started modifying the rear wall and will post some pics soon. Cheers Anthony -
1/48 Hobby boss A-10 Thunderbolt II
drizzt73 replied to drizzt73's topic in Work in Progress - Aircraft
After posting the above I thought I should do a test with the walls in place and then joining the fuselage halves and it all fits The top sitting under the pit nicely and with the halves held together Thanks again Anthony- 45 replies
-
- 10
-

-
1/48 Hobby boss A-10 Thunderbolt II
drizzt73 replied to drizzt73's topic in Work in Progress - Aircraft
Hello all, so time for some more pics. Once I finished painting the nose wheel bay I wanted to test fit it as I was concerned about the fit to the fuselage side and also the kit under piece (F3). My concerns were justified as it took a bit of fiddling to get it to sit neatly but once done I epoxy puttied it into place. I then glued F3 to the right fuselage. I am quite happy with the finished result. I then started on the scratch gun bay which I mentioned earlier in the log. I decided I would do side walls, the rear wall and even the top of the bay. It is still a work in progress and most won't be seen but it is there to represent something of a bay. I started by folding some pieces that Eduard include on the bottom most section of the fuselage. I then made some plain plasticard wall. In this pic you can also see the wheel bay. I made sure to make sure the walls fitted within this and the pit. This is the left side, you can see the gun mounting points which I ensured are still useable. I then made the rear wall. The hole that is visible will be explained later. blue tacked into place And a test fit with the gun, again not a lot is visible but it will be better than the bare kit wall I think. Once it has all been painted I will take some better shots. Finally I worked on the top of the bay Any comments welcome. Thanks for looking Anthony -
that turned out great
-
Nice idea with the whiteboard marker Calum
-
Looking good Calum