Search the Community
Showing results for tags 'SPITFIRE'.
-
Hi all, I hope everyone is well? I was hoping to lean on the expertise of the forum members in regard to markings for a gaggle (?) of 1/32 Spitfires I am hoping to build. However, I'm having difficulty getting decals for the identification numbers and letters in the correct size for 2 reasons; 1 is an issue with sets from Kagero that would solve the problem instantly, 2 is because I don't really know what I'm doing! 😄 I initially purchased the Kagero Topcolors set for the Spitfire Vb because I wanted to have a go at these two aircraft: Having been to three suppliers now, offering both new and used, it appears these sets have all been sent without 1 of the 2 decal sheets, typically the one for 1/32. They all have sheet 1 which has complete 1/72 and 1/48 markings and some of the personalised artwork/names etc from the 1/32 but all the identification letters and numbers are on sheet 2 which appears to be AWOL. If you have this set it's worth checking as the "missing" sheet 2 is marked "sheet 2 of 2" whereas from a picture I've seen of sheet 1 it doesn't contain such a note about being "1 of 1" so if you only have that you might think that is all there is. I've also been looking at the Kagero set for the Spitfire Mk.IX but that seems to be very hard to find with the exception of one on eBay where the seller wants more than I'd prefer to pay if possible. I'm also slightly concerned now, given my experience with the Mk.Vb, set that it might not actually be complete anyway. The aircraft I liked the look of in that set was this one: Getting to the point of my question (finally 😂) is that I know there are various aftermarket decal sheets of letters and numbers and I'm wondering if I can use them to bypass Kagero and sort these myself. However, I am totally baffled by the size's (8", 18", 24" etc etc) mentioned as to which ones are correct. I'm also especially wary as the size of the RA-B on the Mk.IX above looks smaller than I've seen before on most other Spitfires (that I've come across) So, long story short, can anyone give me a steer towards anywhere I can get decals to use for: FN-B and BM579 QJ-S and R6923 RA-B and PV181 all in 1/32, correct colours and sizes please? Thanks to anyone that made it through to the end of this post as it's gone on far longer than I'd planned and thanks in advance for any advice offered or time spent helping me out. Mike
-
AZ model has re-released its Spitfire Mk.18 kit. Source: https://www.modelarovo.cz/supermarine-spitfire-mk-18e-1-72-azmodel/ "after a delay, we decided to „dust off“ the mainstream models of older release date in the AZ model. After many wishes of you customers we decided to resume the production of the Supermarine Spitfire Mk.18e model, which is still somehow forgotten by the „big manufacturers“. (...) A simple kit consisting of „few“ parts can be easily glued together by less experienced or novice modellers. Experienced ones have room for their orgy with accessories which are too many for a 1/72 scale Spitfire 14/18." Two boxings: - ref. AZ7884 - Supermarine Spitfire Mk.18e Sources: https://eshop.kovozavody.cz/10883,en_spitfire-mk.18e.html https://www.azmodel.cz/produkt/spitfire-mk-18e/ - ref. AZ7883 - Supermarine Spitfire Mk.18e - Asian territory Sources: https://eshop.kovozavody.cz/10884,en_spitfire-mk.18e-asian-territory-.html https://www.azmodel.cz/produkt/spitfire-mk-18e-asian-teritory/ V.P.
-
This is the lovely 1/72-scale Eduard Spitfire Mk.IXc ProfiPACK. My first Eduard kit, and I was not disappointed: PE, canopy masks, decals for 8 different subjects. Painted with Mr. Color and Alclad, weathering with AK Interactive and Tamiya enamal washes, oils, and some pigments. Some light chipping with Tamiya dull aluminum on a nasal aspirator filter. I'm still relatively new to WWII aircraft, and so this is my first Spitfire. Obligatory, but I had fun. Thanks for looking!
-
 After its 1/48th Spitfire Mk.IX, Eduard is to release a limited edition Supermarine Spitfire Mk.VIII - ref.? Source, p.5: http://www.eduard.com/store/out/media/InfoEduard/archive/2014/info-eduard-2014-01CZ.pdf V.P.
 -
Thought a few people may be interested in this. I guess this should really be in the RC plane section but that never seems to get many visitors and as I am concentrating on the actual build of the plane I'll post in here unless anyone objects. So I'm building a DeAgostini RC Spitfire. for those that don't remember, this was available years ago as one of those buy weekly magazine kits. the type where issue one costs 99p and then you have to take out a mortgage to buy the rest of it. I got mine as a complete set from E-bay last October and started building just before Christmas. No one seems to have a good word to say about this kit in the RC world. There are a few problems with it that I will try to sort out as I go along. These are even included in the instruction books as a "how to improve you model" section. But then my interest is only really in the building part (and the fact that it's a spitfire) and it probably will never get the chance to fly. So the plane is made from pre-cut balsa sections with only a few parts that need cutting and shaping. Most kits come with some wood sections and a few "interesting" parts like the propeller and wheels, but I'm concentrating on the main structure at the moment and leaving the extra bits alone until they are needed. progress so far... kits 1 and 2... kit 3 ... kits 4 and 5... kits 6 and 7... kit 8. now nearly 3 foot long... kit 9... next to my "ready to fly" parkzone micro spitfire... this is the resin pilot that I bought for it and painted last year... kit 12 now fitted. Starting to put the skin on. as you can see the pilot may need cutting down...
-
 A little something I finished earlier this Fall, but struggled with since Spring of 2014. Lost interest for awhile, then ran into many problems during the paint phase. Basic kit is the ancient FROG double offering of the Spit XIV with V-1 and the special 'double stand' to display them. The Buzz was somewhat heavily modified, as what FROG offered did not match drawings of the production/armed V-1's (more the unarmed prototypes) and had some shape errors especially around the pulse jet. The Spittie was not modified much other than scratching up a pit (populated with an Airfix Johnnie) with a vac'd canopy replacement, rescribing the entire airframe, and substituting the molded exhausts for a donated spare set from I believe a newer Airfix Spitfire XIX. Paints for both were Vallejo throughout. And with a little bit of prop action haha The biggest struggles were with paint and the decals. The Spit was painted THREE TIMES. First time I used the color call-outs that Vallejo gave with their 16-bottle RAF set....these, aside from the Dark Green and Sky, were dismally inaccurate. I'm mostly satisfied with my final mix of Ocean Grey, but still don't think it is 'correct'. The kit decals were a chore to use this time, unlike with a FROG Javelin I built a few years ago, and I did end up having to create masks to spray the Sky codes on the fuselage as the first one piece code/roundel/code decal I tried to apply strenuously objected to working whatsoever though I did manage to save the actual roundel. By the time I got to weathering, I had just about reached my wits end and only wanted it to be over, so stuck with a simple wing root chipping exercise and an oil wash/filter session. While most certainly not a very accurate rendition of a Spitfire, IMHO it still looks good and has the cachet of being a good old nostalgia build. Not completely unhappy with the outcome, but not overjoyed either. Cheers, and Happy Holidays! Erik the H in sunny Florida
- 27 replies
-
- 49
-

-
A man has built a three-quarter scale replica of a Mark V Spitfire using the instructions for an Airfix plane model. https://www.bbc.co.uk/news/articles/cn33npnzvk8o
-
 Here's my latest completed project, the 2009 new tool 1/72 Airfix Spitfire Mk IXc. This is the kit that comes with no cockpit other than a bulkhead, seat, and pilot. I can't paint a figure to save my life, so stuffing the pilot in wasn't an option. I used a spare bulkhead and instrument panel from an Eduard Spitfire, scratched out a "floor" using that part from a newer Airfix Spitfire as a guide. I used an old white metal seat and control stick I had on hand, and added Eduard seatbelts. I also added the tanks behind the bulkhead. I secured everything in place with epoxy, sealed up the fuselage, and realized I never took pictures of all the work I did. Oops! I removed the extra inboard landing gear humps from the upper wing halves and scratched some basic wheel well details. I also scratched out the rear view mirror, added the lower centerline identification light, and added the fuel filler. I chose to replicate MH779, FU-N, of 453 Squadron, based at Ford Field, Sussex. Paints are Vallejo Model Air, and the decals are a mix of Eaglecals and the kit decals. I relied on Eduard Spitfire instructions that included MH779 I found on Scalemates as a painting and decal guide. I've found, for me, especially on smaller scale subjects, less is more when it comes to weathering. The wear and weathering were done with oils, Tamiya Weathering Master, and a silver artist pencil. I replicated the wing root wear using Vallejo Metal Color dull aluminum, mixed with retarder medium, applied with a small fan brush and a piece of sponge. The whole thing was sealed with Vallejo premium matte varnish. I had FU-N with this build, the kit was easy to build and non-self inflicted troubles were minimal. I'm pretty satisfied with the end result. The last photo is of W/O Roderick Lyall in the cockpit of MH779 in June, 1944. Thanks for looking! Somehow I missed a couple photos. They've been added.
 -
Border Model is to release a 1/35th Supermarine Spitfire Mk.Vb kit - ref. BF004 Test shot pics. Source: https://www.facebook.com/rayxdow/posts/pfbid04xS58D4fcgaMmbAqPTjW5RTiGynVzEEu85eospWW7N6pq4tiEV8baKzugsuh3pgMl V.P.
-
Hello all, I've now finished my first "proper" attempt at modelmaking with this Airfix 1:72 Spitfire Mk.Ia which I picked up at Christmas from the fabled "middle of Lidl", at half price to boot - just £3.50! I learnt a LOT from this kit, and there are a few things I'm not happy with (the paint is too thick in some places so it's filled in panel lines and stopped them from taking the wash later on, had some trouble with varnish coats pooling, might have overdone the weathering) but overall I'm pleased that I actually completed a kit even when at times I felt like it wasn't going to turn out any good. This is compounded by the fact that I am diagnosed OCD so it's quite difficult for me to be realistic about what I can achieve and to know when to put it down and walk away for a couple days. My ethos going forward is very much "done not perfect/don't let perfect be the enemy of good". And compared to my very first attempt at modelmaking (an Airfix Hurri starter set I built during the first lockdown) I'm satisfied with my progress. All painting was done using Humbrol Gen 2 acrylic dropper bottles and brushes, with Humbrol spray primer. Having used Vallejo and Citadel paints a lot in my miniature painting side-hobby I found them to be lacking for modelmaking (in particular, the Vallejo just peeled and flaked if you blinked at it, even with spraycan primer underneath) so thought I'd give the new Humbrol paints a try as I had seen a few good reviews on Youtube and they're a decent price. Some colours went on better than others but overall they were perfectly good paints. I think next time though I'll add in some Acrylic Thinner and build up the layers in many multiple thin coats. I let my impatience get the better of me a few times with this build and slapped it on in a few places. I used Eduard masks for the canopy and the camouflage - the canopy was fine but I found that the camouflage ones, when painted over with a brush, leave a little "lip" along the edge of the tape that can be quite difficult to get rid of. I tried gently scraping it away with a fresh craft knife blade, and sanding it gently with a 3000 grit sanding stick, but the result wasn't great and in a few areas it just messed the paint up and caused me to apply another too-thick layer of paint. For future builds I might give white-tack a try or just freehand it as best I can. I applied Ammo by Mig Ultra Matt "Lucky" varnish which is what I usually use for historical miniatures but I can't help but wonder if its maybe a bit TOO matt - are Spitfires more of a satin finish in real life? Let me know! Weathering was achieved with Flory clay washes - Grime for the interior and Dark Dirt for the exterior. I used Humbrol weathering powders for the exhaust and gun smoke, although I found that you have to be careful with these as they like to get everywhere and stain bits of the model you don't want weathered. I'm also not sure how to fix them in place, I've thought about adding a final coat of varnish but I'm worried that the action of brushing it on will just smear them everywhere. Again, let me know if you have any tips. I may come back to this and add a bit of chipping and wire for the radio, although I'm not so sure of the best product for the latter - any suggestions would be appreciated. Anyway, thanks for looking and any thoughts/feedback are very much welcome! - Joe
- 27 replies
-
- 49
-
-
Another spitfire. Nice simple kit to put together. Painted with Tamiya and finished with Flory’s wash.
-
Basing on photos here ( https://www.nevingtonwarmuseum.com/germany-messerspit.html ) it is clear that plane had wings painted in camo, though hull seems to be in a single color. Or maybe lightning hides it? I'd assume hull is single color. The difficult part is - what colors would have Germans used to paint new camo? The most probable are current colors used for German fighters. But which scheme? Plane was captured in November 1942 then transported to Germany, repaired and tested. Then it was rebuilt. I'd risk it was somewhere at the start of 2nd quarter of 1943, March-April maybe? Maybe half 1943 if they took their time. I am not that versed in German camo, but from some research I see two options: 1. RLM 70(71?)+02 - overall "green" 2. RLM 74+75 - overall "grey" Now, mentions about Messerspit claim it was painted "dark green", suggesting option 1 but my limited knowledge suggest this camo was used rather in 1941 while in 1943 version 2 would be more probable? On the other hand factory personnel would have access to all paints so maybe they picked what they liked better? Or even make their own scheme...
-
Last year on one of the model shows I was given revell set of spitfire Vb and Bf109 G10 in 1:72. I would not buy this set myself, as I've seen how many errors are in those two kits. First I wanted to sell them but I noticed that this two pack is more expensive than those two models when bought alone. Sigh. Model landed in back of the stash for some time. But after building first Spitfire Vb by revell this year and noticing that you can, indeed turn it into a decent model I started thinking about doing something with that other duopack. And then I found good images of Spitfire MkVb DB605 aka Messerspit. It was captured Spitfire Mark Vb (EN830/NX-X) that accidentally landed on the Channel island of Jersey on 18th November 1942. It was taken to Rechlin, Germany within a month of its capture. After some testing Germans decided to remove Merlin 45 and replace it with a Daimler-Benz DB 605A, a propeller and carburettor scoop from a Messerschmitt Bf 109G was fitted as well. Also its 12 volt electrical system was replaced with the Luftwaffe's 24 volt one. The original guns of the Spitfire Vb was removed as well According to multiple test pilots this hybrid plane turned out to be better than both Spitfire MkV and Bf109 G, joining strong sides of both planes while eliminating some of their problems. If I knew how much work it would be I would probably just get Brengun model... Especially as Revell propeller for Bf109 is completely crap (I guess molds are completely worn out by now) - each blade has different shape and length So I would have to buy new one (possibly Eduard printed one). But, instead I started work on revell plastic by removing engine from Spit and attaching new one from Messerschmit. It indeed fit well, having same width as spitfire hull but I found out I had to build entire upper part of cowling and fill the intake on the under side of it. Then I built cockpit with spare Eduard frame and plasticard floor, I also found 3d model of spitfire seat and printed it. Seat belts are from eduard set. I used front part of canopy from kit, but I decided to use another piece from Eduard for the back and movable part - as I plan to build my Eduard spits with open cockpit I have spare closed canopies from multiple models. So I cut one of them and tried to place it on this model. The fit is... not great. I had to thin parts of movable section as well as cut into the hull to fit it and even then I got small crack on the glass... But still it is better than Revell's foggy and scratched offering. With cockpit done I was finally able to join flusage halves, wings and attach engine. It obviously turned out not fitting that well but lot of fitting, gluing, puttying, sanding and polishing later, the result look like this:
-
Second build. Another spitfire completed. A few mistakes on my behalf but I am learning and most important enjoying myself.
-
While working on Vc from Malta, I pulled out "Spitfire Mk.V" by Revell - the well known 1996 boxing featuring some nice looking details and some massive blunders. I actually thought it is mk.Vc so I started it planning to build it with Xtradecal decals I used for the other Spitfire. But as you may be aware, it is in fact mk.Vb. Oh well. At this point I decided to build it as LF version as I do not have clipped Spitfire in my collection. Kit has decals for it - AEoE, EP120 (boxart plane). So I built model with clipped wings. And then I learned Revell idea of "Sky" as used on code letters and band is too dark. I looked through my spares box but haven't found any decals for LF version of mk.Vb. I do have some nice ones for full span wings. Sigh. Now I am not sure how I will paint it. Either I will stay with AEoE and ignore that letters are too dark. Or I will make undocumented plane from 303 Squadron that operated some LF Mk.Vb from late 1943 to June 1944 using RFoD codes from well known Zumbach's plane from the period when 303 first operated ordinary Mk.Vb (Oct'41-June'43). Cockpit is one of the weakest parts of this model that would require complete rebuilding. On the other hand, transparencies are so terrible, you will not see much of this. So, as I started this model with attitude "I have it so I will build it" I decided to paint what little there is and hide it under the glass. The other major problem is obviously lack of gull wing. I decided to check if I can do something about it. Using rotary tool and sandpaper and copious amounts of putty and surfacer plus actual forcibly bending the plastic parts I managed to get some promising results. During this process I learned changed shapes interfere with cockpit floor. This plus the fact that this "flat" part has no panel lines (despite model having very nice panel detail overall) got me thinking and I believe this may be actual reason why they flattened this piece - they could have discovered that there is a problem when building test shots and at this point the only way to make body buildable was to carve into mould to flatten it. At some point (I have this model for a long time so box was opened numerous times) I managed to lose kit spinner so I fitted Rotol prop from Airfix. Is it acceptable? If the shape is bad I may print new one as I got the files when building Malta Spitfire.
-
I am building model of EP120 as LF MkVb with AEoA codes in 1943. While it is described as LF, I am not sure it actually got new engine (would this mean new exhaust?) as the plane today has 3 stacks with tube shaped ends (somewhat similar to Mk I exhaust). Wouldn't ordinary Vb use fishtail? This may be due to engine replacement at some point. Photos of EP120 current state: https://airlegend.fr/en/aircraft/supermarine-spitfire-mk-lfvb-ep120/ As I would prefer to make it as it appeared during WW2, I'd like to ask which exhaust type it had. Maybe there are wartime photos? So far I found only photos showing middle area of this plane.
-
My first kit in over 50 years. Thoroughly enjoyed it. Made some mistakes but all part of the fun! For a starter kit I was impressed by the quality of the fit.
- 10 replies
-
- 34
-
-

-
.... and we're off. My wife ( blessed be her name) bought me this for my (hrrmph) birthday. It's taken me nearly two months to get started. (I blame the distractions involved in moving from Brazil to Canada). But now here we go. I've completed page 1 of the 44 page instruction booklet in a day and a half - that means I should be finished sometime around christmas....😮 It'll be the RCAF Ian Keltie City of Winnipeg version. I've previously built the 1/24 Typhoon, which judging from other posts, seems to be a pre-requisite for doing this.!🤣
-

-
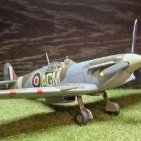 ok here we go..... This is the version i'm going to do - as now restored at Duxford. No 3rd Party Items just things i had knocking around at home ... like the odd bit of wire Later found out that the IFF? tranmitter should not be there? oh well its there now! First time using photo eched parts ...interesting Just taped in place.... the fit is just great on this kit! Another day another few bits of primer... Mr Surfacer 1500 naturally Same bits detail painted Cut the tail elevators to droop a little. All orifices filled - ready for a coat of Tamiya Surfacer. The undercarriage covering panels are just blue tacked in place ... i thought better than having two undercarrige stalks poking out in the way. Never used Tamiya Surface Primer before .... lets see! Seems Ok... Its bought out some details i had not even seen before Thats it for now.....
- 10 replies
-
- 14
-
-
 Good day fellow modellers! I would like to present you my the latest model in a few words and a few more pictures. Criticisms, comments and suggestions are more than welcome. Spitfire Mk.Vb, 1/48 Eduard, 11149 (Eagle's Call Dual Combo) Pilot: Lt. Dominic S. Gentile, Debden-Essex/England, August 1942. Level of details: EXCELLENT! More suitable for a 1/32 scale! After famous Tamiya's Spitfire series in 1/32, the second place is certainly occupied by Eduard's Mk.V Spitfires! Accuracy: I did not make precise measurements, but I would say that Eduard has done a superb job here as well. On the Internet, didn't find any objections in this regard. And when we are talking about accuracy of the details, just worlds of praise. FIT: Almost flawless. First of all, I would like to point out that I am extremely satisfied with the fit! Parts with extremely complex geometry fall into place without need for a puty! I used puty in very small quantities at only 2 places: the upper cowling of the engine (given in two parts) and the connection of the lower wing with the fuselage. But Eduard's plastic made sure that everything was not ideal, which caused a slightly obtuse dihedral of the lower wings. The problem was easily solved by applying masking tape in order to stretch up wings to the right angle when assembling the body and the wings. Decals: A new type that gives the possibility of double treatment: as standard decals and as transfer decals. In both cases they worked great! If you prefer to peel off decal film, do it after 24 hours at least and after that (the peeling) immediately protect the decals with varnish. Decals have responded wonderfully to gunze's decal setting solutions. The box: Attractive with a brief history of RAF and USAAF units in which American pilots flew Mk.V Spitfires. There is also a review (of a few sentences) about each plane that is the subject of this Eduard’s boxing. The illustration is in the newer (already old) Eduard manner for limited editions - it's just a illustration of the plane (great one) with a symbolic, graphic background. Painting and weathering: I used Gunze C colors (standard RAF shades C361, C362, C363, C368) and the camouflage was done freehand (no masks at all). Weathering was done in the following order (conditionally): chrome silver (partly), chipping fluid, first layer of camouflage, marbling technique in several colors (used stencils for that), final camouflage, sponge technique, chipping the paint, wooden crayons, protective varnish, decals, protective varnish, powder pigments, protective varnish, panel wash (Tamiya), protective varnish, oil painting wash and final varnish. FINAL IMPRESSION: Absolutely for every recommendation! As far as I'm concerned, it's only the first in a row, and I'm not even an die hard fun of Spitfires! The model made for review purposes for online magazine Maketar plus (https://www.maketarplus.com/) and obtained by courtesy of Eduard. ...the few references photos (internet sources, for discussion purposes only): And "few" photos of details...
- 26 replies
-
- 63
-
-
-
 Hello everyone, I’d like to share my completed Spitfire Mk.XII from Airfix in 1/48. This was an ok kit, there were some big gaps to fill and the detail was really lacking in the cockpit which I enhanced with a Eduard PE set. Those with a keen eye will see both ailerons are down which I have since found out was a chargeable offence for a parked aircraft back in the day. The weathering may not be to everyone’s taste but I’m happy with it. Thanks for looking, Tom