Search the Community
Showing results for tags 'Dingo'.
Found 8 results
-
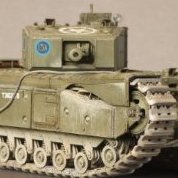
Dingo Mk III, 11th Hussars, 1945 (MiniArt 1:35)
Howard M posted a topic in Work in Progress - Armour
Having made MiniArt’s Mk Ib and Mk II Dingo Scout Cars I wanted to add a Mk III to the collection. MiniArt make one but it is very hard to find. Thankfully their Mk II kit has all the part needed to build a Mk III so I'm going to use that for my build. This is the vehicle I am going to model. It is from D Squadron, 11th Hussars, 7th Armoured Division and was photographed in Tonning, Germany near the Danish border. The regimental history says D Squadron was there between 10-20th May 1945. The photo is of poor quality but you can see it has been equipped with a spare wheel and a single Vickers K Gun (most up-gunned Dingos had two). There is no armoured roof so it is either an upgraded Mk II with the roof removed, or a Mk III built from scratch without one. I’ve assembled most of the components I need – a Dingo Mk II kit, a Dragon SAS jeep which comes with one more finely detailed K Gun than it needs, and the old Tamiya jeep which will donate drum magazines. I like the DEF Model weighted wheels and have used them on my other Dingos. Markings are from Star Decals and Mk III instructions are from scalemates.com. I’ve taken plenty of photos for reference including this one I saw at Bovington. It’s a Mk II converted to a Mk III owned by John Pearson who is driving it. (John also owns the running Valentine IX DD behind it). I got chatting to him on a Valentine tank modelling group and he very kindly invited me to visit his collection of vehicles. John is very amiable and hugely knowledgeable, and I spent a marvellous afternoon looking all over his vehicles and taking pictures of the details you often can’t get to see, so I’ll post some here as I build this model. My historical picture doesn’t give any details on how the spare wheel is mounted but I found this picture on a Dingo group of a reinforced frame to carry it. It's a modern interpretation but it works so I will copy it. I’ve only just started construction but here is my reinforced rear plate and a spare wheel for it. I’m using DEF Model wheels so taken one of the wheels from the kit and hollowed out the wheel mounting from the back to leave just the tyre and hub. Next up is the interior where I’ll use the photos of John’s Dingo and some creating thinking regarding ammunition storage to model mine. It usually takes me several months to finish a model but I'll add to this diary as I go. -
My finished Dingo Mk III, 1:35 by MiniArt. Kit: this is MiniArt’s Mk II kit built as a Mk III. The Mk III is very difficult to get hold of, but the Mk II contains all the parts needed to build a Mk III except for the canvas roof. Vehicle: A D squadron, 11th Hussars Dingo photographed in Tonning, Germany in 1945. It lacks the armoured roof so is either a Mk III or a Mk II converted to a Mk III. Reference photo at the bottom. The Build: The kit is pretty good out of the box but for this one I wanted to match my reference photo as much as possible, include detail I've discovered while researching, and expand my scratch-building skills. The Vickers K Gun is a spare from the Dragon SAS ETO jeep, the spare magazine drums come from Tamiya’s old desert SAS jeep, and the British Gerry cans, RAC helmets, and some stowage come from MiniArt kits. The wheels are Def Model weighted wheels, which freed up a wheel for the spare at the back. There is considerable scratch building as well. I'm pleased with the way this one is coming out but may build something larger next to let my eyes recover! Muddy footprints on the front from the crew climbing in and out. I drilled out the lightening holes in the brackets for the sand channel just below the front storage box as they are solid in the kit. The fatter roll is from a stowage set, the thinner one is the rolled up canvas roof which I scratch built and is often mounted higher, but from my reference photo I think on this vehicle it was lower. Quite a bit of chipping round the engine deck. It's a single metal cover and the examples I have seen are quite battered from being taken on and off all the time. Hidden now but I added the brake and electrical cables behind each wheel. There is no light on the rear mudguard as that seems to have been a post war feature. There is little mud or dust of the Dingo's wheels in my reference photo, I suspect it spent the last few days running along roads rather than cross-country. I replaced the protective ring round the base of the antennae with one from my stash box as the one provided is very thick. It is not quite square but I left it at a slight angle to represent wear and tear on the vehicle. Some interior shots. The war has just ended so my crew have got a camera out to take some snaps. The map is a WW2 British military map. I added the tan rectangles on the cabin lip which are the padding used to cushion the armoured roof if it was carried. Mk IIIs still had them in case it was decided to re-fit the roof later on. I have no clear photos of the mounting for a single Vickers K Gun so simply used the one from the Dragon jeep kit. I think in reality the mounting was thinner and simpler, but for practical model building this one works fine. The canvas cover for the rifle breech is scratch built, as are the brackets holding it in place at either end - MiniArt provide the rifle but nothing to secure it in place. You can just make out the scratch built gear pre-selector through the steering wheel on the right. I don’t have a clear photo of the interior of this Dingo so had to use some creative thought on where spare magazines would be kept. Some Dingos were equipped with twin Vickers K Guns and had racks holding half a dozen magazines on the cabin exteriors, but for mine with a single gun I have just stashed them in likely places in the cabin. It is almost impossible to access the interior of the cabin after it has been closed up so you need to plan painting and weathering (such as the colour of muddy footprints) in advance so it matches the exterior. A 1:35 Dingo is a small model! My Dingo collection - this Mk III on the left, a Mk II of the Inns of Court Regiment in the centre, and a Mk Ib from the 1st Armoured Division HQ on the right. My reference photo - Tonning, May 1945
-
 Hi guys, Over 10 months, I built these vehicles for a diorama about El Alamein based on a well-known photo which fascinated me. A big project with a lot of variety and challenges including making two Academy Honeys look different. Stug III is from Dragon with PE set added. Dingo is Miniart, 10HP is Tamiya, Panzer III is RFM Full interior. Hope you find these of interest. Edit - Added full diorama scene. Common 'V for victory' hand gesture for British troops throughout war Full scene until I figure out more about GIMP Stug III Ausf D Sonderverband 288 Two Honeys No 1 No 2 Daimler Dingo 10HP for AFPU Panzer III
- 28 replies
-
- 51
-

-

-
- Honey
- Stug III Ausf D
- (and 1 more)
-
Dingo 2 GE A2.3 PatSi (03284) 1:35 Revell The Dingo is a German MRAP vehicle based on the Unimog chassis produced by Krauss-Maffei Wegman for the German Army. As well as being deigned to be mine resistant it will also protect the occupants from machine gun fire, and artillery fragments. The Dingo 2 has increased performance and higher payload than the original vehicle. The new vehicle also features a roof mounted remote weapons station and sensors. As well as the German Army the vehicle is used by Belgium, Norway, Austria, Luxembourg and the Czech Republic, with more than 800 under contract. The Kit This boxing is a re-release of the 2013 kit with additional parts for the 2 model. There are 7 sprues of plastic, a clear sprue and 4 runner tyres. The quality of the mouldings is good. Construction starts with the vehicle chassis. Both side rails are made up along with the front wheels arches. The rails are then linked by cross braces and the transmission casing. The rear plate containing the tow hitch and convoy marker plate is added. The front suspension units are then added into the chassis. Next up the front & rear axles are made up, along with the wheels. The transmission power shafts are then added as well. These can then be added to the chassis with the rear suspension units being added as well. The engine is then made up and added on to the chassis. along with the exhaust. Construction then moves to the body of the vehicle. The lower body pan is made with seats being made and added, along with equipment and its racks. At the front the dashboard is made up and added. Next the armoured windscreen and doors are made up, The doors being added into the vehicle side panels. The entry steps and supporting structure is made up for each side. The sides, rear, roof and windscreen can then be added onto the main body. The separate rear stowage compartment can then also be made up. These can then all be attached to the chassis along with the bonnet assembly. Last up the roof mounted remote weapons station and sensors can be made up and added. To finish off a few fitting such as mirror and antennas are added, a length of antenna wire being included taped to the front of the instruction booklet so it does not get lost. Markings There are markings for 3 German Army vehicles, one training unit in Germany, and 2 operational units in Afghanistan. Decals are by Cartograf as can be seen from the small "c" at the end of the code, which is a guarantee of good registration, sharpness and colour density, with a thin matt carrier film cut close to the printed areas. Conclusion It is good to see this kit being re-released and upgraded to represent the latest vehicle in use today. Highly recommended. Revell model kits are available from all good toy and model retailers. For further information visit or
-
Daimler Dingo Armoured Car. Pics thanks to John B
-
Hi all, I'm currently building a Tamiya 1/48 Dingo mk.II as used by the Federation Armoured Car Regiment in Malaya in 1952-1964. The Malayan Dingos had been handed down by the British Army (some via the Australians) to provide escort duties, roadblocks, reconnaissance and fire support and armoured protection against Communists in the Malayan jungle. The Dingos were modified by British army units in-country to offer better protection against ambush in the jungle. I've used the Tamiya kit and made the armour extensions using plastic sheet. The dimensions are not really exact, but I think I've captured the look of the Dingo reasonably well. This was actually more of a exercise or proof of concept before I convert, and potentially ruin, the bigger (and COSTLIER) MiniArt kit. The Tamiya kit is really well engineered, and goes together very nicely. The progress shown below is the result of a few hours' work over the last weekend. Hopefully, I'll get the interior painted and finished this coming weekend so I can button up the fighting compartment. Now I've got to look for a 1/48 bren gun to arm the little fella.
-
I modified the front and added tow hooks, lifting eyes, headlights, tail light, horn and a plate on the left rear fender. Markings are very wrong for an early Dingo but there are none supplied with the kit and I had to raid the spares box. I must be crazy! Pre-primer, you can see some of the added detail more clearly.
-
Monty's Caravan Leyland Retriever and Scout Car 1:76 Revell Field Marshal Sir Bernard Law Montgomery, 1st Viscount Montgomery of Alamein, KG, GCB, DSO, PC - unsurprisingly shortened to 'Monty' for most purposes, was the legendary commander of the British Eighth Army in North Africa who masterminded the allied victory over Rommel's Afrika Korps. He went on to command the Eighth Army during the Italian campaign and had overall command of Allied ground forces for the D Day landings. He was also the senior commander for the less successful Operation Market Garden airborne assault. A significant number of artefacts associated with Monty are still extant, including a Leyland Retriever which resides at IWM Duxford. Anyone who knows their model history will instantly recognise this as one of Matchbox's original 1:76 scale releases. Inside the modern Revell end-opening box are three sprues of dark green coloured plastic which hold a total of 142 parts. You get rather more than a caravan though included is the Leyland Retriever itself, a Daimler Dingo scout car, three figures (including, of course, the aforementioned Monty) and a diorama base. The instructions kick off with the Leyland Retriever caravan. Despite being the same age as me, the kit is surprisingly complex. The ladder chassis forms the basis of the model, onto which the drive shaft, axles, suspension, exhaust, steering rods and other running gear have to be fixed. The wheels themselves are pretty nicely moulded and feature nice, chunky tyres. The cab is reasonably well detailed, with gear levers, an instrument panel and steering wheel all included. The caravan body is a separate sub-assembly, meaning you can convert the basic vehicle into a range of different variants if desired. The internal structure is very basic, even though the rear door is designed to be posed in the open position. A nice canvas awning structure and ladder is provided if you want to finish the model in the parked position with the included diorama base. The canvas roof is pretty good and should look convincing enough once painted. The Daimler Dingo Scout Car is surprisingly well detailed for such a tiny model. Seats for the crew are included, along with a steering wheel for the driver. The angular box structure is split logically into bottom, front, rear and side pieces and the wheel arches are moulded separately. The suspension units fit into the sides of the hull beneath the wheel arches, with the tiny wheels being added last of all. Small details such as headlights, various stowage bins and the optional bren gun are added last of all. The roof hatch can be posed in the open or closed position. The diorama base is comprised of two base plates, a couple of barricades and some oil drums arranged into a rudimentary table. It's fairly basic stuff, but as with all diorama bases you can add as much or as little extra detail as your spares box will allow. Two decal options are provided for each of the vehicles. The Caravan can be finished as it appeared in North Africa in 1942, or Germany in 1945 when Monty accepted the German surrender from Admiral Doenitz. The Dingo can be finished as a vehicle of the 2 Troop, B-Squadron, Household Cavalry (in dark green) or HQ Squadron, 10th Royal Hussars (in a desert scheme). Conclusion Whilst this set is neither perfect nor state of the art, for those who were weaned on kits from Airfix and Matchbox it is a welcome trip down memory lane. The kits themselves are actually pretty good and contain enough detail for this diminutive scale and the inclusion of the scout car and diorama base adds significant value to the overall package. Recommended. Revell model kits are available from all good toy and model retailers. For further information visit or