

Woadism
-
Posts
9 -
Joined
-
Last visited


Woadism's Achievements
")
Newbie (1/9)
20
Reputation
-
 Thanks for that - it's reassuring I'm not the only one. I'd come across this r/flying post with a comment saying that said 3 degrees was about the norm: ...and I had eye-balled it to just a touch over 3, so pretty close in the absence of something more solid.
 -
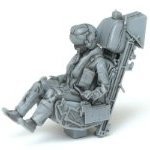
Hi all Being a NZer, I've posted about this already on Kiwimodeller - http://www.kiwimodeller.com/index.php/forums/aviation-models/90-1-24th-scale-piper-tomahawk-in-design-a-request-for-information - but haven't had any luck so thought I'd cast a wider net. I've had a long term project trying to make and eventually sell my own custom 3D-printed model kit of a Piper Tomahawk in 24th scale. The design is fairly mature at this point, but I do occasionally run into things I'm not sure of and I'd like to get things correct if I can. I realised relatively recently from drawings and photos that the engine (and therefore cowling) is actually offset, I presume to balance out the torque of the propeller rotating in a single direction (?). ...further evidenced by the fact that there are four fasteners on the forward part of the cowling on the longer left side, and only three on the right. The drawings in the manual seem to be generally more of a visual guide than an accurate and measurable reference, and I didn't find a specification for the angle. I was wondering if anyone here flys/has flown/maintains a Tomahawk and happens to know what the correct offset angle is? Thanks in advance Hamish.
-
On designing your own continuous supports for custom parts
Woadism replied to Woadism's topic in 3D Printing Chat
I had been using either sunlight or a home-made station in a large shiny metal cooking pot wound around the inside surface in a spiral with a long length of UV LED string light. Your comment stuck in the back of my brain and I finally got a proper curing station (the Elegoo Mercury) and man, it really is night and day. This thing is so much better than my terrible DIY attempt. Lesson learned - it has almost completely solved warping issues I was experiencing and is far quicker too - thanks for leading me here (eventually). -
Hi all I've been working, for a painfully long time, on making my own 24th scale Piper Tomahawk, in as much detail and as close to regular injection-moulded standards of quality as I can. One of the issues I've had to tackle is how to deal with parts that warp while they cure - this was particularly evident in an early iteration of the tail, which I had designed in two halves - I guess because that's what's in the majority of off-the-shelf model kits: It was also took a long time to generate the supports, because Chitubox's auto support tools aren't up to the task for something like this. I decided to try modelling a frame that would brace the part as it cured, and went through various iterations of that: The light-weight ones only stopped the warping where they touched, leaving bulges, and the heavy raft - aside from wasting a lot of resin - was too firmly attached and would break the part itself on removal. Now - my eventual solution for this particular part was to model it in one piece (and my apologies for the state of these photos - advertising copy they are not) - because parts being in two halves is obviously a design consideration for injection moulding that doesn't always apply to 3D printing: ...but the issue of how to better brace and support parts, and avoid (or at least mitigate) the damage of support removal, remained. Recently, however, I came across some posts by Hugh Evans about his development of continuous supports in an Elegoo Saturn series facebook group: https://www.facebook.com/groups/elegoosaturn - I won't copy his images here, but basically he's custom modelling a fine continuous support along the edge he wants to support rather than relying on the point supports generated by Chitubox or Lychee to direct contact the model. It was also covered / tested out by Uncle Jessie in a recent video: This caught my attention as an approach that might offer some solutions. Modelling a custom continuous support could allow for smooth continuous supporting of edges without the dimpling effect of regular supports, and let me design custom braces as necessary. As a test, I made some custom supports (loosely modelled on the dimensions of the supports I use in Chitubox) for a part I wanted to run a test print of - and although there's room for some fine-tuning, and there wasn't any bracing required for this part, I think it worked really well: You can see how little material was required in the light shining through the 2nd photo. This part has some really fine edges, and some awkward angles. Making custom supports let me spread the support load more evenly, avoid the 'pimpling' on the bottom, and even let me support that whole back edge which I couldn't do effectively in the normal tools. Conclusion: if you're modelling your own parts, it might be worth designing your own supports, too - I suspect I'll be doing this throughout the project now.
- 8 replies
-
- 13
-

-

-
How do I even produce a stl file for my car ?
Woadism replied to Cklasse's topic in 3D Printing Chat
That was the basic plan, but those clear prints are pretty convincing! At the moment I have plans to (eventually) sell it as a printed kit, rather than as a digital file. -
How do I even produce a stl file for my car ?
Woadism replied to Cklasse's topic in 3D Printing Chat
Iceman 29, that turned out great! Approx. what thickness is that piece? -
How do I even produce a stl file for my car ?
Woadism replied to Cklasse's topic in 3D Printing Chat
Also, a tutorial like this might be a good place to start - along with a good set of drawings! -
How do I even produce a stl file for my car ?
Woadism replied to Cklasse's topic in 3D Printing Chat
Hi Cklasse I agree with nick's comment above, that Blender is probably a good place to start - those parametric engineering-style modelling tools are better for less organic shapes. BUT - designing and printing anything as complicated as a car at 1/24th scale isn't going to be quick or easy. I've spent faaar too long on my 1/24th Piper Tomahawk and it's very much still under development: You'll also need to have a think about how you want to produce the transparencies - I'm personally intending to vac-form the canopy, as direct 3D printing, even with clear resins, won't produce a clean enough result, and making moulds and casting in resin seems like a lot of trouble (but may end up being the best bet, if vac-forming doesn't go well). -
Thanks for the write up TheBaron - really helped when I was trying to decide on a new bigger format printer. Aside from a few mis-steps during the initial levelling process (all user-error!), I've found it fairly simple and (so far) more reliable than my other two, a Phrozen Mini and Mighty (both 4k). The only real challenge I've found is maintaining consistent temps, and something I'd love to see start appearing in these consumer grade machines is a small (optional?) thermostat controlled heater installed directly in the unit (like the air filter).