
Richie B
-
Posts
78 -
Joined
-
Last visited
Content Type
Events
Profiles
Forums
Media Demo
Everything posted by Richie B
-
1/48 F-15C 65AGRS- In flight and lit up - Finished!
Richie B replied to Richie B's topic in Ready for Inspection - Aircraft
Many thanks everyone for the kind words, much appreciated. I’ve gained a lot from looking at the impressive work of others on this site, certainly an incentive to push my own abilities. -
1/48 Eduard F-15C - 65AGRS - In-flight and lit up.
Richie B replied to Richie B's topic in Work in Progress - Aircraft
For those that are interested, a full set of completed photos are at the link below: Til next time! -
Well, almost a year and a half to complete this one - not bad timing by my standards! This was the Eduard version of the academy kit which included some nice extras like cockpit details and the exhausts. However, none of that could offset the kits main weakness which is poor fit - namely intakes, cockpit area and rear fuselage. I then didn't help myself with adding lighting which is always a challenge in confined spaces - even though the kit at 1/48 is reasonably large. The colour scheme was chosen by a good friend of mine, who will ultimately benefit from acquiring it, so the decals are from Afterburner. The work in progress is here if interested: OK, on with the photos! The stand is made from a wooden base and 2 acrylic rods bent into to shape using a heat gun. And some close ups. I kept the weathering pretty light as these jets were generally well looked after. And luckily after all that, the lights still worked! I had to 'cheat' on the Form lights as they are too difficult to do properly in this scale so those are glow-in-the-dark decals. Many thanks for looking, til next time!
- 12 replies
-
- 35
-

-

-

-

-
1/48 Eduard F-15C - 65AGRS - In-flight and lit up.
Richie B replied to Richie B's topic in Work in Progress - Aircraft
Done! And for those wondering if the lights still work (of which I was one!) ... I'll add some more images in the Finished section later. Thanks for staying the course!- 29 replies
-
- 6
-
-
-
- 1/48
- F-15C Eagle
- (and 1 more)
-
1/48 Eduard F-15C - 65AGRS - In-flight and lit up.
Richie B replied to Richie B's topic in Work in Progress - Aircraft
Final Touches Nearly there, just some minor details and the stand to complete. here's where she is at the moment: Tanks, Pylons and weapons complete with some light oil streaking on the pylons and tanks. Rear staining was added but restrained as these were comparatively well looked after jets. PE actuators were somewhat fiddly to apply. Top weathering with panel line washes and some staining with oils is pretty light. A bit heavier around the grills. Even the scratch gun came out OK. Most assemblies and fiddly bits added and an overall Matt varnish added. Hopefully the next post will be ............. Done!- 29 replies
-
- 7
-
-
-
- 1/48
- F-15C Eagle
- (and 1 more)
-
1/48 Eduard F-15C - 65AGRS - In-flight and lit up.
Richie B replied to Richie B's topic in Work in Progress - Aircraft
Many thanks Tomcat, weathering is coming along so hopefully getting near the finish line on this one! -
1/48 Eduard F-15C - 65AGRS - In-flight and lit up.
Richie B replied to Richie B's topic in Work in Progress - Aircraft
Decals I used the long-OOP Afterburner set which went down very nicely and as these jets have limited stencilling (mostly black), I also used those from the Afterburner set rather than the ones included in the Eduard boxing. Although, this boxing provides decals for the tanks, there aren't any for the weapons so I had to source some Blue bands (from Fantasy print) as these will be training rounds. Once, complete I resealed the decals with more Tamiya X-22. The stand is a new addition since Xmas and is much better for keeping the model stable whilst working on it. Now she's ready for a bit of weathering. Not too much as the maintainers usually did a good job on keeping these aircraft looking respectable.- 29 replies
-
- 6
-
-
- 1/48
- F-15C Eagle
- (and 1 more)
-
1/48 Eduard F-15C - 65AGRS - In-flight and lit up.
Richie B replied to Richie B's topic in Work in Progress - Aircraft
Gloss Varnish Just a quick update to prove that things are still progressing. Gloss varnish coat is on using Tamiya X-22. I usually struggle to get a smooth even finish and this time was no different despite a mist coat of thinner over the top. The gloss is good enough to decal on though and even though the shine makes the colour variation harder to see (and photograph!), it is still there thankfully. I also varnished the fuel tanks and pylons ready for a bit of weathering. Next up - Decal time!- 29 replies
-
- 1
-
-
- 1/48
- F-15C Eagle
- (and 1 more)
-
1/48 Eduard F-15C - 65AGRS - In-flight and lit up.
Richie B replied to Richie B's topic in Work in Progress - Aircraft
Post Shade Blending With the added colouring being quite 'distinct;' it was necessary to tome it down by blending it with an overcoat of base colour. The aim is to achieve an overall effect similar to the tailerons below, non-uniform but realistic tonal variation.. The camera makes it look a little more contrasting than real life but it highlights the tonal variety you can achieve. How much you want to tone it down is of course up to you. There is no real pattern I am replicating as I find I make enough errors to make it interesting anyway (!) and certainly no accentuating every panel line. The effect is to generate an overall, more subtle approach I suspect a coat of varnish and weathering will blend it even more so this will be as far as I go at this stage. I've also touched up the leading edge grey where required and sprayed the RHWR antenna white/grey as per pictures. The gun port got its black outline and the nose became Med Sea Grey as the advertised colour looked quite dark. I'm happy with the end result which is somewhere between weathered and well-used. Of course, as this is post-shade you can always add more though I think subsequent weathering will not need to be as heavy as I might have done previously. A few more touch-ups then its varnish time.- 29 replies
-
- 5
-
-
- 1/48
- F-15C Eagle
- (and 1 more)
-
1/48 Eduard F-15C - 65AGRS - In-flight and lit up.
Richie B replied to Richie B's topic in Work in Progress - Aircraft
Base Colours On I usually use MRP paints as they go down very thinly and this one is no exception. I sprayed the light blue freehand then used bluetack to mask the demarcation lines for the darker blue. This mostly worked ok but I will need to go back eventually and neaten some of the lines up. You can see (mostly on the light blue) where I have deliberately covered the black base more heavily in certain areas than others to give a varied tonal hue. To increase the tonal variety I also added some different blue patches using a template and a mid-tone blue. This is only on the light blue in these photos but I will also add the same to the darker blue. The lighter parts of the black basing have sort of worked (mainly on the lighter colour to be fair) but it is very subtle so I may have to go back over this with a lighter tone of the main colour at some point. After adding the colour tone patches to the dark blue my next job will be to add some more defined shading to certain panel lines. Not too many otherwise it will look too much like concrete paving. Don't worry, those tonal patches will be toned down with a final light overspray on each of the main colours to blend them all in. Time to dig the reference docs out!- 29 replies
-
- 1
-
-
- 1/48
- F-15C Eagle
- (and 1 more)
-
1/48 Eduard F-15C - 65AGRS - In-flight and lit up.
Richie B replied to Richie B's topic in Work in Progress - Aircraft
Pre-shade So, the answer is a bit of both. Not sure which has the best effect so I'm going to try both and try and work out my preference as we go. Black pre-shade works well for creating darker tones of the same colour and the opposite is true. You can use different colours to increase colour tonal variation but the risk is you overspray too much of the primary colour and erase all that careful work. Post shade allows you the ability to add tones after putting down the primary colour as its easier to add then take away. You still need to blend but your not worried about the correct underlying colour as its the primary colour already. In reality, all weathering is post shade so it can generate a more natural look. In an attempt to catch the best of both worlds I've added highlights to areas that would catch light more often, typically edges and tops of curves. I used a light grey colour as white can be a bit poor in coverage. The aim was not accuracy but just to break up the blackness. i also sprayed the grey leading edges and masked them off. Again, not sure whether its easier to spray them mask or finish everything else, mask then spray. Will let you know! OK, pre-shade done, time for some colour!- 29 replies
-
- 4
-
-
- 1/48
- F-15C Eagle
- (and 1 more)
-
1/48 Eduard F-15C - 65AGRS - In-flight and lit up.
Richie B replied to Richie B's topic in Work in Progress - Aircraft
Back to Black I've still not completely converted to black basing but this model needed primer after all the extra work done to get it to this stage. Before I started, I sprayed some aluminium on the bare metal engine areas and added some extra tones to make it less uniform. Apologies but I forgot to take a picture of this before masking it up. For the primer I used some Stynylrez which did the trick but have to say was hard going as it was probably a bit thick out of the container. It thus required a bit of sanding afterwards to smooth the finish. As ever, a couple of retouches were required (actually more than a couple but whose counting). However, the overall effect wasn't too bad and certainly good enough to paint over after the touch ups. Now onto the more interesting bit, work some more on the pre-shade or leave it to the post shade?- 29 replies
-
- 1
-
-
- 1/48
- F-15C Eagle
- (and 1 more)
-
Remarkable detail for such a small scale, excellent!
-
1/48 Eduard F-15C - 65AGRS - In-flight and lit up.
Richie B replied to Richie B's topic in Work in Progress - Aircraft
Gun Slight diversion whilst the paint dries. The 'gun' supplied by academy is somewhat bland and whilst not that visible, it could certainly do with a facelift. Excuse the quality (its really quite small!), I tried adding some holes but that wasn't enough, So, I then shimmed some small discs of a piece of plastic rod. By gluing theme where the holes were, drilling out the centre and filing flat, a slight;y better rendition was created. Not a prize winner in the world of scratch building but a small win nonetheless! -
1/48 Eduard F-15C - 65AGRS - In-flight and lit up.
Richie B replied to Richie B's topic in Work in Progress - Aircraft
Cockpit Area Not unsurprisingly the cockpit area also needed some 'adjustment'. The large canopy frame on which the main part of the canopy sits is too short so I added extra pieces to the canopy sill at the front. I also had to remove the two hinges at the back as they wouldn't fit the fuselage section where they are supposed to go and add them separately. They probably would canopy up but this is in-flight. I added some rivet detail on this piece as well otherwise it looks a bit bland. A light wash was added and some gentle fading on the front coming to give it a weathered look. The Eduard PE HUD is very fiddly as there are no attachments for the clear film, lots of steady handedness required here. (Took a few attempts!) Time to add the canopy pieces together and then its prime time.- 29 replies
-
- 1
-
-
- 1/48
- F-15C Eagle
- (and 1 more)
-
1/48 Eduard F-15C - 65AGRS - In-flight and lit up.
Richie B replied to Richie B's topic in Work in Progress - Aircraft
Coming Together With the wiring complete it was time to connect up both halves and glue them together. Luckily, no major dramas but I knew already that the fit wasn't going to be pretty in places. The fuselage at the rear had some gaps and the area around the tailplanes needed sanding to get a better fit with the tailplanes. The connection behind the cockpit was another area that was difficult to finesse. I'd previously chosen to glue this troublesome section to the front section as the join here was harder to fix. The gap where the airbrake is where you can access the battery, if you can find it amongst all the wiring! I gave the wing joins some further attention as this has to be seamless. This also meant some rescribing was going to be required. I also glued the final elements of the intakes on. Not sure if my approach was the best but I'm pretty sure that any sequence would cause issues somewhere. So now the post assembly, fill and sand routine begins. The under-wing join is pretty good and the intakes need a little tlc but nothing too drastic. The nose undercarriage needs a little tidying up as well. Before primer I need to close the cockpit area up so I polished the canopy and masked both inside and out. I had the Eduard mask set but it didn't seem to fit very well so ended up cutting them into pieces and reassembling. Back to fill and sand, fill and sand.....- 29 replies
-
- 2
-
-
- 1/48
- F-15C Eagle
- (and 1 more)
-
1/48 Eduard F-15C - 65AGRS - In-flight and lit up.
Richie B replied to Richie B's topic in Work in Progress - Aircraft
Now that most of the internal sub-assemblies are complete focus can shift to putting them all together. The snag with adding lighting is that you have to build out of sequence to get all the electronics wired up before you close it up, As an example, I would normally leave the engines off until the end to minimise painting issues. Unfortunately two things made that impossible. Firstly I need to construct something very solid to hold the weight of the model when suspended on two acrylic rods. This was achieved through reinforcing the join on the exhaust tube with a strip of plasticard then using milliput to 'cement' both exhausts in place making careful adjustments so that when the top is joined there is no gap where the exhausts join - not easy. The second constraint is that it's really hard to wire a model from the outside! Hence the engine lights needs to be added with the exhausts in place. Luckily I'd left enough room for the LED lights to go to the tubes at the rear of the exhaust by trimming down the intakes at the back. I didn't want to make the tubes any shorter otherwise there would be too much play in the acrylic rods. In addition I've glued the front to the fuselage bottom as this looked like an area begging for mis-aligned parts. The front side sections was glued together first though the fit was not that good so required quite a lot of filler and sanding to erase the seam. Parts were sprayed with MRP surface primer which goes down very nicely but is quite thin so the surface needs to be pretty smooth. To minimise further clean-up issues I glued the piece behind the cockpit to the front section next, carefully removing the join whilst there was no other parts to get in the way. I had to use a spacer in the rear cockpit section to help hold the walls at the right distance. With the help of some plasticard tabs, the join to the rear fuselage was not to bad noting that the kit really doesn't offer much to help the two surfaces to mate correctly. The only area that seemed to suffer was the front undercarriage door area which I had previously glued shut as this is an in-flight model. The Academy model looks like its designed to be displayed with gear down as the fit closed is not great, especially at the back. To assist I add some plasticard shims to the gear door before fitting which helped a lot but still needed some Tamiya glue soaking to close the gap. Even then it needed a little Perfect Plastic filler to smooth out the remaining gap. What that meant when I joined the rear fuselage on, was a small step at the back where the gear door meets the fuselage. Rather than sand the whole thing (and noting a rather inconvenient aerial in the way) I added a small and thin bit of plasticard to close the step then sanded it thin at the other end. With a bit of judicious sanding I'm hoping that when I respray with primer that the whole thing merges seamlessly. At least the harder work is on the underside, mostly out of sight! The tape is there to stop me sanding away too much of the detail in that area. You can also see how much work was required to get the intake bottom seamless. Tamiya this aint. -
1/48 Eduard F-15C - 65AGRS - In-flight and lit up.
Richie B replied to Richie B's topic in Work in Progress - Aircraft
Well slightly later than planned but the cockpit is getting there! The pilot is one borrowed from a Hasegawa kit (why do so few kit manufacturers include pilots?) and enhanced using some Eduard PE. I'm not a huge fan of PE in 1/48 as the pieces are usually very small and I end up losing them or using too much glue to secure them. However, they do add a lot of detail so I'll just have to persevere. The seat is a resin one from Eduard as part of the kit extras and builds up very nicely. I lost the Oxy cylinder so had to build a new one. The helmet visor and patches are printed out on paper then cut-out and glued in place as I can't paint that level of detail! The Eduard PE front Instrument Panel is very detailed and looks great though as its metal, I can't back light any of the instruments. The cockpit lighting is therefore a mix of point lights in the side panels using thin fibre optics, some wider fibre optics to light up the side panels (these will be partially hidden by the cockpit side-walls) and a single LED mounted above the front IP . I think I'm about ready to get this cockpit installed and then work out how I'm going to wire the rest of the kit up!- 29 replies
-
- 4
-
-
- 1/48
- F-15C Eagle
- (and 1 more)
-
1/48 Eduard F-15C - 65AGRS - In-flight and lit up.
Richie B replied to Richie B's topic in Work in Progress - Aircraft
OK, Xmas and New year done and well behind us now - hope yours was a good one - and its about time for an update! First up its the intakes which as you will remember I cut up to allow easier painting and seam busting. Well they're all back together now which with the help of some alignment tabs was less problematic than it could have been. I've sprayed and the forward parts Air Superiority Blue before joining the rear section and both parts have been lightly weathered with pigments to look a bit dirty. Happy to say the joins are pretty good and seams are pretty much gone (or certainly well hidden!) I'll stuff them with some sponge until the rest of he build is complete so bye-bye for now. Also been working the exhausts which are quite distinctive on the F-15. The insides were dirtied up using pigments in layers which came out quite nicely, just need to add some more detail to the outside of the cans before adding the actuator arms. I suspect the actuators will stay off until the very end as they are guaranteed carpet monster seekers. When I finish spraying other areas or models, if the colour is suitable I start the marbeling process on items such as the fuel tanks. Its the wrong grey colour but once blended in it will add a little discolouration and interest to the tanks. Thanks for looking, next input will hopefully feature a cockpit update!- 29 replies
-
- 1
-
-
- 1/48
- F-15C Eagle
- (and 1 more)
-
1/48 Eduard F-15C - 65AGRS - In-flight and lit up.
Richie B replied to Richie B's topic in Work in Progress - Aircraft
Jumping around on this kit a bit as it needs a fair bit of prep before gluing together. At the back end I've opened up some vents, thinned down the ancillary exhaust vents and added a fair amount of missing rivet detail which is quite visible as the exhaust area is unpainted on the real thing. The kit comes with some very nice replacement resin exhaust nozzles which certainly look more detailed than the kit parts. Parts have been cleaned up and the first stage of paint added. The kit also comes with a healthy dose of air to air weapons but I'm not sure how many of these I will actually use as the aggressors were usually only fitted out in a trg to fight capacity. Still, they look ok as a starting point. Just a quick update and in case I don't get round to any more soon, Merry Xmas! -
1/48 Eduard F-15C - 65AGRS - In-flight and lit up.
Richie B replied to Richie B's topic in Work in Progress - Aircraft
Slime lights are probably the trickiest to introduce as they're comparatively bigger, not in convenient places (to model!) and not a point light source. I've not found a way of successfully using LEDs to mimic the effect but I have used glow in the dark decals in 1/32 scale which took a while to shape and need a UV source. They do look OK but don't last that long. Probably long enough for an initial impact at least! Another alternative is to use the same electro-luminescence panels as they do in the real world - though in miniature. You can get strips which you then cut to size but the electrical connections are quite fiddly and they need a transformer as they work of 110 volts. However, they are more authentic looking and keep going (as long as the battery does). They only really work for 1/32 scale though as the strips and wiring is too bulky for 1/48. All things considered I think this will be a 1/48 test bed for glow in the dark decal application.- 29 replies
-
- 1
-
-
- 1/48
- F-15C Eagle
- (and 1 more)
-
1/48 Eduard F-15C - 65AGRS - In-flight and lit up.
Richie B replied to Richie B's topic in Work in Progress - Aircraft
Okay, on the theme of lighting one of the areas I will be adding lights is the wings. The F-15 has two lights on each wing, red position lights on the leading edge near the wing root and red/green navigation lights on the wingtips. The position lights can be created relatively straightforward by carving away the plastic where the light should be then adding some coloured transparent plastic. In this case I used parts from an old toothbrush, cutting them to size then sanding then back to the wing before polishing the plastic so it retained its see through quality. As mentioned before the Academy wing tips are solid which means a somewhat more drastic approach. Because the LED has a cable you need to be able to feed it through the wing. As the wing is solid you need to carve a channel deep enough to hide the wiring. The LEDs are coloured according to the wing light colour as white light even against coloured plastic, looks too harsh. The channel was carved out using a wide scriber and the plastic where the light was just cut away. I created a large enough gap to fit an LED at the end of the channel, luckily there was just about enough depth in the plastic to do this. The LED was then secured inside and a wingtip light carved out of some more coloured toothbrush parts before being sanded flush. The channel was then backfilled with filler and sanded smooth. Even without the lighting its an improvement on what the kit provides. I've also added some riveting detail which I did before gluing the wings together. The wires for both LEDs will then be fed through a hole in the fuselage to the battery. I've also started to add some more elements to the cockpit though most of this won't be seen since the canopy will be closed. At least I'll know its there.- 29 replies
-
- 2
-
-
- 1/48
- F-15C Eagle
- (and 1 more)
-
1/48 Eduard F-15C - 65AGRS - In-flight and lit up.
Richie B replied to Richie B's topic in Work in Progress - Aircraft
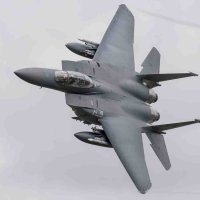
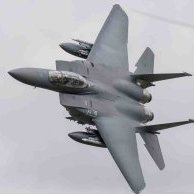
I had a go at the Italeri kit a long time ago (no lighting!). Only bit I didn't care for where the engine exhaust nozzles - resin replacement required. Nice photo of a Lakenheath jet. No slime lighting for this build but might try something else. -
1/48 Eduard F-15C - 65AGRS - In-flight and lit up.
Richie B replied to Richie B's topic in Work in Progress - Aircraft
Hi bar side, yep the Academy kit has solid wingtips just like the Revell F-15E. I'm definitely up for adding the wing lights so standby for some plastic surgery! I wont be adding the fin tip lights though as the solid fins are too thin to be workable. It was bad enough on a 1/32 version. -
1/48 Eduard F-15C - 65AGRS - In-flight and lit up.
Richie B replied to Richie B's topic in Work in Progress - Aircraft
OK, the intakes on the Academy kit are pants. Maybe the designer thought we modellers needed a challenge so they added extra bits that clearly shouldn't be there and a whole raft of butt-joints that just don't. Seamless they are not. Also, there is the question of painting them as the colour goes from fuselage colour (in this case Air Superiority Blue) to an off-white. To help solve this I decided to glue the main intake trunking together then saw them in half where the paint changes colour. The front parts were then painstakingly put together with plasti-card reinforcement tabs then gap-filled and sanded, filled and sanded, filled ... etc. Oh, and did I mention the large number of sink marks on the intake walls? To paint the intakes in this fashion also means not constructing them in the manner Academy would like but I figured that since they'd made such a hash of the design it made no sense to do it that way anyway. I also glued in the undercarriage doors which were a remarkably better fit. With a fair bit of work, patience and sanity checks, they are finally coming together. The rear part of the intakes was less troublesome but the fit still less than desirable meaning more filling and sanding joy. Luckily this area is far less visible. The tabs on the front were added to help alignment when I glue them back together. And to think that most of the time you won't even be able to see down the intakes!- 29 replies
-
- 2
-
-
- 1/48
- F-15C Eagle
- (and 1 more)