

Suddensky
-
Posts
210 -
Joined
-
Last visited
About Suddensky

Recent Profile Visitors
2,739 profile views


Suddensky's Achievements
")
Established Member (3/9)
717
Reputation
-
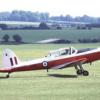
The latest in an irregular series titled Aircraft my wife's dad flew, this was my first biplane since the silver Airfix Gladiators of my misspent youth, and my first ICM kit. And what a great kit it is; fabulous fit, no real issues, and truly brilliant transfers. Highly recommended, and nice to have a bit of colour among all the greys, greens and browns. Went for the factory fresh look, which is unusual for me, and very relaxing it is too, although I chickened out of adding the rigging as I didn't want to mess up the paint job. Painted with Xtracrylix (yellow), Vallejo (red) and Tamiya (blue rudder, which is blue, honest). Anyway, thanks for looking and on with the next one, the Trumpeter 1/32 P-38... wish me luck. Regards, Peter
- 2 replies
-
- 16
-

-
Ha! Thanks! Yes, good spot... fixed now. Masking now removed!
-
The latest completion, I'll probably revisit it at some point and add a bit of weathering with oils etc, but for the moment I just wanted it done, it all just felt a bit 'meh' towards the end. Not the finest from Trumpeter, but far from their worst, with some lovely little touches like the hollowed out gun barrels and exhausts. The fit was pretty much OK throughout, but the undercarriage was tricky to align and very flimsy. Painted with the usual mix of Vallejo and Xtracrylix, and the first outing for the AK Green Putty, which I seemed to get on pretty well with. Would not rush back to one of these, I've got the Eduard Profipack E-7 Trop and the ZM G-14 in the hoard, which I'm very much looking forward to for when the urge for a '109 descends upon me again, but for now I'm happy to see this off the bench and replaced with the next victim, the ICM Stearman. Thanks for looking, Peter
- 5 replies
-
- 12
-
-
Yes, the AK heavy chipping stuff, it works pretty well and is not too sensitive when you reactivate it.
-
Nope, just the etch ones from the kit. Didn't have any spare HGW cloth ones!
-
What an absolute belter of a kit, and a genuine pleasure to build. Honestly don't think I could find a fault with it if I was asked to. Painted with Xtracrylix and Vallejo, and had a blast going to town on the weathering, with a light wash, pigments, and AK and Mig effects. Thanks for looking, Peter
- 9 replies
-
- 27
-
-

-

-
An absolute corker of a kit all round, and I'm greatly looking forward to their Hurricane. Had a slight issue with the transfers, but I think it might be something to do with the fact that my bottles of microsol/set are positively ancient. Does that stuff lose it efficacy over time? Also, forgot to take any proper pics before giving it to a friend, so these will have to do. Best, Peter
- 6 replies
-
- 24
-
-

-
-

Kotare 1/32 Spitfire MkI (early)
Suddensky replied to Suddensky's topic in Work in Progress - Aircraft
Evening all, and back too it, with masking... lots of masking... Which turned out OK overall, not unhappy with it. Started on the weathering, beginning with the paint chipping on the wing roots. Managed to stop before I did too much, which is unusual for me. The AK chipping fluid did well here. And that's where the photos stop I'm afraid, not much to miss though, just sticking on the exhausts and fiddy bits. Shame to not record the rest of the weathering though, I enjoyed doing the oil streaking on the undersides, and the some oil wash panel lines on the around the place, before finishing off with some pigments. Plenty of pics of the finished thing though. And that's about it, thanks for looking, and on with the next one! Best, Peter -
Kotare 1/32 Spitfire MkI (early)
Suddensky replied to Suddensky's topic in Work in Progress - Aircraft
Well once the cockpit was done, things escalated pretty quickly. I managed to mess things up a bit by fitting the cockpit walls to the completed cockpit when I should have added them to the fuselage halves and then closed things up. I'm pretty sure this is what put everything just ever so slightly off in terms of fit when I joined the fusealage together. Not enough to be a real problem, but definitely enough to be irritating. Then on to the wings, with the black and white wheel wells as presecribed in the instructions. I can't quite get my head around how the undercarriage will fit into the wings at this point, but I'm pretty sure all will become apparent in good time. Then it was time for a bit more of the sticky stuff, and here we are. Truly fantastic fit all round. I used one of the redundant canopy options and side hatches as masks, and went in with the Citadel primer followed by some pre-shading and some dull aluminium for chipping later on. Then got on with the undersides: And made a start on the camoflage: And that's about it for now, hopefully back soon with some more painting. Thanks for looking, Peter- 4 replies
-
- 12
-
-
-
Afternoon all, thought I'd document the process on this one as I've been very much looking forward to it. Will be gifted to a friend upon completion (although he doesn't know it yet). I'm in danger of running out of space for completed models until I figure out a suitable wall mounting mechanism, so as I near the end of each build, I'll send pictures of my stash to an unsuspecting chum or family member under the guise of 'Hey, you get to decide what I build next', then make them accept it upon completion. Nobody has turned down the surprise gift of an unasked for plastic aeroplane yet, and it means I get to keep building, which is important. The accidental purchasing at the last Telford got a bit out of hand, so I've imposed a moritorium on kit buying until one of three conditions are met: 1. I have just five unbuilt kits left, or 2. HKM releases their 1/32 B-26 Marauder, or 3. An injection moulded 1/32 Me410 appears. I've allowed myself one wild card exemption just in case I find an Airfix 1/24 Hellcat or Typhoon anywhere, but apart from that, its just aftermarket and consumeables in the shopping baskets. Anyway, enough waffle and on with the build. It seems that anything which can be said about the kit, has already been said, and sprue shots have been pored over in forensic detail, so I'll give that bit a miss, except to say that it's an absolute belter of a kit. Immediately ran into a problem, as the new version of my trusty Halfords grey primer is, to say the least, somewhat suboptimal... Fortunately there's a gaming/miniatures shop just up the road, so I availed myself of this: Which I think TBH is a bit better than the original Halfords stuff I've been using for decades. With that mild irritation overcome, the first step was drilling. Lots of drilling. And then on with the cockpit; I cut out the transfers to reduce the carrier film, and was pretty happy with the results. Found a tiny bit of etch in the spares box for this, not entirely sure what it is, but the transfers are phenomenal. Things came together pretty quickly, although the very first thing I glued together I managed to put upside down. And all the subs ready to go. I went with the HGW belts as usual, fiddly as hell but a great product. And it builds up into this. The kit really is rather good! And that's about it for now. More soon I hope, as there really aren't many bits left once the cockpit's done! Thanks for looking, Peter
- 4 replies
-
- 13
-
-
-
This had sat in the stash for years, so long that I don't actually remamber buying it; so as part of my dedicated stash reduction exercise, it had to get built. The kit goes together pretty nicely, but this was only ever going to be about the distressed winter camo, which I'd never attempted before, with star player being the AK worn effects chipping fluid, which performed flawlessly. Completely OOB (I even used the kit's etch seatbelt), it has a lovely engine to build, but could I get it to fit in? Not in a month of Sundays. Still, not entirely displeased with the overall outcome. Thanks for looking, Peter
- 1 reply
-
- 16
-
-
Genuinely thought I'd be wrapping this one up tonight, but the best laid plans and all that. Decided to keep the weathering very low key in the end. I've recently bought a job lot of new and part-used weathering products, including Mig and AK washes, staining effects and pigments, so had a bit of a play with those. Used a fuel stain effect around the filler caps, but I'm not sure I mixed it properly as it dried quite thick and shiny, but not the end of the world. Then tiny amounts of engine grime around the nacelles, followed by some oils for leaks and streaking, and then airbrushing on the exhaust stains. Used an earth pigment where the wheels would throw up dirt, and around the wing roots where there would be heavy foot traffic. Did the soot around the gun and ejector ports with smoke pigment, it gives you a great amount of control. All in all I wasn't feeling too bad about things up to this point and stuck all the sub-assemblies together. So just the glazing left to go. I mean how hard could it be? After all, I've got the Montex masks right? Well it turned into an absolute nightmare. It was my first time using the black vinyl Montex product and I'm not sure I'll be rushing back to them as the adhesion wasn't great. Also my first time using internal masks, and once again I ran into issues trying to get them lined up with the exterior ones around the framing. I'm not really complaining about the product, it's more like catastrophic user error. This was all compounded by failing to mask the insides of the side portions of the windscreen, and in trying to clean it off, managing to snap the whole thing in two. At this point I took a breather and ordered a set of clear sprues from Revell, I wonder how much they'll want for those! I hate leaving things half finished but really wanted to move onto the next project, so stuck the canopies on with pva so I can get them off easily later, and took a couple of pics for the record: It's such a monstrous testament to my idiocy that I found it actually hurt my eyes to look at it, so made a start on knocking up a tarpaulin to shield the world from the offending area. I'll give it a couple of days to set before I paint and weather it, but in the meantime I feel I can legitimately get started on something else. I'll let you know how things turn out. If the cost/benefit of the replacement sprues doesn't work out, I'll just stick with the tarp. Thanks for looking, Peter
-
Well it's been a while, but considerable progress has been made. The engines were built and weathered, the only issue being trying to fit the long brown pipes: In the end I decided to omit them rather than damage the existing work, as everything would be covered up anyway, but despite this, I was pretty pleased, which in retrospect turns out to have been a bit of a shame: Exhausts, undercarriage and wheel bays swiftly followed: And I was feeling pretty good about the whole thing (despite that seam line)... Which turned out to be misguided when I tried to fit the nacelles and panels. As @javlin commented earlier, there's a bit of an issue with the fit. I kind of get why the kit's designers have made it so complex, and have so few solid connection points, I suppose they wanted to give the closed or open options in order to show off the rather nice engines. But trying to get it all closed up neatly is a nightmare, and some of the panels just plain don't fit. In the end I removed the exhausts and resorted to chopping off quite substantial bits of the engines and bearers in order to get everything anywhere near aligned. I'm not one to normally blame a kit for things not going well, but I'm certain I genuinely didn't do anything wrong up to this point. Anyway, I must have got a bit cheesed off because I stopped taking pictures until I'd stuck the wings together and got them primed, followed by some Vallejo dull aluminium for the chipping (and my first use of AK chipping fluid, more about that later) and then pre-shaded everything. In the end the nacelles don't look too bad, and removing the exhausts definitely made painting easier. The colour coats went on nicely, but I wasn't as neat as I might have been with the Montex masks. I think it's the first time I've used masks for the German national insignia and had a bit of trouble getting all the various bits aligned. Also, the Montex set was specifically for the Dragon boxing, so the crosses and ID codes don't match with what Revell provide, but I think I can live with it. And as you can see, I had a bit of lifting when I removed some of the masking on the wings. The AK chipping fluid worked very well (perhaps too well), and rather than trying to fix the light grey, I opted to extend the chipping/wear inboard. And for once I don't think I overdid it, which is unusual for me. Wheels and props are done, and I'm nearing the weathering stages, which can always go either way. Anyway, thanks for looking, Peter
-
Thanks, I'll look out for that. Looks like I'll need to pre-paint some of the outer faces of the nacelles and panels, due to the size of the exhaust stacks.
-
Having just finished the Revell P-39 (ex- Special Hobby), I fancied something a bit more... predictable, so went for this, the Revell (ex- Dragon), Bf110 C-7. Picked it up quite reasonably at the Farnborough show a few weeks ago, but realised quite quickly that it had to be built pretty soon because it didn't fit neatly into the hoard, as the box was enourmous and really tatty. Not sure where Fred was when I took the pic, he's usually there for scale. The plastic looks fantastic, and I'm greatly looking forward to the build. Some minor enhancements have accidentally arrived: Fantastic value in these two sets. The Montex pack has everything you need for the painting, and the HGW set has belts for two aircraft, so six seats in all, leaving three left over for future '109s or similar. Decided to try to follow the instructions faihfully this time, so started where we often do. In a glorious revelation I read somewhere about using PVA for putting the belts together rather than CA, it genuinely makes things so much easier. I've never got on well with instrument panel transfers, but the etch set for this was an unjustifiable investment, so tried to make the best of it. Cut them all out individually and doused everything repeatedly with Micro-Sol. Looks a bit better in situ: Started on the floor and walls, working on the assumption of hard times on a dusty Eastern front. Not sure what caused this cracking (or shrinking?) of the colour coat. Someone at my local club suggested it might be too much hairspray, which seems to make sense. It's a pretty blunt instrument and I remember it going on very quickly and pooling. Not the end of the world, but must be more careful with the more visible areas. The belly cannon build up as a lovely little module. As do the nose machine guns. And suddenly it all starts to come together... Buttoned up stage one: And stage two, with the fuselage: The instructions would have you attach the port cockpit wall to the inside of the fuselage and then join that to the rest of the cockpit, but I'd recommend fully enclosing the cockpit and then joining the fuselage halves around it. Great fit so far, no problems and looking forward to getting on with the engines. As with the cockpit and gun bays, nothing extra will be added as I'll have it all closed up at the finish. Also, I really must get a wriggle on with getting through the hoard, as I still seem to accumulate more than I make. Plus, in a genuine coincidence of staggering beauty, we are spending the weekend with friends about 30 minutes from Telford, so that's my Saturday morning sorted. My shopping list so far reads: nippers, sprue, x 1, so should be a pretty cheap day. I'll take all my pocket money though, just in case I accidentally see the 1/32 HKM A-20... or other things... Thanks for looking, Peter

