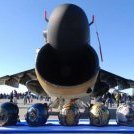
nikos Posted December 1, 2020 Author Share Posted December 1, 2020 The front window entered. Minor defects from the painting were corrected. Two pairs of thin sheet of aluminum soft drink were placed in the front intakes. The kit does not have them. The motor shafts were glued to the propeller bases. Fortunately, the strong gluing succeeded without leaking glue to the motor shafts. Terminals were installed in the cables. Because this aircraft has a larger wheelbase than the rest and so the wooden tram that I have for an airport runway representation would like to be pierced from the beginning, I decided to put cables with terminals. The rest of the aircraft I have the terminals are mounted on their wheels. The styrofoams at the ends of the wings protect the SMD leds lest my awkwardness damage them and then no repairs can be made. The SMD leds of the wings are glued with fine gluing and with bare very thin cables. Because they come from the inside of the wing and then outside from the bottom to be glued to the edges, in order not to short-circuit the glued from below with insulating tape which was painted in the color of the lower surface of the wings. Link to comment Share on other sites More sharing options...
nikos Posted December 1, 2020 Author Share Posted December 1, 2020 1 Link to comment Share on other sites More sharing options...
nikos Posted December 2, 2020 Author Share Posted December 2, 2020 For the presentation of the aircraft I made a wheeled elevated workbench for engineers from thin wire. Of course, to protect them from the Mediterranean sun, I added a beach umbrella made of wire and colored strips of insulating tape. The staircase will also serve as a decor. It also takes a little humor to lighten the "rational" modelist dogmatism. 3 Link to comment Share on other sites More sharing options...
nikos Posted December 4, 2020 Author Share Posted December 4, 2020 1 Link to comment Share on other sites More sharing options...
nikos Posted December 6, 2020 Author Share Posted December 6, 2020 Link to comment Share on other sites More sharing options...
nikos Posted December 7, 2020 Author Share Posted December 7, 2020 I think it FINISHED 1 Link to comment Share on other sites More sharing options...
nikos Posted December 7, 2020 Author Share Posted December 7, 2020 Link to comment Share on other sites More sharing options...

Recommended Posts
Create an account or sign in to comment
You need to be a member in order to leave a comment
Create an account
Sign up for a new account in our community. It's easy!
Register a new accountSign in
Already have an account? Sign in here.
Sign In Now