


Neil Lambess
-
Posts
279 -
Joined
-
Last visited
Content Type
Events
Profiles
Forums
Media Demo
Posts posted by Neil Lambess
-
-
I thought I would post a teaser picture for now as ive hit a couple of snags , firstly I discovered the kit is missing two sets of Airbrake interiors....... (doh!) and Ive slowed right down on the fiddly fit of the open canopy and detailing its interior (not a lot of reference around on the net )
it will probably be nearer christmas before Im done and i dont want to keep you all waiting
but on a more positive note , the Decals snuggle down nicely , and im happy with the paint job . I belong to the school that says there is no such thing as a perfect natural metal finish, so i tend to weather and tone them down quite a bit. pictures of the real thing show a large amount of fuselage buckling and denting along the welding joints and rivet lines. My favorite method for giving the impression of this effect its to use Tamiya Metallic Grey (which as the name suggests is a very flat dull aluminium colour) and paint thin slightly wavy vertical or horizontal lines along the panel joins or areas that appear buckled. The Tamiya paint gives a nice subtle contrast effect that changes with the angle you hold the model (the dark vertical lines on the tail are exactly the same shade as those on the wings and fuselage , as are the ones on the ailerons which should give you some idea of how the effect varies with the light)
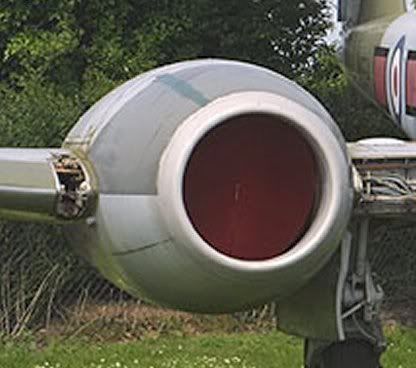
one slight problem with the kit concerns the blow in doors on the intakes. Pro Resin molded both rows of these shut , but the first row always appears to be open on the real Aircraft. On my model ive just painted the first row black as it would be an extremely tricky fix (I did think about cutting a trench on the intake , adding platicard walls and seperate intake doors but you would still have the problem of a solid rear wall as the intake molding is a big lump of resin at that point. ) As it stands the intakes are a beautifuilly cast item with nice interior detail so i left them as is.

-
Still plugging along !
Heres the cockpit ,mostly complete, the ejection seat appears to be missing its back cushions...(as does the Cosford example) , so ill need to sort that out and add some seat belts
The instrument panel comes up nicely with some drybrushing and a few spots of colour. you will note i also have to scratchbuild a control column to replace the original that appears to have eloped with the Carpet Monster
and Finally ive got the Flaps on ! , dont feel bad about the earlier Flap confusion guys, its a VERY unusual wing shape
I hope one more coat of paint and itll be time to do some subtle weathering and decalling....... (as long as I can resist the urge to put it in International Rescue colours !)
-
Im having so much fun building this kit, I just cant stay away from it....! I may be suffering from the opposite of Advanced Modellers Syndrome...
zipping along today ive added the outer wings (decided to cut the ailerons out to make things more difficult for me later on)
Then i added the tailplane unit , seperated the Rudder , and to really temp fate the nose pitot unit (which comes molded as one piece with the nosecone....on reflection i think this is a very good idea as it makes the pitot stronger than if it had been a seperate part . To prove this i immediatly dropped the whole model onto a concrete floor seconds after attatching the pitot and to my utter amazement the thing bounced !
not a scratch or resin chip on it
probably wont post an update for a few days as im now into the tedious " sand ,paint ,polish then repeat" phase of natural metal finished aircraft modelling
although in saying that ill try to avert insanity by detailing the cockpit , the seperate air brakes and the undercarrige so stay tuned!
-
Thanks for the kind comments guys , Ive built a few resin kits , mostly Anigrand experimentals , but this is the first Olimp/Pro resin ive had a go at. and its definatly a top notch and well thought out model
anyway after painting it with my own mix of humbrol metalcote (aluminum and steel mixed together) i spotted a few more surface imperfections, but managed to deal with those and bung the engines on tonight.
then the thought struck me that if you added wheels to the real one , you would have a good chance at cracking the land speed record.......at least Mach 1.88
I forgot to mention that the kit is of the second prototype , the differences been the fire extinguisher bulges under the engines and the parachute in the tail cone. it wouldnt be too hard to convert it to the first
airfame, (basicly just scratchbuilt the extenal chute housing it was fitted with)
it also features some of the finest rivet detail ive ever seen on a model
-
Ive been waiting for the Olimp / pro resin release of this little beauty for some time, and first impressions upon opening the box were very good indeed
it looks accurate to photos with the possible exception of the rear fuselage taper been slightly "off"
very crisply moulded parts with fine details , but unfortunatly some of the casting blocks were large , chunky and difficult to remove. (particularly those on the engine intakes and exhaust) so be prepared for lots of whittling , carving and heavy sanding......furthermore the texture of the resin in my example goes from soft and spongy to dry and powdery which can make cutting difficult
the biggest challenge so far with this build has been the unfortunate number of air bubbles in the resin, sadly Pro resin decided to cast the parts the "right way up" this means that the air bubbles rise to the top of the fuselage , the top of the wings and the nacelles, for those of us who dont enter competitions, it would have been nicer if the kits molds had been turned upside down so that all those nasty air bubbles would be on the underside of the airframe.
the main fuselage is molded in 4 halves , so I elected to join each front section to its corresponding rear section , rather than glueing the two front halves together this was a wise move as a rather large gap appeared on the underside....... it would have been a disaster if id tried to get a matching join with the other method, so be forewarned !
the cockpit is very nicely cast with raised instrumentation and various bits and bobs, it was nice not having to superdetail and scratchbuild a cockpit for once
Finally after a weekends work its starting to come together and look like the wee beastie currently parked at Cosford.....
the next step , due to the unusually shaped airframe, will be to put a silver/steel paint coat on before the engines are atached to the fuselage as
I really want to make the job of sanding any imperfections out as easy as possible. if you put the engines on first it would be a tight squeeze to do any fine sanding on them....
oh well fingers crossed and hopefully ill put some more pics up in a day or two.
in the photo below note the thin resin fillets protecting the leading edge of the wing, a very good idea by Pro resin
-
I think the nose is fine on the Mach 2 Valiant.
it looks short because the canopy is set too far forward and the engines are way too deep , those two faults create an optical illusion of a short nose...
heres a pic of an unextended nose beside the real thing.....i matched the fuselage depths to get them the same size
note the green lines pointing to the same positions on the real airframe. if you add the Mach 2 Glass canopy front it extends way to forward , creating an optical forshortening of the nose......
Note also that the underfuselage blister is also too far forward componding the short nose "effect"
if we take a picture of an extended nose youll see that its now too long.....
(apologies to lord Melchett)the Mach 2 kit for all its faults does match the Plans in the WARPAINT issue on it.
extending the nose has the same optical effect as shortening the canopy and making the engine intakes shallower, in that the proportions look better, but its actually making the front of the airframe a larger scale than the rest of it.....
-
the Lincoln kit you mention was actually a 1/150 scale kit and I believe the other is a re mould of the same kit. The FROG Victor was never remade or reissued by anyone else as the original moulds disappeared many years ago ( unless someone cloned a production kit).The Lincoln kit is a bit of a hybrid like the Lindberg as it has the short fuselage and cockpit glazing of the prototype and tail of a B1.!!
Almost entirley correct...... the Frog V-bombers molds were shipped to New Zealand and reissued here by Tri-ang Pedigree NZ ltd in a generic "bomber series" box together with the Canberra , one side of the box had artwork of the Valiant /Vulcan and the rear had the Victor /Canberra ...although the majority were released as Frog kits i have seen a couple of Tri-ang labelled boxes....(i believe these were issued for a very small period in the late 60s early 70s so as not to conflict with Imported Frog branded kits which were handled by a different importer....(well thats the story i was told...)
the moulds were eventually sold to Lincoln NZ but never re-issued , the "legend' is that they fell off a ship en-route to Hong Kong , but ive met a ex- traveller for Lincoln who told me they were sold for scrap metal when Lincoln was going belly up in NZ.... along with the DH110 , the English Electric p1 the Scimitar and many many others.......sniff
-
Dylan , That's about it for choice unless you fancy a crack at the rarely available vac-forms made by Nova and Formaplane.
The Formaplane Victor is a dog to build , mostly because its entirley fictitious and you have to build everything from scratch ......IE : they never made one....
the RAREPLANES Victor however was a much nicer kit than the Matchbox..... for one thing the intakes were better !
-
I mainly use The Richard Caruna ones included in the Warpaint book and an old MAP one I've had floating around for a while,
Andy
I HATE to say this but the MACH 2 kits nose matches the Warpaint plans exactly....! (well it does on my example) .its not too short at all according to them
I tend to get good side profile photos off the internet and enlarge them on the computer screen to the size of the kit parts rather than depend soley on plans and one thing this shows is that the kits nose is fine length wise but the front Canopy section is way too far forward (and has the wrong window frame layout)
every other point you mention about the kits faults is definatly correct...... (im still reducing the wing thickness at the engines.....I lined the intakes with plasticard, and have been sanding the undersides away (actually ive been hacking the undersides away with a chisel and then sanding!) and im slowly getting the kit into shape....
I think the nose looks short due to the depth of the engines and the wing root creating an optical illusion , once you correct the wing depth , i really think your nose is going to look too long (dont shoot me!) (a quick test is to vivid marker in the dielectic panels on the nose as the contrast between the black and white areas also throws a visual illusion up making the real aircrafts nose look less blunter than it is
its still alot easier build than the Matchbox Victor as far as correcting the intakes goes...and i have to admit im enjoying the build a hell of a lot more than usual .
finally does anybody have a "true" head on shot of the intake opening?, by that i mean one taken off a ladder directly in front of them and perpendicular to the wings sweepback. its impossible to get an accurate shape for them from any photograph taken from the ground (which is looking up at a 45% angle or from when the aircraft is directly head on in front of you (the wing is then at a 45% angle ) in fact i cant find a single photograph that shows their true shape......
-
not sure those links are workingproperly but this one should
http://s44.photobucket.com/albums/f25/icke...=outerwing2.jpg
-
I didn't think the outer wings looked massively over-thick?
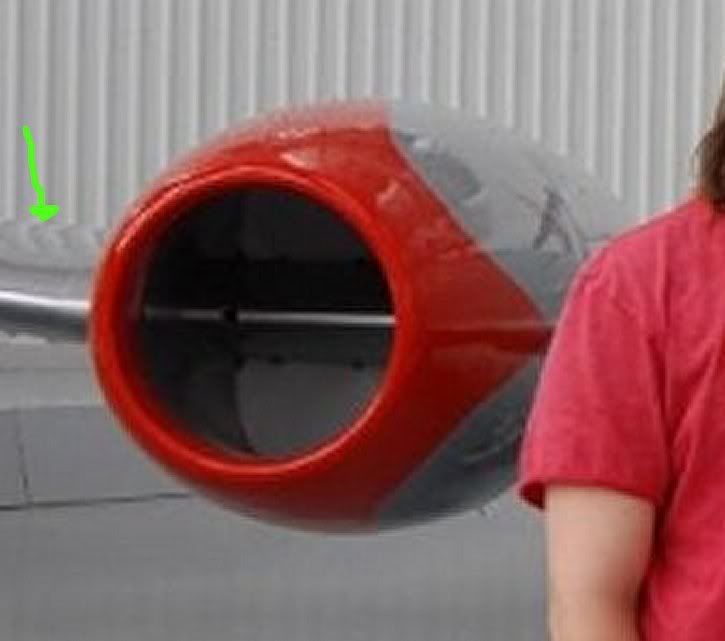
they are in fact very chunky if you look at these two photos.
<a href="http://s44.photobucket.com/albums/f25/ickermeteor_man/?action=view¤t=outerwing2.jpg" target="_blank"><img src="http://i44.photobucket.com/albums/f25/ickermeteor_man/outerwing2.jpg" border="0" alt="Photobucket"></a>
<a href="http://s44.photobucket.com/albums/f25/ickermeteor_man/?action=view¤t=wing1.jpg" target="_blank"><img src="http://i44.photobucket.com/albums/f25/ickermeteor_man/wing1.jpg" border="0" alt="the fat wing"></a>
in the second one note that the green arrow is the top of the wing...... the brighter leading edge makes the wing look thinner than it really is...... also in the first pic notice how high up the side of the engine nacelle the wing curvature goes........


 (apologies to lord Melchett)
HMS Ark Royal 1975
in Maritime Cold War to 1990
Posted
I have Sailor on dvd and have wanted a kit of this for such a long time...... (im not even a ship modeller but would snap it up in a flash)
in fact if Airfix announced an Ark before the lustys released, ill even buy one of those !
(i know thats bribery but i want a 1/350th Ark Royal !)