

Dennis_C
-
Posts
2,076 -
Joined
-
Last visited
-
Days Won
1
Content Type
Events
Profiles
Forums
Media Demo
Posts posted by Dennis_C
-
-
Hey, I'm not forgetting the Lansen after J-21 was done!
Fully completed decal job recently:

Decal sheet included some stencilling as well, but that was so tiny and in black font so hardy recognisable on a model. I'd admit that Tarangus decals were very good quality. Thin, strong, adhered excellently.
I used mr.mark softer for the first time on this model and was quite satisfied. Previously I just used 70% acetic acid diluted about 1:1 with water. This was sometimes too aggressive and had strong odour. Mister Softer is definitely more gentle substance but with similar effect so is likely also acid based. Still have to try that on some less appeaseable decals.
Next steps would be weathering, painting some niche details, and installation of external parts such as pylons, engine, aerials, undercarriage etc.
All the best,
Dennis
-
 4
4
-
-
Hi all,
Some further update on the project.
First of all, Whittle is already primed. Its undercarriage is assembled and enhanced with straps. Clear Prop gave p/e parts for the straps. I managed to set them all right to the front wheel. But unfortunately I lost one yoke from the main undercarriage to the carpet monster. So I scratched these from wire there.
On Vampire I made couple more small edits:
I drilled two holes for aerial on port wing and removed a hole from starboard wing. The whip antenna was located on port wing on mk.I and was only later (from mk.III?) moved to starboard.
That is all for now.
Kind regards,
Dennis
-
4
-
-
Hmmm. Interesting!!! A must have for every Vampire fan
")
-
Hi Wojtek,
5 hours ago, Wojtek Bulhak said:BCI team livery is quite intimidating to make in decals. With masks even harder.
I would probably suggest making masks to cover white painted areas before painting red + a lot of straight thin red decal stripes to makes thin outline around red areas (it would be quite simple to apply these decals parallel to red/white border) + several curved red decal elements for nose area. And standard decals for other elements.
-
Great result given Frog kit and just 3 or 4 days to finish it!
-
Nice to see that the kit is being re-released. But when is the box with Biało Czerwone Iskry decals is coming.....?
-
2
-
-
Hi All,
Time to refresh this thread.
I've finally prepared both Vampire and Whittle for painting.
Standard job is done on Whittle to finish it. Since last time I added tail surfaces, flaps. Did some more sanding, especially in the intake and front wheel bay. Installed canopy as the last step. Also assembled undercarriage. A bit nervous and fiddly job!
Different story with Vampire though. I mostly completed this a while ago and considered that as okay for painting. But then I took it again and hmmm...
Isn't that a helicopter with that many raised bits across?
So what I did - I compared it to some photoes, Airfix Vampire and read couple critiquing articles on this kit. Based on that I figured what could be fairly easy fixes. What is particularly annoying - that is those raised hinges for different doors. They are also present on top side. Raised on the kit these should be flat with fuselage surface in the reality. But since it's just too much - I did not sand them off and left as is.
Basically that's the result:
As you can see I sanded and filled some most prominently questionable details.
In addition I drilled gun openings. I also drilled through the holes for navigation lights from outside and filled in the drilling 'tunnels'. I also drilled a 'landing light' which Special Hobby forgot to provide. My plan is to paint this opening with bright silver and then fill in the hole with Kristal Klear at the very end of assembly.
So that's where the process is now. Let me know if any questions.
Kind regards,
Dennis.
-
7
-
-
Oh - a complete Sea Sprite is a great news! Meaning A/B with only one engine looks a little "incomplete"
-
 1
1
-
-
1 hour ago, Wulfman said:
Three lovely builds, how about a Lightning !
Wulfman
Hi Wulfman,
Yeah - indeed Lightning is the #1 twin-boomer in aviation history! Probably followed by Cessna Skymaster or was the Vampire second?
And in fact I have a Lightning in my trophy list. Nuance is that it was assembled probably 30 years ago from an ex-Frog kit, was not painted (though at some point it had paper red stars and number codes sticked with pva glue!) and survived several air battles over by bedroom
It still does not look too bad. Maybe I should either restore it or buy a newer and better one...
-
1 hour ago, John Masters said:
Nicely done. I have this kit as well and look forward building it. I'll peruse your WiP to see how it went.
You're always welcome to the WIP and let me know if you'll have any questions.
In fact I would not say construction was challenging. Dry-fitting is a must of course.
Special attention to main wheel bays as they are tricky. There are no pins or guides that help to align interior sections. But making sure those bits are attached symmetrically is crucial to sit your model parallel to the ground. And I also figured reinforcement with plastic pieces from inside the wing and boom is important to ensure those inserts do not detach.
Also now I see that a better exhaust is a good idea. The SH provided one is too shallow. Do not look realistic at all which is perhaps the weakest aspect of the whole model. Something should be done there too.
Kind regards,
Dennis
-
 1
1
-
-
19 hours ago, TheyJammedKenny! said:
Everything looks exactly right with it, including the very subtle grease and rain streaks from forward to back along the fuselage and wings.
Thank you, Alex.
I find that such streaks look more realistic. And this allows to better highlight moving surfaces than e.g. typical preshading of panel joints.
-
1
-
-
Excellent execution and incredible result with decals!!!
And strangely with blue base colour it looks very Su-30ishly! At first I did not realise it is a twin stick Eagle rather than Sukhoi
-
Thanks everyone for nice words and appreciation!!!
7 hours ago, Doc72 said:Collecting twin-boomers also is a nice idea.
Yeah, there is something about these beasts. They're surely making a difference in a cabinet. Just make sure you have enough lead in the nose!!!
47 minutes ago, Pyradus said:the photoetch and resin wheels add a good amount of delicate detail on this early jet
Unfortunately those times are over, when MPM was putting a decent fret and a handful of resin casts into each box. Now they put decals for instrument panel and sell resin separately

And no-no to masking Fw-189 freehand!!! I challenged Vultee Vibrator a while back. Never again!!!
45 minutes ago, Spitfire31 said:in reality, the J 21R contained only about 50 per cent J 21A parts, and it proved better as a low level attack machine than a fighter
Yeah that is true. Conversion was not simple engine replacement. Hopefully there will be a more decent model of Yak-15 - the only other serial production fighter redesigned from piston machine.
And Tunnan is a B according to Tarangus instruction
-
2
-
1
-
-
Hi all,
Just created an RFI for A21R here
Thanks for looking!
-
2
-
-
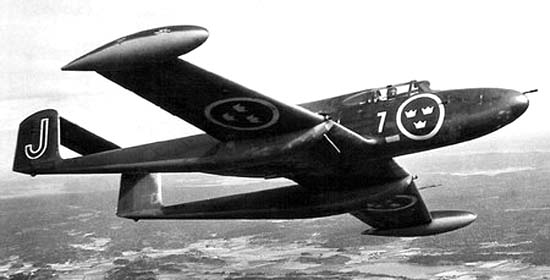
Hi All,
One new jet added into my collection! And this is the one I wanted to add for quite a long time because it's Swedish, it's from early jet age, it has centrifugal engine, and it's a twin-boomer. So win-win-win for me
J21R was not super successful or super numerous aircraft. Neither it had a super long career. However this stands among those first generation jets that opened jet age for pilots and engineers in their native countries. I have a soft point to that era of aviation so very glad I now added this jet to the collection.
I had a thread in WIP section on this project so there are some insights on construction.
In general I did not find construction process too challenging. Even alignment of booms was not complex. Decent Czech short run with only reasonable dry-fitting required, nice perks in the box such as resin wheels, rich PE fret. In fact this can be called an OOB build as only contents from SH box were used except for manually added pitot tube (the kit's one was super-thick) and also an antenna on the starboard wing made with fishing line.
Paints used for the scheme are Hobby Color H309 for green and H53 for grey. The scheme I used is for F7 Såtenas wing circa 1953-54. As far as I understand this was a fighter-bomber wing and J21Rs of that wing would normally be armed with gun pods or rockets which was making them A21R really.
J21R is definitely not the most ordinarily looking aircraft. And honestly I was not perceiving this as 'beatuful'... But after putting this on wheels and placing it on the shelf - WOW! It is actually a very appealing bird! Look at these a little more 'artistic' photoes:
And finally there are some group shots. With another Swede in my collection:
...with it's British stablemate
...and full collection of twin-boomers from my cabinet
Hope you liked it!
Kind regards,
Dennis
-
36
-
-
Hey all,
Finished A-21R today. Let's call it A-21 after Toad has been installed
Several photos in the cabinet that I did on my cell phone camera under the electric light. Will later treat it with a decent photosession to post into RFI. One photo is with the younger brother - J29B.
Sprayed it today with satin micro finish. Installed the gun pod and added antenna on the starboard wing made of fishing line.
Next is the Lansen to be finished!
Cheers,
Dennis
-
5
-
-
1 hour ago, Christer A said:
Filling that little hole won't be a problem for someone who managed to fit those tiny tiny etch-pieces!
Great find though!
Already filled. Not perfect as I wanted to minimise damage to surrounding paint but that's offset with beauty of the new pitot from brass tube and wire
And now I have a plastic stick to use as a 30 mm caliber gun elsewhere😉
-
2
-
-
Some further work with J-21
All is on picture...
Kit has a hole for pitot on the wrong side! Compare to actual photos.
http://www.airwar.ru/image/idop/fighter/j21r/j21r-5.jpg
And even instruction shows it correctly on the port side:
Blind me... Okay. Some delicate sanding and very delicate brush painting now.
Cheers
Dennis
-
2
-
-
Hi,
While my Lansen is approaching the decalling stage, I spend couple last nights killing my eyes with this:
This is a rare example where undercarriage doors are supplied with microscopic p/e hinges. Some nervous job and of course carpet monster took its tribute! One of the L13 parts was lost... bit since it should have been somewhere under the gear no one will know
I'm not yet 100% done but the intermediate result is below:
Couple pe bits have to be added yet but overall seems not too bad so far.
I was lazy to make a new pitot. Still kit's one is a bit machinegunny in size. So this is not final stage yet probably...
Thanks for looking!
Dennis.
-
4
-
-
Before...
And after
Wraparound painting with a single colour isn't fast but done after all! And I like a lot how it turned out. H309 for green FS34079 diluted with white. Same colour as on J-21R. Unpainted aluminium leading edges probably are a little wider than they should be but I like how this looks which is probably most important. Still have to cover the airframe with varnish.
Regards,
Dennis
-
7
-
-
Agree. Per what I know Academy's P-38 is the best in class. Probably Hobby2000 just do not have that relation.
-
Hi @Bob Hsieh,
A very interesting subject and from an "interesting" kit! And great work on improvements so far! T-34 (airplane, not a tank!) deserves a better kit in 1/72...
Cheers,
Dennis
-
1
-
-
Hi Terry,
On 31/08/2021 at 10:29, Terry1954 said:I love the way you have detailed the J32 wheel bays. Your work on the rear of the port side bay looks very similar to what I am doing. I had considered re-doing the whole bays completely, but your work has convinced me that repairing that part looks fine!
This is how wheel bays look like after aluminium painting.
Silver painting revealed couple places where I did not clean excessive glue, but otherwise looks fine.
Regards,
Dennis
-
4
-
-
1 minute ago, Bill Bunting said:
Oh boy I guess I should repaint the spinner. I think I will go with MSG and PRU. I like that combination.
Now where's that tape?
I liked MSG and white
Looks great. Try that if you find MSG+PRU not best!
-
1
-


1/72 - Dassault Mirage F-1 family by Special Hobby - F-1B/C/CG/CE/CH/EQ/ED/AZ/CZ released - Heller F-1B rebox
in The Rumourmonger
Posted
Have Special Hobby ever issued the B version as a separate box? Or was that only within duopack?