


DJJunis
-
Posts
608 -
Joined
-
Last visited
Content Type
Events
Profiles
Forums
Media Demo
Posts posted by DJJunis
-
-
Excellent Russ! Very well done!
-
 1
1
-
-
These are absolutely AWESOME! Very well done.
All the best!
Don
-
1
-
-
All,
Unfortunately due to life getting in the way I am not going to be able to continue with the group build. When I do have time I will be building the B-17 but it certainly will not make the date for the GB.
I will put in-progress picks up as I go when I can.
All the Best!
Don
-
 3
3
-
-
On 8/6/2023 at 5:34 AM, Trevor L said:
I'll pull up a chair for this one.
I have this kit, but I've been wary of starting it as bombers are not my normal thing.
Good luck with the build.
Thank you Trevor! Well it has not started well as one complete sprue is missing from the kit.
I have contacted Airfix and surprisingly they do not have the sprue available even though the
kit is in their catalog. Very disappointed to say the least. I will have to sacrifice another kit
for the parts.
-
1
-
-
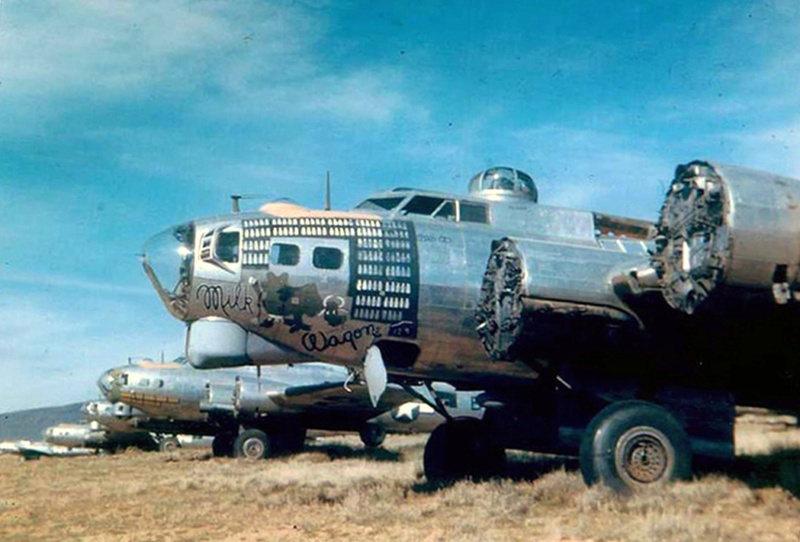
On 8/10/2023 at 12:22 PM, Snafu35 said:
Hello DJJunis,
This colourful B17 will make a great addition to your collection!
This colour photo shows the chin turret in Neutral Grey. This will add extra character to your flying fortress.

This photo was taken at the Kingman depot in Arizona. Milk Wagon was stored there until its destruction. The aircraft was struck off the register on 21 November 1945.
To Trevor L: You should go ahead and take advantage of this group build, which is an extra motivator.
Regards,
Eric-Snafu35
Thank you Eric! I do have that picture but always great when folks are enthusiastic about a build.
All the best!
Don
-
3 hours ago, vppelt68 said:
Welcome! V-P
Thank you V-P!
-
-
Absolutely lovely very well done!
All the Best!
Don
-
V-P,
Could you please add me to this group build please.
Thank you!
Don
-
 1
1
-
-
WOW tremendous Russ...well done!
All the Best!
Don
-
1
-
-
Magnificent Tom! WOW...just freaking awesome!
All the Best!
Don
-
1
-
-
David,
Your IL2 looks fantastic! You got through the really difficult part so I have confidence you will get done . If not for the GB I am sure shortly after. Well done!
All the Best!
Don
-
Hello,
Here is my completed IL-2 M3 from Accurate Miniatures. It was quite a handful.
All the Best!
Don
-
39
-
-
Hello All,
Completed the IL-2. I am so glad I got through it. Next one I do will be a Tamiya one.
Hope you enjoy the pictures.
All the Best!
Don
https://i.imgur.com/PZr1OuC.jpg[/img
-
6
-
-
Hello All,
Here are some updated pictures of the IL2 and a surprise guest appearance by another ground attack stalwart used during the same time period. The IL2 is now officially in paint..the underside color is on. Using MIG acrylics as well as Vellajo. It took a while to get this one to paint. But it is there now and feeling pretty good about it. Most of the remaining parts have been cleaned up and ready for paint also. Hope you enjoy the pictures.
All the Best!
Don
-
4
-
-
3 hours ago, Col. said:
This one looks to be coming together nicely now.
Thanks Col.... it is actually. Rather pleased with it now. Wasn't feeling good about it for a while as you have to make sub assemblies that HOPEFULLY fit together. They do ..eventually..lol.
I also had thoughts about starting something else...because I am of Lithuanian heritage and the Ukraine situation is very close to my heart in all honesty. So I set it aside for a few days then some friends
told me to carry on as it is history not now. So here we are. Nearly there will be working on the canopy to get it to the point of putting some color on it.
Thanks for the kind words.
Don
-
4
-
-
That looks brilliant! Well done!
All the Best!
Don
-
1
-
-
Really excellent modelling!
All the Best!
Don
-
1
-
-
Good Day All,
Here are some pictures of the IL-2. The landing gear pods are not cemented yet. Overall the parts fit very well and the seams are good but as I pointed out clamping and such is difficult.
But enough of that ..on with the pictures. I hope you enjoy them,
All the Best!
Don
-
8
-
-
On 2/24/2022 at 2:44 AM, djktrumpet said:
Looking very nice so far! I'll follow along, as I'm building the same kit.
David,
New pictures will be up tomorrow. Much work has been done. It is not the easiest of kits I must say that. But it looks the part.
A couple of points.
1.) Followed the directions explicitly. If you don't you may have fit issues.
2.) Make sure the front cowl assembly lines up at the wing fillet areas. I had to trim down the oil tank..which you cannot see anyway
to ensure free movement for lining it up.
3.) The fuselage halves were warped at the front so I took my time cementing them, I used CA and quick drying Tamiya cements starting at the oil tank.
4.) After the fuselage was assembled I cut off the mass balance on the rudder..because it got in the way and I know I would break it off anyway.
5.) I saw the lower fuselage seam through the gunners station so I covered it with a piece of plastic.
6.) The cowl parts are extremely thin and care must be taken to line everything up. I used tape to put it together then used the Tamiya cement
and finally CA to lock it all together.
7.) I put some support strips on the lower wing at the wheel wells to support the joint of the outer wing panels to the inner wing. that worked really well
as I was able to achieve a very good joint with the Tamiya cement and no clean-up required.
8.) I did use parts of the Eduard set...it's not worth it at all. The instrument panel is not the correct color and the kit part probably fits better.
My biggest piece of advice is to again follow the directions especially when assembling the fuselage. It is also difficult to clamp some assemblies
so I ended up holding them...hence the use of quick drying cement and CA.
As a side note I tried to use Mig/Ammo interior grey green on the interior. It did not work well at all....I used no thinner as it was for airbrushing. It really never dried properly
and it turned out like a semi gloss. So I went back to find the equivalent of my trusty Vallejo with a Tamiya grey as a primer and it's perfect.
All the Best!
Don
Don
-
3
-
-
Very nice!
All the Best!
Don
-
Well done Steph! These pictures are great too!
All the Best!
Don
-
1
-
-
Very well done!
All the Best!
Don
-
Thank you all the the encouraging comments. Much appreciated.
Don


Supermarine Spitfire Mk VIII, 457 Squadron, 1st Tactical Air Force ( RAAF ), Netherlands East Indies, 1945
in Ready for Inspection - Aircraft
Posted
Very well done Russ! Excellent!
All the Best!
Don