

Scott Hemsley
-
Posts
640 -
Joined
-
Last visited
Content Type
Events
Profiles
Forums
Media Demo
Posts posted by Scott Hemsley
-
-
Quote
Also, does anyone have any idea of the accuracy of the long range belly tank that comes with said kit?
I believe you'll find that "long-range belly tank" is actually a gun pack that was fitted to 418 Sqn. Boston's in the later part of their career with the squadron. but I see how such an assumption can be made just by its length and the overall shape. The gun-pack housed 4x 20mm Hispano cannons and by some squadron accounts, started appearing on squadron aircraft, mid-late '42.
As for it's colour, same as the underside colour.
Scott
-
 1
1
-
-
There's a larger version of the OP's small photo that he included in his initial post and those roundels are definitely RAF as opposed to the reverse colours of the French roundel.
Scott
-
 1
1
-
-
Quote
stevehnz wrote:
The more I look at the linked photo I start to wonder about the spinner colour too, it looks very dark against the red in the markings & shark mouth, but afaik, red was stipulated for the Desert Air Force so unlikely to be any other colour? 🙁
Any ideas anyone?
Just drawing at straws here, but could the spinner colour be Dk. Earth? That's not without precedent as there are colour(ized?) shots of some Spit VIII's in Sicily./Italy with Dk. Earth spinners while still retaining the desert cam carried in N. Africa. Certainly in at least one of the 112 Sqn. photos in the link posted above by Mark Harmsworth, the spinner looks remarkably close to the adjoining camouflage colour on the cowling - which would happen to be Dk. Earth.
Scott
-
FWIW, 405 Sqn. was attached to 4 Grp during 1941-42, based in Driffield, Pocklington & Topcliffe, Yorks.
Scott
-
1
-
-
Granted photo coverage of the Mk.II are few and far between compared to the other versions, but they do exist. One thing to remember though, not all Mk.II's had the waist positions (usually assoc. with the Mk.III) and while the kit provided insert is generally a good fit, it does require some filling along with some careful sanding to maintain that fabric-covered surface.
Also in addition to the Polish squadron mentioned by Ossington 2 and the two RAF squadrons mentioned by Paul Lucas, the RCAF used them as well with 405 Sqn. (LQ codes), May 41 - Apr. 42.
Scott
-
2
-
-
I just checked the site to make sure he still offers them, but Belcher Bits does a set of 4 Merlin's for the Tamyia Lancaster with both covered and exposed exhausts.
Scott
-
1
-
-
Squadron still list vac transparencies for the Academy/Minicraft kits under the 'Squadron name' on the Falcon Models site.. Scroll down the list until....
[9162 1/72 Consolidated PBY-5 Catalina (nose turret; cockpit canopy; side blisters) Academy/Minicraft kit]
Scott
-
Words fail me, except to say that this has got to be the best Swordfish build I've encountered 'in the flesh' or online, regardless of scale ... an' the presentation was top notch, too.
")
Scott
-
1
-
-
Maybe slightly off topic, but for those that don't know ... the 'Brengun' C-130J engine nacelles are the former 'Attack Squadron' set. When 'Attack Squadron' ceased their resin operations. 'Brengun' took up the slack obtaining rights to all the 'Attack Squadron' resin. I've got 2 sets of the Brengun (Attack Squadron) C-130E/H nacelles and can attest that the detail and fit - both in terms of assembly and to the Italeri kit, is excellent.
Scott
-
One thing I forgot to mention I discovered when I did my build ... the transparency for the tail light is molded to fit according to the fuselage contour (the alleged 'ill-fitting' light also frequently mentioned in past BN threads).
Scott
-
According to ScaleMates, if you're referring to kit SH72423, A-20A/B/DB-7C Havoc/Boston & the photo of the box contents, you should have nose transparencies covering both the DB-7 Havoc & the Boston III.
Scott
-
Part A18 will provide the correct shape & adding the 'location tabs' on the fuselage side of the join will avoid a straight 'butt' join & provide strength to that join. The most troublesome section of those 'location tabs' was directly in front of the wheel well. Unfortunately, that small section (as I recall) played a critical role in making the transparency hold it's correct shape. I don' think you'd gain anything with a dummy bulkhead except losing any detail that's on A18.
Looking at the instructions of a more recent release than mine (identical, BTW), I was reminded of another problem area. I don't know if they corrected it on subsequent releases, but on mine part A7 proved much too long to fit in the transparency. I wondered if it was meant for the longer transparency of the Boston IV. In my case, the solution was very straight fwd.....
418 Squadron according to their Sqn. history, didn't use a bombsight for their intruder missions. The Mk.I eyeball proved more effective given the low roof-top altitudes usually flown, thus the molded in bomb sight was removed & the front of part A7 both shortened & reshaped. However, there's another mod required to part A7. If you examine the part, you'll notice that the floor covers the small downward-looking glazed panel in the nose transparency. Part A7 needs to have that bit of the floor removed (duplicating the size & shape of the downward panel) thus exposing that downward panel. The two 'crescents' on either side of that cut-out need to remain since that's where the bomb-aimer placed his feet while seated.
The RAF Boston's were fitted with bombsights as they conducted their bombing missions at a much higher altitude. In that case, the bomb sight was mounted on a swing arm attached to the top of the bomb-aimer's port side console. I'm only guessing that it was on a swing-arm else it would imped any effort of the bomb-aimer to enter or exit the aircraft.
One other thing I found odd. The rear canopy (K3) is a single piece. I always thought that they should've provided a 2-piece option if the twin Browning's (G17) are to be deployed. IMO, it made no sense to provide the guns with only a closed rear canopy.
If the guns were deployed, the rear portion of the rear canopy slid back inside of the fixed front portion. When the guns are stowed, the guns are lowered into the fuselage & the barrels are hidden in a 'closed' bay directly behind the rear canopy. When I cut mine to open it up, I had to resort to using the rear portion of a Falcon Clear-vax vac-form to enable the fwd portion of the rear canopy to fit inside the fixed front portion of the kit's rear canopy. With it being intended for the old Airfix Boston (which has a fuselage narrower than the MPM fuselage), it was easy getting the 'moveable' portion of the rear canopy slid into place inside the fixed portion of the kit canopy.
Scott
-
1
-
-
Ever since MPM first issued their 72nd Boston, BM has seen posts re the fit of the nose transparency to the fwd fuselage. Upon opening the kit, my first response (like most modellers) was to remove the fuselage halves & the nose transparency, then proceed to dry-fit those parts, if nothing else than to confirm all the BM posts, but there was one thread (sorry, I forgot the chap's name) that provided a vital clue to solving the problem. Like the OP did, glue the 'floor' of the cockpit assembly to 1/2 of the fuselage (parts A16, A18 & D21). This provides some structure to the fwd fuselage when dry-fitting. Notice the fwd fuselage is a bit 'flared. Now, once the halves are again taped together, you'll likely see a very different gap in the UPPER fuselage.
When I did my Boston (2010 Boston Mk.III "Intruder" release), I seem to recall that I used a 1mm shim on the upper fwd fuselage to close that gap.
Having delt with the fuselage, I focused on the fit of the transparency. The problem I found was that due to the thickness of the transparency, it was able to flex quite easily resulting in a x-section that was different from the fwd fuselage. I found that dry-fitting the transparency after gently squeezing the sides resulted in the transparency conforming to the fuselage x-section. Applying thin/narrow tabs to essentially built a 360 deg. lip around the whole of the fwd fuselage caused the transparency to hold it's correct shape. Carefully applied Tamyia Extra Thin worked just fine.

Scott
-
3
-
-
Julian: Thanks for pointing that out, but I'm aware of the changes required to the Airfix kit, for both the Mk.4 and the Mk.2.
Tony: That's exactly what I was looking for ... thanks!
Scott
-
My refs are tied up in storage, at the moment & a Google search reveals nothing, so I'm hoping someone here can answer my question.
Hopefully as we begin to empty our storage unit, I hope to get a hold of my 2 Airfix 1/72 Sabre kits, which I intend to do as a RCAF Sabre, both a Mk.2 and a Mk.4 - which brings me to my question. Does anyone have a clear underside photo or can provide a link to one, that shows the overall underside and in particular, the Duraluminum panel on the underside.?
Scott
-
Quote
Excellent silver wings! Not an RAF expert I still appreciate every well built between-the-wars bird.
Bi-planes and me don't get along (more of a post-1940 guy), but that doesn't stop me from appreciating a well-built bi-plane....
Scott
-
1
-
-
PM inbound....
Scott
-
 1
1
-
-
Quote
I've seen a reference somewhere that Coastal Command had RCAF 404 also flying FB Mk. IV mossies for a few months near the end of the war.
You are correct, Chris. They operated them for a brief period ... Mar. - May '45.
Scott
-
Thanks JackG, totally forgot to list 406 Sqn. My initial post has been corrected.
QuoteThe same Canadian website lists the following bomber/PR variants B Mk VII, B Mk XX, B Mk 25, PR Mk VIC, PR Mk XVI but unfortunately not how many or who with.
LimaOperator: From the above list, only the PR. Mk. XVI was operated by the RCAF. Could you post a link to this website you mentioned. I'd be interest to see what they did say about the other marques listed.
BTW. the PR MK. XVI used the 2-stage Merlin, so unless the OP performs an engine change and modifies the canopy - the PR. Mk. XVI had blown side panels as opposed to blisters in addition to an astrodome (?) above the navigator's seat, the B.Mk. IV as presented to the op would still be incorrect for a 400 Sqn. PR. Mk. XVI. I'm not aware of any 1/32 conversion sets to take a B. Mk. IV to a PR. Mk. XVI, but I stand to be corrected.
Scott
-
Judging by the side blisters & the "V" windscreen, the kit is of a Mosquito Mk.IV. Unfortunately, that marque wasn't used by the RCAF. The RCAF only used the Mosquito in the NF, PR or FB roles and not as a dedicated bomber like the Mk.IV, which you possess.
According to the publication "RCAF Squadrons and Aircraft" (S. Kostenuk and J. Griffin) - long OOP, the only Canadian-based squadron to fly the Mosquito was 133 Squadron, which flew Mosquito Mk.26's (Apr- Sept '45) out of Patricia Bay, B.C. However based on the canopy of the single B&W in the book, the Mk.26 appears to be a Canadian made clone of a Mk.VI ... a FB variant - completely different nose-canopy to your Mk.IV.
In the ETO, the RCAF operated Mosquito's with the following squadrons:
400 Squadron (PR.XVI; Dec.'43 - May '44)
406 Squadron (Mk. XII; Apr. - Jun.'44), F.B. Mk.XXX (Jul.'44 -Sept.'45)*
409 Squadron (N.F. Mk.XIII; Mar.'44 - Jun. '45)
410 Squadron (N.F. Mk.II; Nov'42 - Dec.'43), F.B. Mk.VI (Jul. - Sep.'43); N.F. Mk.XIII (Dec.'43 - Aug.'44), N.F. Mk. XXX (Aug.'44 - Jan."45)
and
418 Squadron (N.F .Mk.II Mar.'43 - Nov.'44); F.B. Mk.VI (Nov.'44 - Sept.'45)
Scott
-
1
-
-
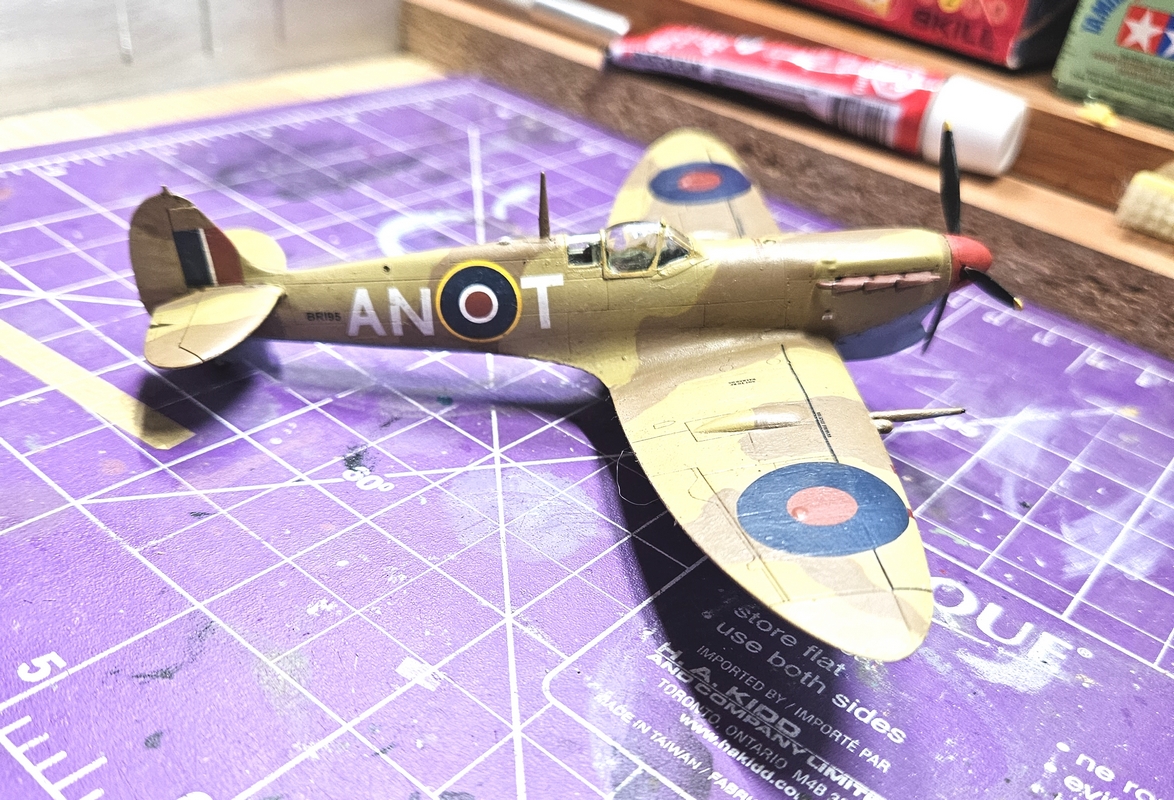
A while back with my Mosquito PR.XVI RFI, I alluded to a Spitfire Vc was working on and this is it. I had no issues with the kit, but I did have issues with the decals ... I ran out, kinda. 🙂
While it's mainly OTOB (a lovely kit), I did use the blunt spinner from my meagre parts box (source: Sword Spit V) simply because I felt it was better shaped than the Airfix option. I also added a mirror to the windscreen framing (something I think Airfix should have provided - others have been known to do this) in the form of a cut-down P/E 'jet mirror'. It may not be perfect, but at least it's there.
The main issue was my own doing with the decals. I was sure I had two remaining 56" B-Type roundels from the Xtradecal generic RAF B-Type Roundel sheet (X72043) but after I applied the roundel to the stbd wing, I found out differently. An order to Hannants wasn't possible at the time, so I found myself improvising a B-Type roundel by taking one of the kit's SAAF B-Type roundels and with some red mixed to 'match' the same brick-red in the 'real' B-Type roundel, I painted over the orange centre of the SAAF roundel.
Less of an issue was mixing the AK Middlestone paint to match, if not approximate, some colour(-zed?) 417 Sqn. Spitfire V photos. Personally, I feel the AK Middlestone is far to intense and 'golden', anyway. It took a former art student to correct my previous attempts at mixing and in the end, she had me first add a little flat white to lighten the AK Middlestone and then follow that with some Dark Green (in this case FS34079) to nullify the 'golden' appearance of AK's paint. I'm told that, any dark green would've worked, but the darker the green, the more immediate and drastic the resulting effect. Apparently it has something to do with 'hot' and 'cool' colours.
Build Summary:
Kit: Airfix Spitfire Mk.Vc
Paint: AK 'Middlestone' (mixed) and 'Rubber Black' (for the tires),
Aeromaster 'Azure Blue' and 'Dk. Earth' (both old jars, but still as good as the day I bought them),
MIG 'Afrika Korps' wash
Decals: Xtradecal X72043 - generic RAF B-Type roundels and X72069 - generic RAF C and C1 roundels/Fin Flash
Sword 417 Sqn. Spitfire Vc (codes and serial)
kit decals (stencilling)
Now the photos:
Scott
-
12
-
1
-
-
Greg B: Thanks. I first tried putting it here, but I didn't find a way to start a new thread.
Scott
-
Technically it's a general question, but it just happed to become a problem on the upper surface of a Spitfire, hence WW2 Aircraft. As I just mentioned, it happened when I was removing the masking for the DE on a desert scheme. Normally, I have no problem removing Blu-Tak, but in this instance the Blu-Tak didn't exactly peal away cleanly in some areas.
My question is other than sitting around and repeatedly trying to rub it off, does anyone have another method of removing it without damaging an otherwise 'good' camouflage finish?
Scott
-
I have to thank everyone who either replied to this RFI or simply responded to my initial post. I considered it a personal victory when I completed the Mosquito (despite those who continued to suggest that I'd have to accept that I couldn't model anymore), but the reception its had here has made it just that victory more special. Now if my future builds turn out as nice. 🙂
Thank you. :))
Scott
-
2
-


Boston III undercarriage colour...
in Aircraft WWII
Posted
As your initial post mentioned you wanted to do a 418 Sqn. Boston III, you should loose the long-range tank. 418 operated in the night intruder role from the UK over the continent, using the two nose .303's & bombs, or when fitted - the belly gun-pack as well as the nose cheek .303's. There was no requirement for a long-rang tank to be fitted.
Scott