


Jpthedog
-
Posts
342 -
Joined
-
Last visited
Content Type
Events
Profiles
Forums
Media Demo
Posts posted by Jpthedog
-
-
Wow - very impressive paint finish. I would be very pleased with that model.
-
 1
1
-
-
Nudging along! Preshaded and blue sprayed to underside. Blades painted.

-
 7
7
-
-
Whoops been too long since last post and time is marching on to end of the GB. Got some primer on today though, which shows up the usual seam lines.
Another picture plus the kit exhaust (middle) which looks a little anemic and solid so I might upgrade with a piece of alu (too small diameter) or plastic tubing drilled out, which will need a bit of heat applied to achieve a curve.....
Any way hope to get some paint on this weekend - 3 weeks to the end of the GB!
-
7
-
-
On 9/14/2020 at 9:50 AM, stevehnz said:
Liking the look of this. After seeing @JMW's epic multi build which involved a couple of these Roden kits, I'm becoming quite keen on one, this build is doing nothing to dissuade me of that, other than some real modelling, they seem quite doable.
")
Steve.
Steve - glad myself and J-W are providing 'inspiration' to tackle a difficult-ish kit. I think the shape is good and can be made to look decent if you have the time and are have advance warning of its issues. All kits are doable - just depends at what lengths you want to go to. This isn't too bad, you just expect more from a well known manufacturer.
-
2
-
-
OK decals on and suddenly the finishing straight is in sight! I used the aftermarket set from steelwork modesl.de and they are nice but quite fragile and easily crumpled in my ham fisted decalling.... so I ruined a number 7 for the serial so coated the rest in Klear to strengthen them. Then I mis-aligned the cartoon decal that is part of the serial on the other side - try as I might I could not shift it, so it stays where it is - 95% in the right place....
So whats left?
Build undercarriage, insert tail wheel and paint, hang the undercarriage doors - always fun
Glue on exhaust stacks - all 24
Fit cowling over exhausts - cajouling required for the thinned cowling
Paint the nose glazing and fit along with machine gun
Fit the machine gun in the central turret
Paint props and spinners and fit
Then final matt coat
Hmm thought there wasn't much left... liking the colours tho
-
13
-
-
Jason - yes agree the splinter camo is wonderful and I quite like doing it. SCW all the way for me - so many great aircraft and colour schemes to chose from. I would build the kit again as it is an OK shape i think and I know from the outset that nothing fits. Get that 111B finished!
JP
-
2
-
-
Todays progress
Masking on for the final camo colour
And after green has been painted and taking off the masks with a couple of coats of Klear. I will micromesh gently a few paint ridges before decals go on. Notice how i am leaving the under carriage until last....
-
14
-
-
1 hour ago, CliffB said:
Hi JP, yes it's the 111c (image from Scalemates)
Cheers
Nice! Presume it's the same kit with the same issues. Pre war colours are a favourite of mine, so who knows...
-
2
-
-
15 hours ago, CliffB said:
It's really nice to see this early bird. For my sins, I built the Lufthansa version when it first came out, so I appreciate the great job that you're doing
")
Cheers
Cliff - yeah I like the shape of the early 111s- LH so is that the 111c? I would like to do it, but not sure I can face another, although I would be wise to most of the fitting issues! Thanks for the comments, JP
-
On 9/10/2020 at 7:28 AM, Mottlemaster said:
Howabout a video of the unmasking, 0r even a live video.
Seriously, it looks like you have completely tamed this monster with your perseverance and skill.
Hmm - minimal appeal for the video I would think! It's unmasked now and looks ok - few touch ups as usual but the masking sheet worked well. Pics to follow
-
2 hours ago, Corsairfoxfouruncle said:
Hmmm you might want yo think about selling that I'm sure more than a few people would buy them. Especially in this build.
Happy just to share....
-
1
-
-
Thanks FoxFour - well thats the masking part 1 anyway - I printed off a near 1 to 1 of the camo for the kit then used that to help cut out the mask from the vinyl sheet. Also used Tamiya tape for any easy masking like wingtips. The test will be the next stage for the final colour. Takes a while but as ever its always a great moment stripping off the masking to see what the paint looks like. Usually good and bad!
-
3
-
-
Quick update - using Artool Ultra Mask film for the masking of the splinter camo. Sealed the edges with Klear as usual and will spray the RLM62 green next
-
5
-
-
1 hour ago, JWM said:
Nice progress.
I started to like those Roden Heinkels. Perhaps I should buy the "B" variant to do one from SCW...
J-W
J-W - its easy to forget how frustrating they are!
-
1
-
-
1 hour ago, Andwil said:
I think he is pointing out that the rear face of the prop is painted black while the front face is nmf. ( At least they are on the reconstructions pictured).
AW
AW thanks for confirming prop colours. Will come to that once they are sitting on their wheels.
JP
-
On 9/4/2020 at 6:14 PM, KayFranz said:
Warning!
Jpthedog and everyone else who builds Cierva or Rota.
Here is a photo taken 20 years ago during the construction of a Spanish replica. The original Avro ROTA K4232 and the C-30 MZA under construction stand side by side.
And what are the colors of the propeller blade on the pilot's side?Regards...
Kay Franz - not sure what the warning is but thanks for the photo
Still conjuring with the undercarriage arrangement....
-
Getting to the painting stage - all primed with Tamiya rattle can
Hmm a few blemishes, not least the undercarriage bays pressing through from below, but not letting that bother me too much. Photos with natural daylight can be harsh tho!
And the underside sprayed with Sovereign paints RLM65 light blue over some pre-shading
White wingtips top and bottom next, then onto splinter camo....
-
6
-
-
Really struggling with this now - I've hit the modelling wall! Anyone have any advice of how to put this undercarriage together? The kit parts are a selection of pieces with no real definate location points and there is nothing to really work from. I have downloaded some drawings to assist with the arrangement, and just spent half an hour tidying up the parts and then scratching my head as to how to construct this in a robust fashion that matches both sides! Notice piece number 26 - has a dovetail end (picture and in real life)- now tell me how is that physically possible to insert into a fuselage???
Of course I have the same to do with the Merlin kit - but in white metal!!
-
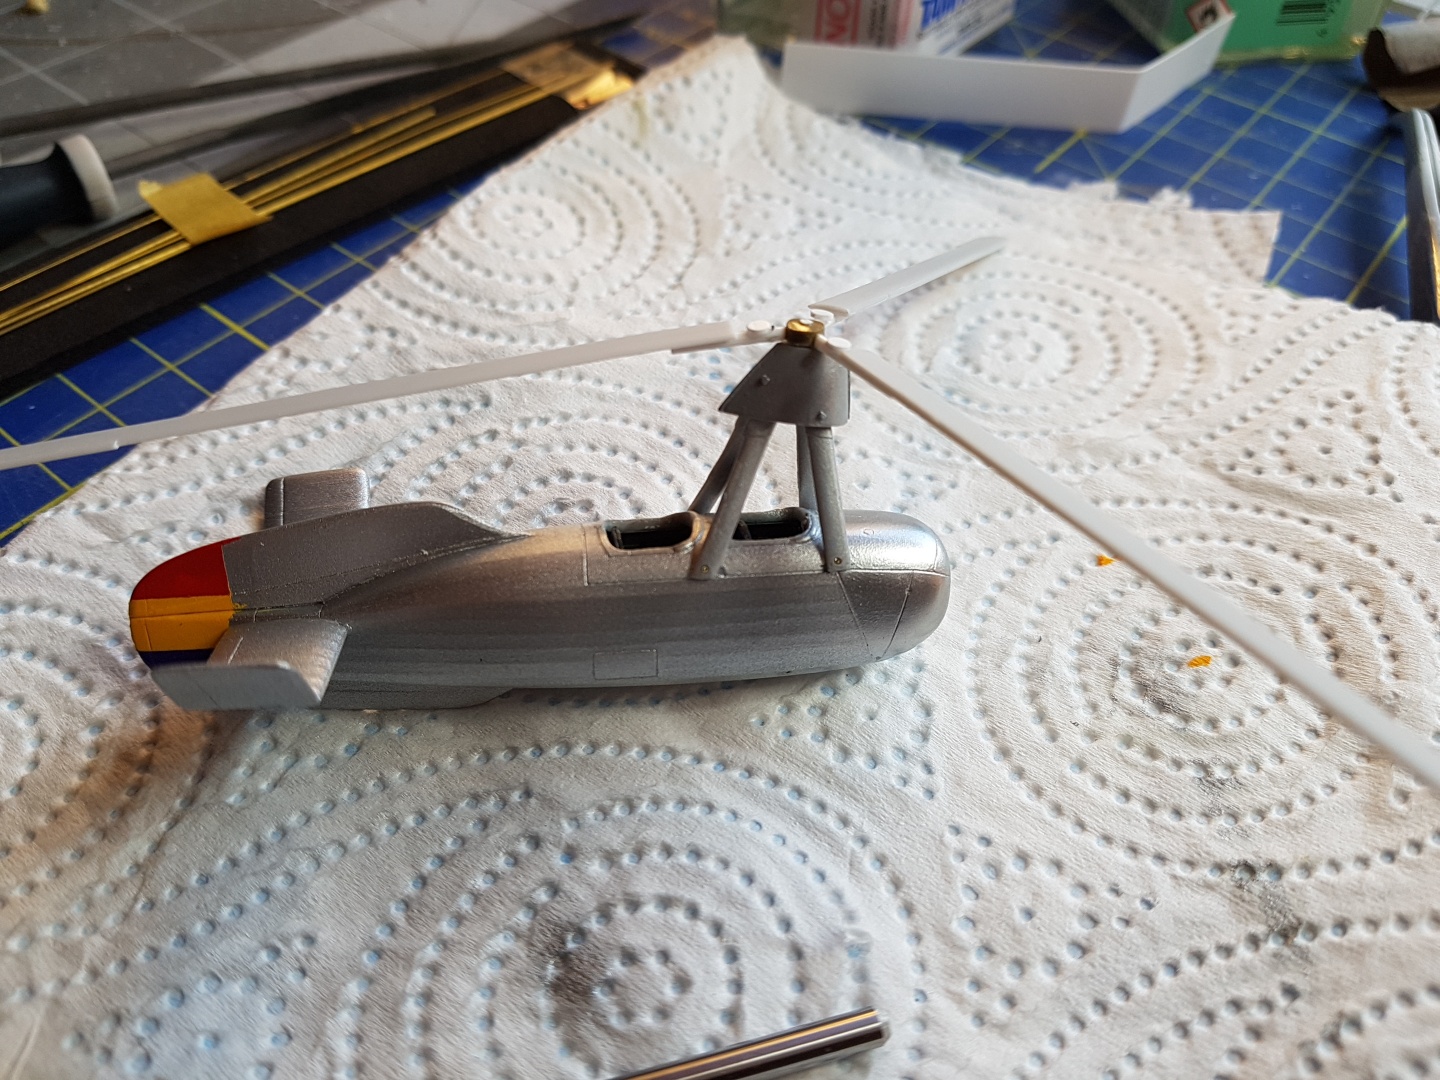
Been a while but the Roden He 111b had been taking a lot of my modelling time. Here is a quick update on the Azur C30. Delicate work to fit the rotorhead to the fuselage. Vague locating points and an already painted, body so I decided to drill and pin the legs on to make sure of a neat and strong connection. Will fill the small drill points later. Blades dry fitted just to see what its looking like.
The unweildy undercarriage arrangement next....
-
1
-
-
Tonights status - wings on, gaps filled and cockpit glazing glued - took the photo before that but trust me! Tidying up any areas that need filler for a sand and prep for primer at the weekend.
I repeat on this one - no parts have actually fitted so far, without first filing, sanding or scraping!
-
4
-
-
8 hours ago, JWM said:
One question. The instruction says that the three "bottles" inside each wheel bay should be blue. You done them RLM02. In some build in larger scale which are in Net those "bottles" are painted red. They looks like some hydraulic devices, so maybe there is a rule on color for them? Any expert knows?
Regards
J-W
J-W
If they are definately a ceratin colour then I can repaint, but once on the display table anyone will be so amazed that the model is actually finished they wont be looking underneath inside wheel wells!!
-
 4
4
-
-
9 hours ago, Greg Law said:
Boy this build is fighting you. You are doing well by just keeping going with it. 👍
Greg - certainly is and I think more to come with undercarriage. No kit has beaten me yet - although some do languish on the shelf of doom still! I think I am over the worst and just too much time invested to give up, so it will be completed for this GB.
-
1
-
-
On 8/25/2020 at 8:35 PM, Arniec said:
You are doing a good job. I hope it will be a great model in the end.
Cheers,
Thanks Arniec - hoping to persevere through build and indeed deliver a great model - glad you have confidence in me!! Wings are on now and the gaps filled with plasticard - painting soon! JP
-
2
-
-
On 8/25/2020 at 5:04 PM, Mottlemaster said:
Does the canopy fit with the gap filled. .O
It will do!!!
-
1
-
1
-


Kinetic 1/48 Harrier T8
in Helicopter / Autogyro / STOVL GB
Posted · Edited by Jpthedog
Very tidy harrier!