

Ian A
-
Posts
27 -
Joined
-
Last visited
Content Type
Events
Profiles
Forums
Media Demo
Posts posted by Ian A
-
-
-
-
-
-
-
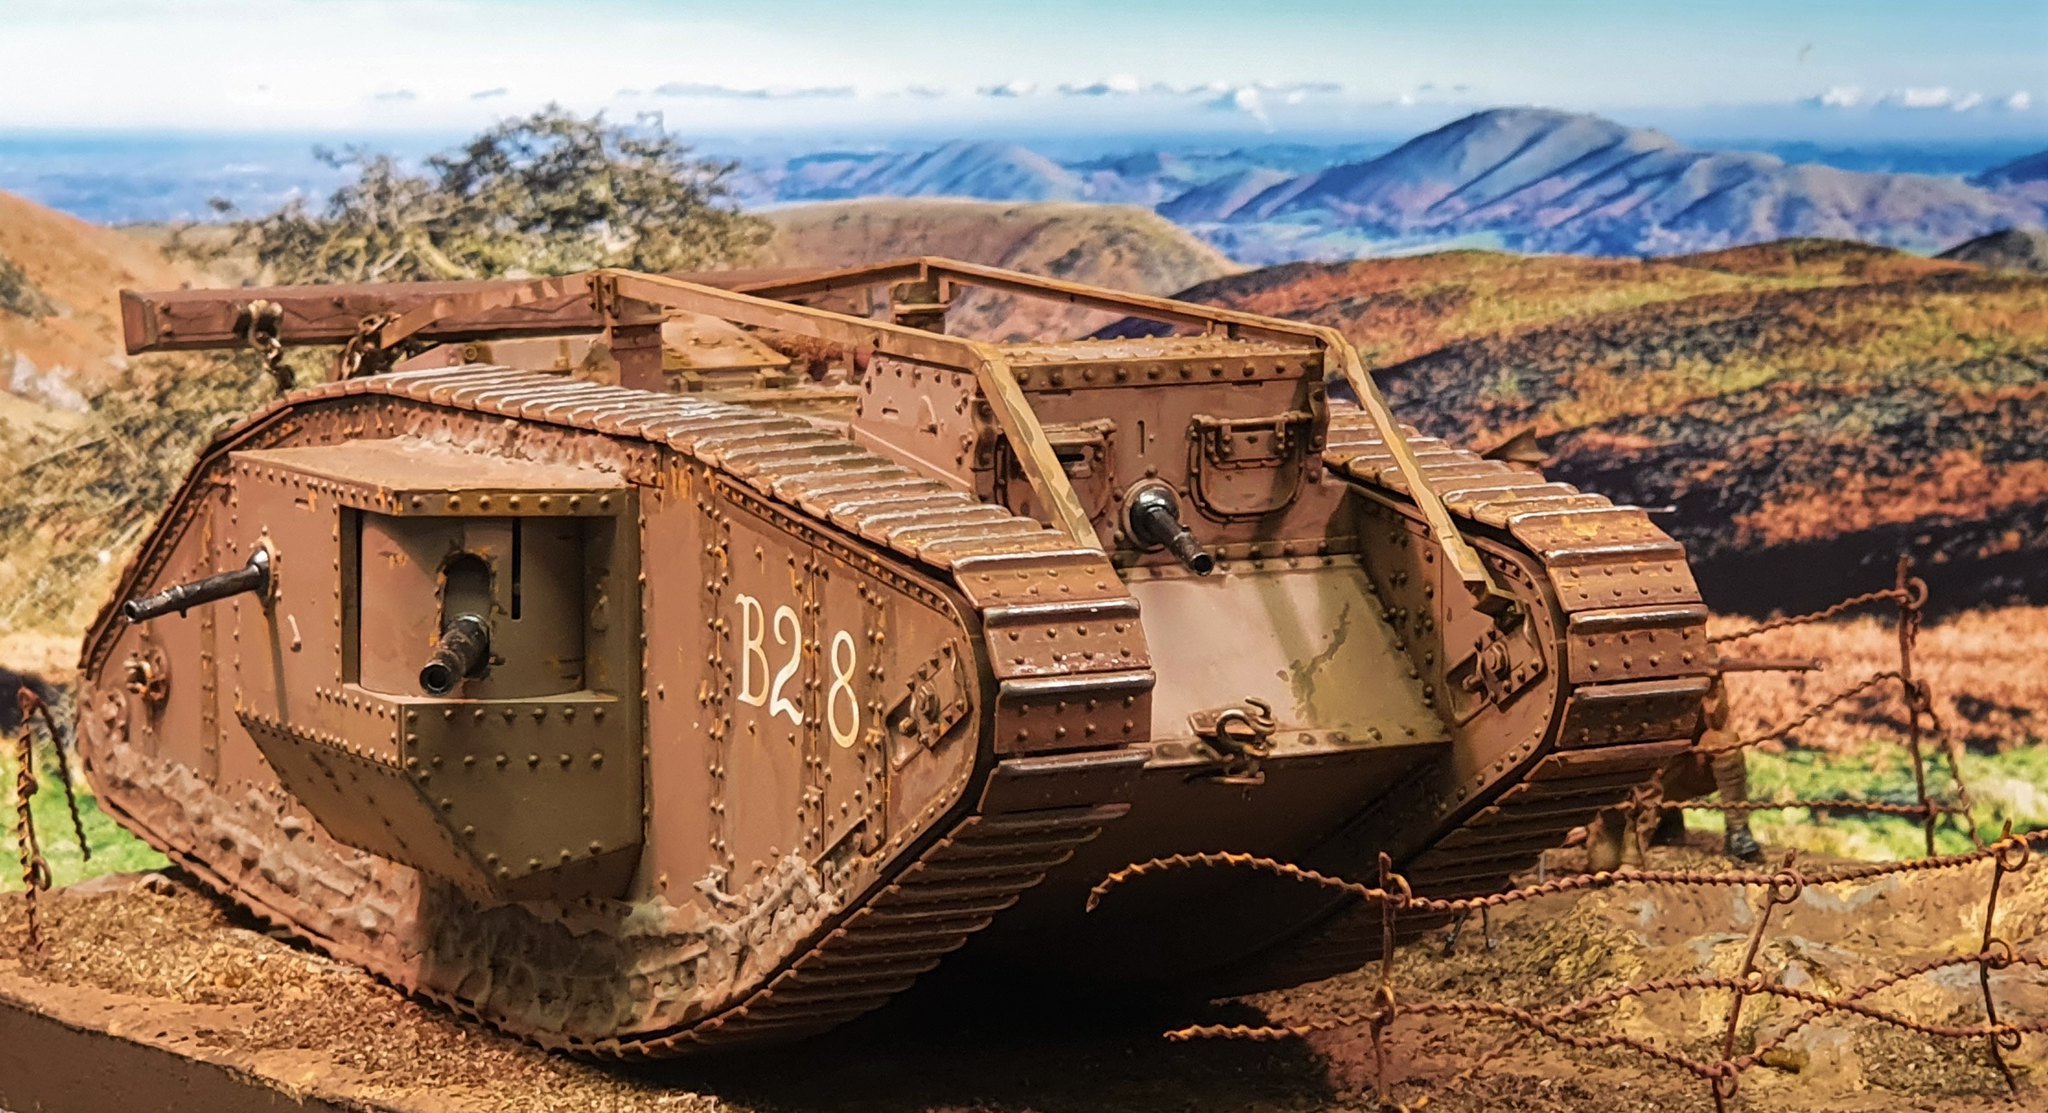
This was a pretty obvious choice when I saw it on ebay, I had a poster of pretty much the same bike on my wall as a callow youth.
Built from the box, I am reasonably pleased with the way it turned out, I just had a little bit of trouble with some of the decals cracking up.
-
On 8/22/2021 at 12:14 AM, Das Abteilung said:
Well I have to say that this is a bloody good first effort!
The mud along the bottom is perhaps a little thick and smooth and would probably be spread and splattered somewhat more widely. Finding a real photo and using that as a muse is always a good idea. And the 6pdr gun barrels were painted the tank colour.
But - and this is perhaps more for future avoidance now - you've fallen into the trap which very many people do (egged on by a couple of Spanish "artsy" modellers with products to sell) of assuming that tanks went rusty fairly quickly.
Which they did not, because of the corrosion-inhibiting properties of other metals in the various steel alloys used for armour plate. Nickel, manganese, molybdenum, chromium were all used to some extent. This is even more true in WW1 when all armor plate was face-hardened and thus had a very high (<0.5%?) carbon content in the outer face from the heat treatment process by which mild steel was made into armour plate. The track plates on WW1 British tanks were also made of face-hardened plate. So rust would take very much longer to form on armour plate than on mild steels and you would be unlikely to see a rusty WW1 tank in service. Worst case - you might get some slight rust on, and streaking from, mild steel fixtures and fittings. If the unditching beam had been used since last maintenance then the wearing surfaces of the rails would be rusted: I don't believe they were greased. The tanks were well-maintained, the crews and workshops took great pride in their steel beasts and they were usually only in action for a few hours at a time before maintenance periods. Reliability was not a strong point and the maintenance burden was high.
You only need look at the Mks XIII and IX at Bovington, which were parked outside the front of the museum for 35 years, to see how little face-hardened plate deteriorated. In fact the 18 surviving WW1 rhomboid tanks around the world are all in remarkable structural condition including the several sat outside for decades in Russia, Ukraine and at Aberdeen Proving Ground. The notable exception is the one at Ashchurch, gutted in the 20's to become a shed for an electricity substation, The MkIV in the Brussels Royal Army Museum is untouched since WW1: it has not been restored or repainted, but has been kept indoors. And is the only surviving original whole-vehicle colour reference BTW.
They did leak oil from various places, oil seals in those days being much less effective and often involving leather. Such as the 2 round bearing covers on each side behind the sponsons and the ones at the rear
In the late 1930s we see the arrival of Rolled Homogenous Armour as used on welded tanks (you can't weld face-hardened steel without compromising the heat treatment). This has a lower face carbon content but still rusts only slowly.
Having re-read your piece, I would be grateful if you could point out the locations of excess rust on my model, there is no rust on the face of the armour plate other than streaks running down from some of the rivets, which I am sure would be a natural corrosion point. The armour plate is painted in my take on the 'mid-brown' prescribed by the ministry. As for sources, I did indeed find a number of original photos including some 'colourised' ones which did indeed show signs of streaking.
-
2 hours ago, Buzby061 said:
A great first attempt. Nice work on the figures too.
Were they training in the Lake District?
Pete
Thanks, in fact it's a photo that I took from the Long Mynd in Shropshire.
-
10 hours ago, Das Abteilung said:
Well I have to say that this is a bloody good first effort!
The mud along the bottom is perhaps a little thick and smooth and would probably be spread and splattered somewhat more widely. Finding a real photo and using that as a muse is always a good idea. And the 6pdr gun barrels were painted the tank colour.
But - and this is perhaps more for future avoidance now - you've fallen into the trap which very many people do (egged on by a couple of Spanish "artsy" modellers with products to sell) of assuming that tanks went rusty fairly quickly.
Which they did not, because of the corrosion-inhibiting properties of other metals in the various steel alloys used for armour plate. Nickel, manganese, molybdenum, chromium were all used to some extent. This is even more true in WW1 when all armor plate was face-hardened and thus had a very high (<0.5%?) carbon content in the outer face from the heat treatment process by which mild steel was made into armour plate. The track plates on WW1 British tanks were also made of face-hardened plate. So rust would take very much longer to form on armour plate than on mild steels and you would be unlikely to see a rusty WW1 tank in service. Worst case - you might get some slight rust on, and streaking from, mild steel fixtures and fittings. If the unditching beam had been used since last maintenance then the wearing surfaces of the rails would be rusted: I don't believe they were greased. The tanks were well-maintained, the crews and workshops took great pride in their steel beasts and they were usually only in action for a few hours at a time before maintenance periods. Reliability was not a strong point and the maintenance burden was high.
You only need look at the Mks XIII and IX at Bovington, which were parked outside the front of the museum for 35 years, to see how little face-hardened plate deteriorated. In fact the 18 surviving WW1 rhomboid tanks around the world are all in remarkable structural condition including the several sat outside for decades in Russia, Ukraine and at Aberdeen Proving Ground. The notable exception is the one at Ashchurch, gutted in the 20's to become a shed for an electricity substation, The MkIV in the Brussels Royal Army Museum is untouched since WW1: it has not been restored or repainted, but has been kept indoors. And is the only surviving original whole-vehicle colour reference BTW.
They did leak oil from various places, oil seals in those days being much less effective and often involving leather. Such as the 2 round bearing covers on each side behind the sponsons and the ones at the rear
In the late 1930s we see the arrival of Rolled Homogenous Armour as used on welded tanks (you can't weld face-hardened steel without compromising the heat treatment). This has a lower face carbon content but still rusts only slowly.
Thanks for the information, you've told me more there than I found in a couple of weeks research on the Internet. I'm interested in the colour reference, I read that there were no reliable original colour references available, simply that the Ministry vaguely referred to the colour as something like mid-brown.
-
This is my latest project, my first proper attempt at weathering a military vehicle. Feedback welcome for hints and suggestions.

-
 25
25
-
 3
3
-
-
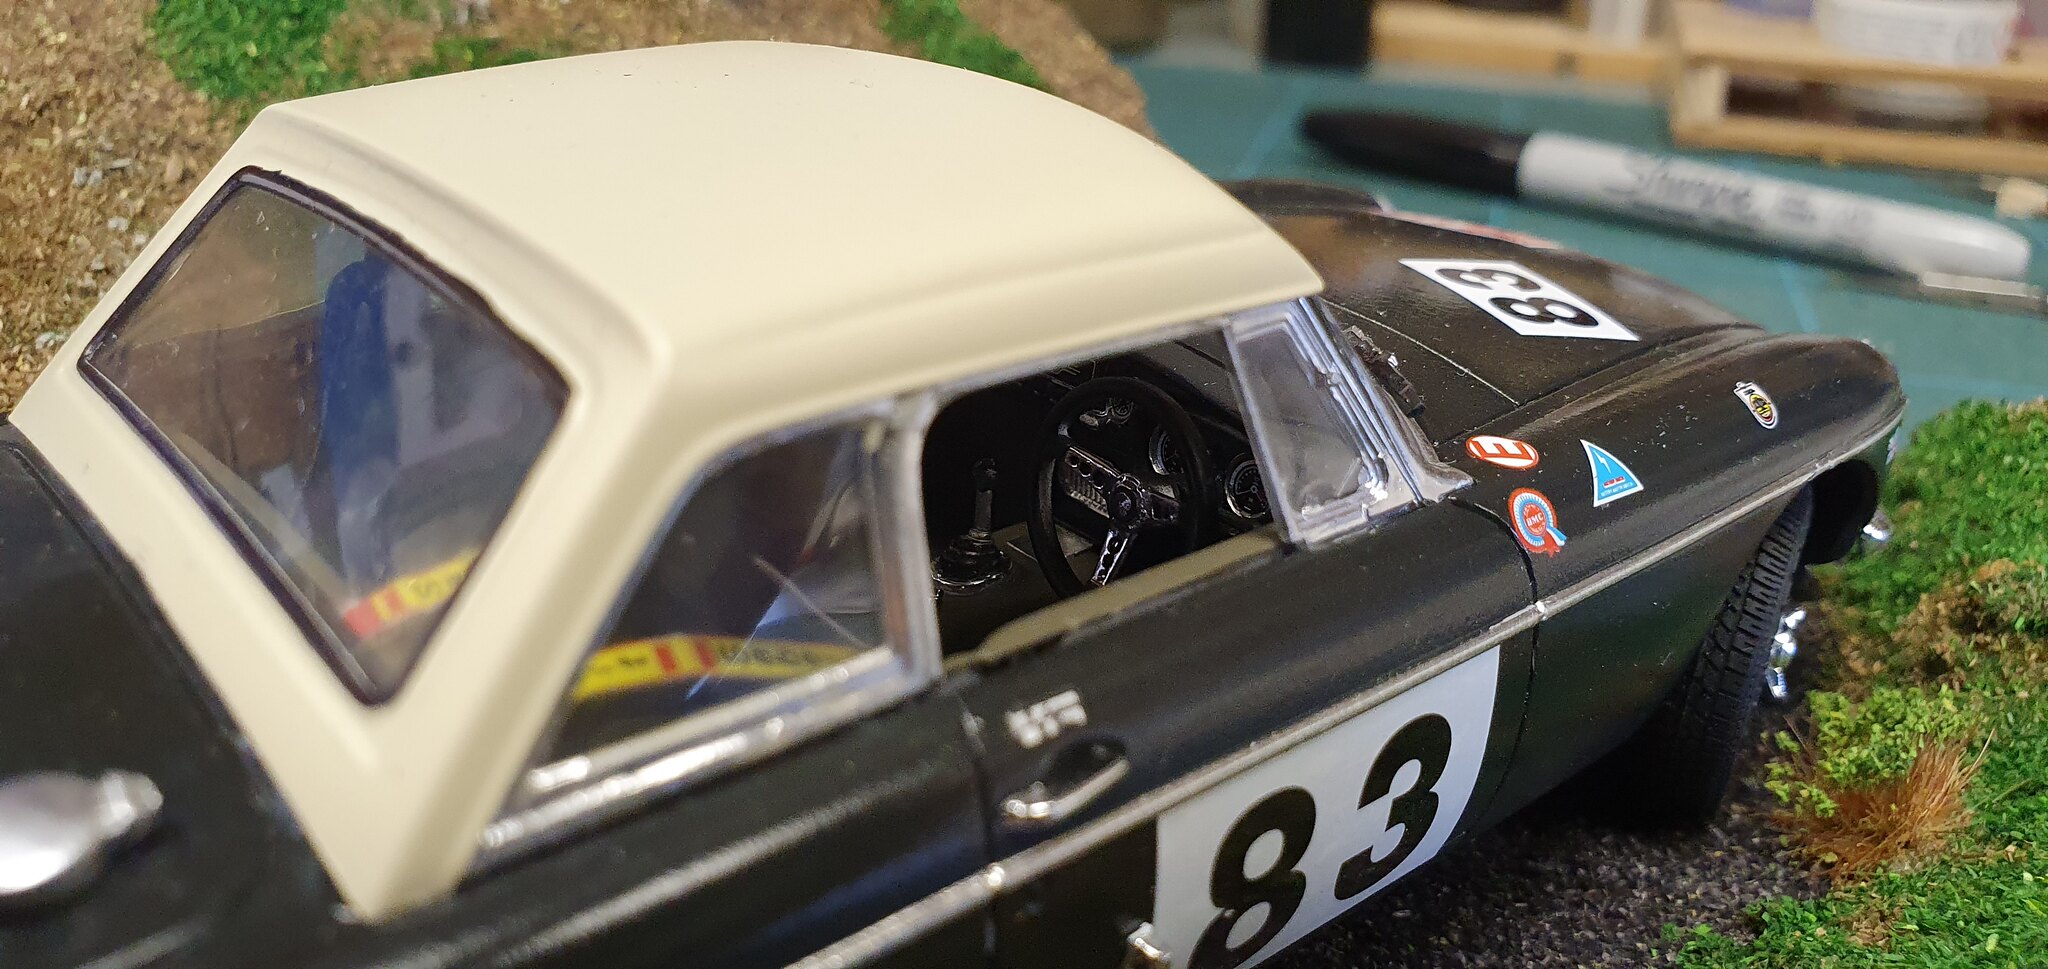
6 hours ago, Pappy said:

Wow, 1964 you say, they must have done something right!
Ian, the surface texture of the fuel tank, is that how the kit plastic comes or is that an effect you have produced?
It looks very interesting, is it supposed to be a fibreglass texture or something?
cheers,
Pappy
Hi Pappy, there isn't actually any texture on the tank, it feels beautifully smooth. The paint is a Tamiya metallic, I assume that the appearance is down to the flakes being picked up by the camera.
-
On 7/30/2021 at 12:49 AM, Little Timmy said:
Wow, that's pretty !!
A suggestion, give the spokes a very light wash of black. That will give them some " depth" .
Thanks for the suggestion, I've put a little wash on and it has indeed made a difference. Annoying really, the wheels were one of the few parts of the model which hadn't received at least a little wash.
-
I bought this on a whim as I like the subject, I had a few moments of worry when I read on the box that the moulds were made in 1964; no problem, the castings were beautiful with almost no flash. It has been a joy to build. Complete except for the two fork top bolts which are currently awol due to carpet monster issues - confident they will turn up eventually (still on a small piece of sprue).
-
22
-
1
-
 1
1
-
-
After a few weeks away from the bench, I got back into it with this little treasure. It was a real joy to build and I was able to try out a few new products and methods - Molotow liquid chrome, Bare Metal foil and last and maybe least, home-made snow (I'm still not sure about the effect).
-
18
-
-
I have thoroughly enjoyed this build, apart from a couple of places where the model didn't quite match the plans - particularly around the front suspension.
This was my first attempt at portraying heavy rust/weathering; I would be grateful for any suggestions as to how to improve my technique.
-
25
-
-
Stunning work!
-
1
-
-
I was wanting to have a go at some figure work and I saw some pictures posted by Stevej60, I was inspired and decided to give it a try.
This is built from the Masterbox 1/35 'Before the Battle'. The box includes the figures and trench, I built the box from artists board and stripwood.
The result doesn't meet the standards of Steve's but I'm fairly pleased for a first attempt.
-
28
-
-
Well, thank goodness I came through that.
I haven't built a biplane for over 40 years and I still remember the nightmare of attaching the top wing; 'It can't still be that bad, surely.' I thought...
Well it nearly hit the round filing cabinet a number of times, and I'm still unhappy that the top wing is set too far back, however I am happy that I have developed (Plan F) a workable method to affix the top wing, in addition to that I have come across a number of issues, such as :
Humbrol Clear gloss acrylic dries like thin porridge, Humbrol Clear matt dries like a ploughed field - probably all down to me but I will approach with care in future.
On the plus side I have survived my first attempt at rigging, used a whole pack of 0.02 MIG Rigging as I climbed the learning cliff, but got there in the end.
I had my first attempt at simulating wood, thanks to a brilliant tutorial on Youtube by Dave's Model Workshop, I am pretty pleased with my first go.
I also have the SE5a in my stash but I feel that it may wait a little while before I can face starting it.
-
9
-
-
Hi guys, thanks for all of your comments. My figure painting is more a case of obstinate determination than any sort of skill, I take photos on my phone, blow them up and revisit the bad bits - over and over again.
As for the ailerons, I had a horrible feeling that I'd got it wrong but it was too late by then.
I will certainly take on board your thoughts about staging, lighting, backgrounds and photographing in future.
Thanks again
-
3
-
-
2 by Ian Armstrong, on Flickr
1 by Ian Armstrong, on Flickr
-
16
-
-
4 by Ian Armstrong, on Flickr
3 by Ian Armstrong, on Flickr
-
4
-
-
-
13
-
-
-
20
-
-
Well, these are strange times. This is my first attempt at a diorama, albeit a very simple one. It is also my first time putting anything I hve produced out in public, so please be gentle.
My wife bought me the Airfix 'Ready for Battle' gift set for xmas, this diorama is pretty much straight out of the box, apart from a couple of little tweaks such as the refueller and the addition of the Tilly.
I look forward to learning from your comments, I would also appreciate some thoughts on photographing dioramas - I am not too happy with how these shots turned out.


Barry Sheene Suzuki RG500 1978 - Italeri 1/9
in Ready For Inspection - Vehicles
Posted