Chris FFZ Posted July 30, 2011 Share Posted July 30, 2011 (edited) OK guys, tired of waiting for paint for my hellcat build, i have decided to get in the game with a quick P-40 build! Let's take a look at the insides and see what we have: Sprue shots: The decals are after market i bought off a guy in england: Edited July 30, 2011 by Chris FFZ Link to comment Share on other sites More sharing options...
Chris FFZ Posted July 30, 2011 Author Share Posted July 30, 2011 First order of business is to paint the visable interior areas green, as was standard on US aircraft in WWII. next, the instrament panel is painted green with black gauges Finally Lt Welsh is painted More next time... Link to comment Share on other sites More sharing options...
AnonymousDFB1 Posted July 30, 2011 Share Posted July 30, 2011 Nice, I have 34, 26 and a side order of 19 please Link to comment Share on other sites More sharing options...
Chris FFZ Posted July 30, 2011 Author Share Posted July 30, 2011 Everyone uses that joke Mish, as I always use menus for placemats! Today's update; The cockpit is assembled and the pilot added The prop is prepainted and assembled Next the holes for the drop tank are filled, won't be using that for this project. While that dries the furselage is joined and checked for gaps, none noticed The wings are assembled and attached to the fuselage, a jig of tape is used to get the correct angle on them. More next time. Link to comment Share on other sites More sharing options...
stevehnz Posted July 30, 2011 Share Posted July 30, 2011 Looking forward to seeing this one done, we saw one of these at the Omaka airshow near here at Easter this year, superb restoration & I'd love to model one of them in these colours. Kinda hoping Airfix might bring theirs out with these markings. Steve. Link to comment Share on other sites More sharing options...
Chris FFZ Posted July 30, 2011 Author Share Posted July 30, 2011 I want that airfix kit also, this academy one appears to be a copy of The ancient frog one, the placement of the drop tank is highly suspect to say The least! Link to comment Share on other sites More sharing options...
AnonymousDFB1 Posted July 30, 2011 Share Posted July 30, 2011 Good progress Link to comment Share on other sites More sharing options...
Chris FFZ Posted July 31, 2011 Author Share Posted July 31, 2011 Today's update; The front air scoop hole is cut out, and the plane is preped for painting. The lower half is painted standard navy gray which is a good color for US army aircraft. The upper half is done in tamiya US army olive drab, and when dry the plan is sprayed with gloss cote for decaling and set aside to dry. Link to comment Share on other sites More sharing options...
oldhouse Posted July 31, 2011 Share Posted July 31, 2011 Nice and fast progress so far !! Link to comment Share on other sites More sharing options...
AnonymousDFB1 Posted July 31, 2011 Share Posted July 31, 2011 That was quick Link to comment Share on other sites More sharing options...
Chris FFZ Posted July 31, 2011 Author Share Posted July 31, 2011 Its 1/72 scale kit with about 20 parts, how long could it take. Link to comment Share on other sites More sharing options...
Shar2 Posted July 31, 2011 Share Posted July 31, 2011 She's looking very good so far. Link to comment Share on other sites More sharing options...
Chris FFZ Posted August 1, 2011 Author Share Posted August 1, 2011 Today's update; Now that she is all glossed up and dried, the decals are applied. These are then sprayed again with more gloss cote and allowed to dry over night. next vallejo matt finish is brushed on The plane, and the first black wash is made to start bringing out details as well as making exhaust and gun trails. While that was drying The canopy was painted first with green enamal (since i know from experience that acrylics don't apply well to clear) and the canopy and side panels are attached using elmer's white glue. Over the next few hours I added concentric washes to give a layered look to the black highlighting, one about every 20 minutes or so, allowing the arcyllic black to dry and then doing it again, wiping away excess that didn't look right. The project at this point is complete, only the finished photos are needed. Link to comment Share on other sites More sharing options...
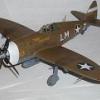
Chris FFZ Posted August 2, 2011 Author Share Posted August 2, 2011 (edited) Finally, the finished shots! Edited August 2, 2011 by Chris FFZ Link to comment Share on other sites More sharing options...
Bertie McBoatface Posted August 2, 2011 Share Posted August 2, 2011 Well you certainly don't hang about! Nice aircraft. I like the early war paint schemes too. Link to comment Share on other sites More sharing options...
Chris FFZ Posted August 2, 2011 Author Share Posted August 2, 2011 Thanks, i can usually bang out a kit in a week, these small ones even faster. It all really depends on how much i like the subject and if there are problems like having to repaint things or messing up decals and the like. That old academy kit isn't great, the canopy is highly suspect for example, but its not bad, and its fun to make! I have a number of cool projects for the pacific war, believe it or not I'm STILL waiting for the paint for the hellcat (Hint: Pay the extra postage fro faster delivery!) and i just picked up an 1/48 oscar. The Hellcat is definetly on, the oscar and geroge are maybes for this, and I just picked up a revell PT 109 to make for the new revell forum but I could have it as part of this build also! So many kits..so little time... Link to comment Share on other sites More sharing options...
oldhouse Posted August 14, 2011 Share Posted August 14, 2011 Nice looking model !! Good Job !! Link to comment Share on other sites More sharing options...

Recommended Posts