
All Activity
- Past hour
-
.thumb.jpg.76f12b87ce9ca9929c9aabdcf8f9d2dd.jpg) Chris, connect a temporary oil line and a jump starter and I'm sure she'll run....!! Looks tremendous, does that! Keith
Chris, connect a temporary oil line and a jump starter and I'm sure she'll run....!! Looks tremendous, does that! Keith -
That is looking really good, and thanks for the idea about using dental floss for the carley straps, i've been wondering about what to use for those myself !
-
 This one is a 'new tool' so maybe wait to see the plastic. Keep meaning to set up a F-35 bingo game 😅
 -

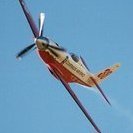
506th FG, 458th FS flown by 2nd Lt. Robert Harvey on 1 June, 1945
mark.au replied to mark.au's topic in P-51 Mustang STGB 5
Retuning from our travels I was able to bring a nice amount of plastic through customs (legally, I might add). As it happens, I didn't buy anything in the Tamiya shop pictured above but made good in another model shop I found which held literally thousands of kits (http://leonardoet.com/en/index.html). Luggage space precluded filling all of my wish list but I did get a couple of big twins; an original boxing AM 1/48 B-25C/D and a Dragon 1/48 Ju-88A-4, the latter of which is destined to join the captured airframe collection at some point. I asp did some reading while I was away - a ten hour flight will do that - about Mustang wings and realised I had mine a little wrong. I won't bore you with all of the detail but suffice to say that whereas I had filled all of the panel lines on mine I needed to undo some of that. The wings were only puttied smooth for around the first 40% of the chord, after that they were left pretty much as manufactured with only a covering of YZC. There was some variation; the smooth surface was achieved by a painting up to six coats of a grey epoxy over the forward portion of the wings and then a red putty covering the panel joins. This wasn't always perfect and in use the wing often showed signs of its make up. Further, the outer panel line which is typically under the national insignia wasn't filled, nor was the outer panel line where thew wing tip was attached. To achieve this finish I needed to remove some filler and add some rivet detail. This was the result. I intended that the added details be barely visible so I didn't make it perfect. Truth is, I am not skilled enough to do it perfectly anyway... Then, for no good modelling reason but because I wanted to, I painted the wings as they would have been in the factory. This meant beginning with an overall coat of YZC and then some grey to represent the epoxy. With that done I then added the red for the putty, a clear gloss coat and then a polish to smooth it up. The final effect worked out as I'd hoped; the surface detail I added, as well as the puttied panel lines are there if you look hard enough but at first glance the wings look very smooth. The final test of course will be what they look like under silver paint... With the upper surface done, I did the same to the underside. The photo above is prior to the clear gloss and polish. Note also that I mistakenly painted the inner aft panels where they should, and will be natural metal when finished. I'm now at the point where I need to decide how I'll do the natural metal finish on the fuselage and the metallic silver wing paint. Some experimentation will be required as I have a specific idea of how I want it to look but no firm idea on how to get there. Cheers. -
Get busy with a single edge razor blade and your files and you can uncuff one quickly enough
-
 Thanks Rob, that's very kind, I have been looking forward to building this for a long time and really enjoying this one. It is nearly ready to be fixed into the cowling. Thanks Adrian, really pleased with the engine. The Fastback is Colour L539 Baltic blue, it is the original colour. The car is very original and any mods made by me are totally reversible. No cuts or holes made to the bodywork or brightwork. The guy who used to run with the spare motor, his name wasn't Steve was it? This guy has a cracking late model Fastback and has a spare engine in the form of a tuned ex Police car motor he swaps them around to keep mileage low. Thanks Roger, very kind fella, I think your right, they will show as a bracket then when I mount the air intake cones. Thanks guys Chris
 -
 Many thanks Paul. Much appreciated. John.
 -

German Sd.Kfz. 222 panzerspahwagen *finished*
Hamden replied to Maddoxx77's topic in Work in Progress - Armour
Stunning result great workmanship with outstanding paintwork and attention to detail as we've come to expect from your adventures Stay safe Roger -
Excellent, Luke.
-
 I bet a lot of us recognised those arms. 😁 As great setting for a great vehicle. Top work. 👌
 -
just lots of ketchup (I used to drown krapdinner with ketchup just so I could slide it down easier)
-
That's the best kind. I like the look of concentration on his face while he cuts the parts from the sprue. A real modeller in the making. And remember, don't touch it until he's with you. You've been told!! John.
-

Jagdpanzer 38(t) Hetzer (Early Production)
Foghorn Leghorn replied to f matthews's topic in Ready for Inspection - Armour
Lovely model and you've nailed the the wet look to the mud. -
'Lunchtime' a Sd.Kfz.222 on patrol in Africa
Foghorn Leghorn replied to Maddoxx77's topic in Ready for Inspection - Armour
Cracking diorama, great weathering and lovely figure painting too. I love the sitting figure, it has a wonderful natural pose. -
Great project for you both and I'm sure you will both have lots of fun! Looking forward to seeing this progress Stay safe Roger
-
It's really nice to see such an excotic model and scheme. Come to think about it, it's the first time I see a RDAF S-61 here. Keep posting, there's a lot to explore from Denmark. /Finn
-
ICM 1/48 Marauder interior, ammo storage?
Tomas Enerdal replied to Tomas Enerdal's topic in Aircraft WWII
Wow, thanks for the great pics and cutaways! Things are getting clearer. -I have decided to not open up to the second bomb bay. The ammo rails to the tail guns are visible however and will be added further to the rear and at the tail guns themselves. -The ammo boxes and the flexible ammo chutes will be added to the waist guns. The Martin power turret will be a little further detailed, but not much. Ar Matt put it, not much can be improved besides the ammo. The waist gun ammo boxes can be seen in at least one pic: It seems like the old Eduard set is rather well detailed and accurate, see instructions here. I also found out that I'm lucky and "rich" in a sense, I found an old Eduard accessory in my stash: Browning 12.7 mm Ammunition. It consists of three lengths (à 42 mm) of ammo belt, surprisingly well etched. But most important, two lengths (also 42 mm) of the flexible ammo chutes. They need to be folded with a folding tool, but they are beautifully etched and will possibly be drapable and will add some beautiful detail if one can get it right. There is also 3D-printed ammo belts available from GasPatch, and Browning barrels available from Master. 3D-printed Brownings are available too, for those who are so inclined. The ammo side of this is looking surprisingly good so far! -
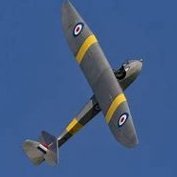
Novo 1/72 Fairey Firefly
FinnAndersen replied to CheapTricked's topic in Ready for Inspection - Aircraft
Ah. Seems that not all browsers support this, apparently not my Opera. I could see the pictures i Safari, though. You did a great job on these ancient kits. /Finn -
 From my point of view, RS just made a conversion set, plus saved clients a trouble with searching and buying basic kit.
 -
That's a great project for the pair of you to do. I hope you have a lot of fun. Nice one.
-
PV-1 Ventura, Aleutian Islands, 1943
Richard S replied to russ c's topic in Ready for Inspection - Aircraft
I too missed this the first time around and really pleased it’s resurfaced. Big fan of Russ’s work. -
This is a bit off the wall, and I was unsure whether to post this question here or in general discussion. But since it is on topic to this build, here goes. Pontos provides some very fine PE fire axes. I have a fair number of reference photos showing the locations of these axes, mounted on weather deck bulkheads. But the photos are, as so usually maddeningly frustrating, in black and white. What color were they? The axes are just dark and could be anywhere on the color spectrum. Does anyone have any info as to whether these axes were painted red? My inclination is to paint them so. Just wondering if anyone knows. Best, Jeff
-
Nice clean build and a nice colour scheme. Just the right amount of weathered look as well.
-

Westland Wasp HAS 1: 'Ambuscade Flight: XT778'
Bigdave22014 replied to TheBaron's topic in Work in Progress - Aircraft
Exquisite. - Today
-
 Thank you very much. Go on Rich, it's a nice kit to build. Alain PS: no post for a few weeks, I am going to Seoul for hollidays.


.thumb.JPG.ebe7bd09037c033b484e59e59a925a45.JPG)


-
Forum Statistics
239.4k
Total Topics4.1m
Total Posts -
Member Statistics
34,551
Total Members3,626
Most Online
-
Who's Online 111 Members, 1 Anonymous, 776 Guests (See full list)
- TEMPESTMK5
- The Rat
- At Sea
- Giorgio N
- Chippy
- PlaStix
- GMK
- gunpowder17
- Hamden
- IanC
- keefr22
- R T Fishall
- Putty Animal
- Tomas Enerdal
- Gustavd
- Pete in Lincs
- mahavelona
- Creepy Pete
- Work In Progress
- BritJet
- PeterR
- quangster
- mick
- mark.au
- dromia
- Dave Swindell
- MOK61
- Pete M.
- Stew Dapple
- maverick_62
- IT_Man
- Bob C.
- theplasticsurgeon
- TheKinksFan
- Classic 315
- ScanmanDan
- John Masters
- Bangseat
- Silmariand
- Roman Schilhart
- bigbadbadge
- Ian Anderson
- theskits62
- Bullbasket
- Circloy
- Tarby
- Toryu
- RidgeRunner
- AC87
- Robert
- MrB17
- moondrome
- Rich75
- cherisy
- Ray_W
- busnproplinerfan
- sallyoz
- Jean-Pierre
- wimbledon99
- Dads203
- Juhannussima
- eclipse
- Rickpadwick1801
- Reini78
- Paul I
- SouthViper
- yezda
- Ali62
- Vadasz
- giemme
- dalea
- TobHol
- SimonT
- Watto
- David Koktavý
- kamikaze
- Foghorn Leghorn
- Wojtek2
- prowler93
- neil5208
- cynicaljohnny
- Tailwheel
- Farmerboy
- IanJohnB
- JOCKNEY
- Peter Milgate
- galgos
- 457
- JeroenS
- Chrisj2003
- Teeradej
- badger
- FinnAndersen
- seanAF
- Stef N.
- Paul Lucas
- Interested bystander
- foeth
- YK GOH
- CliffB
- Richard S
- dickrd
- Jarna
- Seamus
- AleTar
- Zephyr
- Jon Bryon
- Bell209
- GPBooth
- Jabba
- fox1_BE