omegaman Posted October 13, 2011 Share Posted October 13, 2011 (edited) It has been a while since I have done anythign of any use on here! I started this 2 years ago and one thing lead to another and I have only really got a suitable modelling space now (including spraybooth and new airbrush) I have just finished a 21st Century Toys Bf-109G-14 which I am extremely happy with, and I will post it tonight on the RFI section. Here is the progress so far on the skyraider: - http://www.britmodeller.com/forums/index.php?showtopic=36042 The idea is to use the AEW specific bits and bash them onto the tamiya airframe. I also have the airwaves wing fold to use and have cut the wings apart ready for this. Luckily the airwaves set includes the extra crew doors, which have been added into the fuselage where I had filled the airbrakes (as shown in the previous link) I have since glued the fuse together and added the extended cockpit spine fairing from the Esci kit. I had to fashion the circular wheel blanks from evergreen and have now filled them flush. I am deciding if the flaps should be up or down when parked. Most pictures suggest down from my reference. The wings are now attached in addition to this and I have painted the engine ready. I may actually finish something! Edited October 28, 2011 by omegaman 1 Link to comment Share on other sites More sharing options...
omegaman Posted October 13, 2011 Author Share Posted October 13, 2011 Now added some pictures! Link to comment Share on other sites More sharing options...
JohnT Posted October 13, 2011 Share Posted October 13, 2011 Good work. I bought both kits with the same idea in mind but had not thought it any further than that. I'll be watching and learning with interest I take it you ruled out the possibility of using the ESCI fuselage? I assume it has too many problems? Link to comment Share on other sites More sharing options...
omegaman Posted October 13, 2011 Author Share Posted October 13, 2011 Johnt The esci fuselage was not great to be honest and it still has the armour plates. The blanks for the extra crew compartment dont look right or fit well, it was easier to use the tamiya fuse and fill the airbrake housing. Additionally the plastic in my esci kit was far too hard and didnt stick together very well! That combined with the raised panel lines definitely ruled it out for me. Link to comment Share on other sites More sharing options...
JohnT Posted October 13, 2011 Share Posted October 13, 2011 Thanks for that I suspect I will follow in your footsteps at some stage. I have a copy of the Crowood book on the Skyraider which has a chapter on the AEW in RN service and also a copy of A History of the Skyraider AEW.1 from the British Aviation Research Group. It has a lot of data on individual airframes and some B & W photos and profiles. Drop me a pm if you think I might have something helpful JohnT Link to comment Share on other sites More sharing options...
AndyC Posted October 13, 2011 Share Posted October 13, 2011 Good work - it will look a lot better than the ESCI kit alone. I didn't have the patience to follow your path at the time I did mine and it grates a little! Andy Link to comment Share on other sites More sharing options...
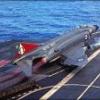
omegaman Posted October 16, 2011 Author Share Posted October 16, 2011 Some more pictures. The majority of the fuselage is together with the radome added. I just need to add the winglets on the tailplane. Just contemplating opeining the cowling for the esci engine to be on display or just use the tamiya approach. Airwaves wing fold should be next. The outer wings are together. 1 Link to comment Share on other sites More sharing options...
Vlamgat9 Posted October 16, 2011 Share Posted October 16, 2011 Top notch! One small thing - don't you need to remove the armour plating from either side of the fuselage around the cockpit? Dont think the AEW 'raiders had this? Link to comment Share on other sites More sharing options...
jimbuna Posted October 16, 2011 Share Posted October 16, 2011 Never seen one before...looks interesting. Link to comment Share on other sites More sharing options...
omegaman Posted October 17, 2011 Author Share Posted October 17, 2011 Top notch!One small thing - don't you need to remove the armour plating from either side of the fuselage around the cockpit? Dont think the AEW 'raiders had this? Thanks! I call it an in service mod! Why should the AEW pilots miss out on armour plating? Even the esci kit has this plating when you are correct it shouldnt be there. It owuld look a mess if I removed it entirely so I thought I would leave it on! Link to comment Share on other sites More sharing options...
Radar Posted October 17, 2011 Share Posted October 17, 2011 Omega, Nice job mate she's coming along nicely, seems a shame that you've gone to all of the trouble with adding the doors and filling airbrakes in and not to take off the armour plating, which is a fairly easy rub down and rescribe job. I don't know if you know but the FAA AEW Mk1's had a special box flame damper unit either side on the nose which is easy to make with folded thin palstic card see below: As far as I know the FAA Skyraiders were the only ones to have this. Cheers Ian S. 1 Link to comment Share on other sites More sharing options...
omegaman Posted October 17, 2011 Author Share Posted October 17, 2011 Good spot on the flame damper! I will add this in! Link to comment Share on other sites More sharing options...
Moofles Posted October 17, 2011 Share Posted October 17, 2011 very intresting build this, shall follow closely. Link to comment Share on other sites More sharing options...
omegaman Posted October 17, 2011 Author Share Posted October 17, 2011 Does anyone know what colour the landing gear bays were? Are they a dark grey? the esci instructions say blue which I dont think is correct. Also are there any more pictures of this flame damper? Link to comment Share on other sites More sharing options...
omegaman Posted October 21, 2011 Author Share Posted October 21, 2011 Quick update - Pictures to follow this evening. I have essentially completed the fuselage by adding the fiddly airwaves wing fold set. The outer wings were a pain but they are now there. I added some anti static wicks from parachute thread, which was an experiment but it turned out well. I will add the main landing gear prior to painting as the sources and brainy people of this website suggest it is body coloured anyway. I will probably add the engine when after painting as the dry fit suggests this will be fine. Over the weekend I should get some paint on! Should sit nicely alongside my latest purchase (Hasegawa Sea King AEW2 - bargain at hannants at the moment!) in my 849 collections. Now if only someone would please release the 1/48 AEW Gannet! Link to comment Share on other sites More sharing options...
Moofles Posted October 22, 2011 Share Posted October 22, 2011 Looking forward to this update. Really enjoying the build. Link to comment Share on other sites More sharing options...
omegaman Posted October 24, 2011 Author Share Posted October 24, 2011 Here are the updates. This is pretty much where I'm at tonight. I will just get the rest of the etch on the wingfolds unless I stick it to my hands! At this point I will then paint by thursday! Going for Tamiya X-3 as XF-17 seemed far too black for me. Decided that I will be adding the suez stripes to it also. Hope you enjoy, thanks for looking! 1 Link to comment Share on other sites More sharing options...
Moofles Posted October 25, 2011 Share Posted October 25, 2011 Some great progress. Link to comment Share on other sites More sharing options...
omegaman Posted October 26, 2011 Author Share Posted October 26, 2011 Thanks moofles. Last night I managed to get a first coat of blue on and am happy with the switch to X-3 Royal Blue. Not too happy with the finish but as an initial coat it will do. I will be glossing the aircraft anyway so was looking more for colour and coverage rather than finish at this stage. Link to comment Share on other sites More sharing options...
omegaman Posted October 27, 2011 Author Share Posted October 27, 2011 Well I got the paint on over the last couple of days (Tamiya Royal Blue) and varnished with a rattle can Humbrol Gloss Clear. This was laid on in thin coats but the wings and an area of the spine have ended up clouding giving a faded effect which isnt as glossy. This is a new can of spray and I gave it a thorough shaking, I have never had any issues with my satin and matt cote cans. What have I done wrong and how can I rectify it - Can I paint over the gloss cote with some more Tamiya blue and regloss or do I have to strip it down? Link to comment Share on other sites More sharing options...
Moofles Posted October 27, 2011 Share Posted October 27, 2011 is this a pre weathering gloss, which you will just decal, then add another coat of gloss for weathering, then seal it all in with another coat of gloss/final varnish. Or is it your final varnish coat. If its the first one, could always lightly sand back, repaint then re-gloss. Link to comment Share on other sites More sharing options...
omegaman Posted October 27, 2011 Author Share Posted October 27, 2011 This is a gloss over the base colour, the internet is not helpful in this matter. It simply says how it happened and how to avoid it but not how to fix it. Humbrol suggest that a coat of gloss will rectify milkiness if it was initially a satin or matt cote but no info on what to do about your gloss cote. I suspect it is trapped moisture so I am thinking that applying a further gloss cote will note change this at all. I may be able ot salvage it as some form of weathering or just paint the areas affected again without stripping back (then if that doesnt work I haven;t lost anything if I have to strip if back anyway) Link to comment Share on other sites More sharing options...
sunshine coast Posted October 27, 2011 Share Posted October 27, 2011 This is a gloss over the base colour, the internet is not helpful in this matter. It simply says how it happened and how to avoid it but not how to fix it. Humbrol suggest that a coat of gloss will rectify milkiness if it was initially a satin or matt cote but no info on what to do about your gloss cote. I suspect it is trapped moisture so I am thinking that applying a further gloss cote will note change this at all. I may be able ot salvage it as some form of weathering or just paint the areas affected again without stripping back (then if that doesnt work I haven;t lost anything if I have to strip if back anyway) The over-spraying with another coat of a different varnish...ie.satin over a cloudy matt.....only seems to work if it is done almost immediately before the milky coat cures .....I have done this myself before so I know that it does work......but I presume is a bit late now for your aircraft .. ....it may be worth a thin extra coat to see if it clears...as you say nothing to loose .. Regards Trevor .. Link to comment Share on other sites More sharing options...
omegaman Posted October 27, 2011 Author Share Posted October 27, 2011 I have just seen that the cloudy area may be covered perfectly by a set of operation musketeer stripes. It may now become a 1956 A flight Spad rather than the 1958 B flight Ark version. I will assess at home! Not all things are bad! Link to comment Share on other sites More sharing options...
Homebee Posted October 27, 2011 Share Posted October 27, 2011 (edited) Nice work Omegaman For such a camo I use the Xtracolor X13 RAF Blue/Grey. Definitely not an easy color to use. V.P. Edited October 27, 2011 by Homebee Link to comment Share on other sites More sharing options...

Recommended Posts
Create an account or sign in to comment
You need to be a member in order to leave a comment
Create an account
Sign up for a new account in our community. It's easy!
Register a new accountSign in
Already have an account? Sign in here.
Sign In Now