Basosz Posted June 19, 2011 Share Posted June 19, 2011 I've been starting kit after kit after kit for a while now and they keep piling up. I don't put the aside or in a box or anything so my desk is now a proper mess. As I really work better with a rather clean desk I decided to finish a bunch of these kits. I've made some pictures to illuminate the whole thing Here is my desk as it is and here it is with the builds carefully and meticulously outlined in Red.Most are 1:35 German AFV from WW2 but not all. The builds in order of my being able to outline them in Paint: 1: German aircraft carrier Graf Zeppelin, Revell, 1:720 I think 2: Sd.Kfz.234 with 2cm KwK, Italeri 1:35 3: Blue Angels F-18, HobbyBoss 1:72 (this was supposed to be a quick build... three months ago) 4: Einheitsdiesel with metal cargo body, IBG Models 1:35 5: Sd.Kfz.10/4 with Flak 30, Italeri 1:35 6: Kubelwagen Type 82, Italeri 1:35 7: Kfz.15 Horch, Italeri 1:35 8: M1 Panther II, Dragon 1:35 They are all mostly built up and ready for several different stages of paint. The M1 Panther II is pretty much ready, but just need decals and some weathering and a small diorama (just a minefield will do fine). Also needs tracks painted. The Graf Zeppelin, F-18 and 234 need paint and decals and weathering. The Einheitsdiesel. Very nice kit, very cool instructions. Needs details painted, decals and loads of weathering/dirtying up. Also some assembly required The gun for the 10/4. Needs more dirtying up with some of the other builds as they will end up in the same diorama. The Kubelwagen. I had it basically done except for the mud. Was looking at my Vallejo pigments and decided to give them a go. Nice stuff which gives great texture. Thing is not done as I got distracted by the 10/4 It is supposed to be a Kubelwagen that was meant to be sent to Africa but wasn't needed any more because the Germans lost the fight over there so they removed the yellow paint but did a lousy job. Hence the yellow patches. Sd.Kfz.10/4. I like this vehicle, but I'm not sure about the details on the inside of the drivers cab. Needs some research. Paint and decals done, tracks and wheels need paint but that shouldn't take too long. Forward underside and some of the nose is dirtied up to see how it would look. I'm kinda happy with it. Photos make it look starker than it really is. The Horch needs some work. Lots of details need paint (like wheels and bits and bobs on the interior). Also decals and dirt The hood for the Einheitsdiesel. This was a testbed for hooded vehicles like the Kubel and the Horch. I used tissue paper and CA to give it some texture. It's not perfect but I'm very happy with it. Well... these are the ones I hope to finish not too far away in the future. Comments, suggestions and questions are welcome. Link to comment Share on other sites More sharing options...
bruce3371 Posted June 22, 2011 Share Posted June 22, 2011 Get them models finished already!! *Cracks whip* Link to comment Share on other sites More sharing options...
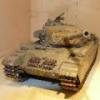
Basosz Posted July 13, 2011 Author Share Posted July 13, 2011 Get them models finished already!! *Cracks whip* YES SIR !! Panther II is done !! <-- linky and a picture: Now working on (almost finished really) the muddying up of the Kubelwagen. I have to say that it looks very good. Final snow weathering on these German WW2 vehicles will be done when the Diorama is being finalised. That is about 10 vehicles in the future though Link to comment Share on other sites More sharing options...
Basosz Posted July 14, 2011 Author Share Posted July 14, 2011 (edited) As promised... Kubelwagen done Edited July 14, 2011 by Basosz Link to comment Share on other sites More sharing options...
robert26 Posted October 3, 2011 Share Posted October 3, 2011 Lovely looking armour....Great to get things finished and onwards to next quest Link to comment Share on other sites More sharing options...
Moofles Posted October 4, 2011 Share Posted October 4, 2011 Stunning stuff, how do you do such convincing weathering and mud build up? Link to comment Share on other sites More sharing options...
jimbuna Posted October 4, 2011 Share Posted October 4, 2011 Fantastic work!! Link to comment Share on other sites More sharing options...
Jaykay Posted October 4, 2011 Share Posted October 4, 2011 Ha brilliant, looks like my bench!! Link to comment Share on other sites More sharing options...
Basosz Posted October 8, 2011 Author Share Posted October 8, 2011 Stunning stuff, how do you do such convincing weathering and mud build up? Hey there Moofles, only just saw that someone responded to this thread Had pretty much forgotten about the Personal KUTA. Have finished 3 builds since the Kubel and am now working on a 4th (P-38 Pathfinder Lightning). So you can pretty much say that the KUTA failed rather spectacularly even though I did finish the Sd.Kfz.234 but that needs pics taken of and loads of weathering. Which brings me to your question about the mud build up... I think I got this idea from a Vallejo instruction DVD I have where the guy uses Vallejo pigments I have four sets of four bottles with only 1 colour which overlaps in two packages so I have 15 different colours/hues to choose from. I just apply some water diluted PVA to the area where I want the mud to be, then use a dry brush to pick up the (sometimes mixed) pigments and just smack 'em on. Since it's mud, it's doesn't have to be perfect. Let dry for a while (takes a bit longer when using diluted PVA) and re-apply (possibly with different colours to get multi-mud build-up. Just thought of that... must try it) if/when you're not satisfied. It's really rather simple but because it's pigment it keeps its texture and builds up rather nice (as you well noticed). They also have rust colours and snow and a dozen others and some need to be applied more evenly to get a good looking result, but this was mud so I wasn't looking for smooth. Link to comment Share on other sites More sharing options...
TinHead Posted December 20, 2011 Share Posted December 20, 2011 I know this sounds a silly question, but to get the canvas like texture on the Kubel top, how did you do that, like tissue first then glued? or.. did you apply it in torn pieces? AR. Link to comment Share on other sites More sharing options...
havoc Posted December 31, 2011 Share Posted December 31, 2011 You would laugh if you saw my work area lol. Have to share the dining room table with the missus !!! When the shed is built .................................. Looks a cracking area there mate and I d love to have all those projects going. Link to comment Share on other sites More sharing options...

Recommended Posts
Create an account or sign in to comment
You need to be a member in order to leave a comment
Create an account
Sign up for a new account in our community. It's easy!
Register a new accountSign in
Already have an account? Sign in here.
Sign In Now