Graham77 Posted January 24, 2011 Share Posted January 24, 2011 Seems like a good place to put this one, it has been sat on the bench for a while now and posed me many problems Here is the kit dry fitted together, how simple it looked A bit of priming in white an grey Then some of the easier colours And then the problems began. I have a number of jet projects but am slowly working my way back into the hobby, this was supposed to be a decal practice model however the painting of the body was pretty tricky. The main colours, white, red and blue all fit around the decals which themselves roll around the body. After much searching on here I finally discovered the best plan was to photocopy the decals and then stick them onto the model as masks. It took many goes for me to get the masks right however i am chuffed with the result (it needs some tidying up I know) and am sure next time I'll get it better. Now just needs the decals adding..... sadly all the white ones have misprinted so the project stalls again while airfix send me some new ones. Gives me time to touch the body work up and try to build some seatbelts for the inside. The end is in sight thanks to a KUTA. Link to comment Share on other sites More sharing options...
AnonymousDFB1 Posted January 25, 2011 Share Posted January 25, 2011 Nice one Graham, always fancied building that kit. Link to comment Share on other sites More sharing options...
Azgaron Posted January 25, 2011 Share Posted January 25, 2011 Nice project Graham! Cheers, Håkan Link to comment Share on other sites More sharing options...
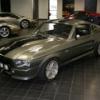
Graham77 Posted February 6, 2011 Author Share Posted February 6, 2011 I had some issues with the original decals for this kit all of the white writing was blurred, Airfix though sent me a new set within a week of calling and while I put off attacking those I added some masking tape seatbelts and finished off the interior (I used my imagination for the belts so I apologise to any purists reading this) Then completed decalling the body, which was a challenge for me ot say the least, lots of trimming of the decals before wetting though has paid off really well (again for my ability) And with just a little paint to touch up and a coat or two of Quick Shine (like Klear) here is the finished motor. Hope you like it and now back to the Saturn V Link to comment Share on other sites More sharing options...
ancient mariner Posted February 6, 2011 Share Posted February 6, 2011 Well done,good job. Its amazing how much time these KUTA builds take up. Link to comment Share on other sites More sharing options...
Azgaron Posted February 7, 2011 Share Posted February 7, 2011 Nice build Graham! Looking good! Cheers, Håkan Link to comment Share on other sites More sharing options...
AnonymousDFB1 Posted February 7, 2011 Share Posted February 7, 2011 I like well done Gonna dirty it up now? Link to comment Share on other sites More sharing options...
Graham77 Posted February 7, 2011 Author Share Posted February 7, 2011 Probably at some point, I have never tried weathering etc so this car is joining the list of "finished" kits ready for me to try out new techniques when I get some more free time. Link to comment Share on other sites More sharing options...
TonyG Posted February 8, 2011 Share Posted February 8, 2011 As it's McRae's Focus, dirtying it down would also entail putting a few dents in it... he was one heck of a driver. Finish on the podium or crash it (sometimes both). Sadly missed from the WRC. Link to comment Share on other sites More sharing options...

Recommended Posts