beeza1 Posted July 6, 2010 Share Posted July 6, 2010 The 1:32 scale Roden Spad VII c.1 is a pretty good kit, not for the beginner but the average modeller should have little difficulty constructing this model. This kit has been around for quite a while now but this time I will be depicting the Lafayette Escadrille by using Pheon Models decals. The decals are superb with excellent graphics and colours, a great little booklet with a brief history and explanation of each scheme, there are plenty of options to choose from, and beautifully printed full colour sheets with decal application directions. Many thanks must go to Rowan Broadbent for supplying the decals and Richard Andrews from theaviattic.com for organising the Roden kit for me. Here are the options available on the Pheon Models decal sheet. I started the build by firstly opening up all the vents around the engine compartment. I drilled three holes in each vent then cleaned them up with a very sharp scalpel. The plastic Roden has used is quite soft so the job was pretty easy, but there are a lot of vents. I also filled in all the indentations Roden had on the rocker cover blisters and drilled them, with the plastic being so soft it was hard to stop the drill bit from wandering so straight lines were difficult to maintain. Des. A build log can be found on my website. http://www.ww1aircraftmodels.com 1 Link to comment Share on other sites More sharing options...
beeza1 Posted July 6, 2010 Author Share Posted July 6, 2010 The fuselage frames had bracing wires with turnbuckles as did the control cables, so I made some small turnbuckles to do the job, these turnbuckles are a lot smaller than those I made for my Bristol so it took some time just to do 14 of them. As you can see in the photo, the turnbuckles are very small. Des. http://www.ww1aircraftmodels.com 2 Link to comment Share on other sites More sharing options...
beeza1 Posted July 6, 2010 Author Share Posted July 6, 2010 I needed to add a grille to the radiator so using materials on hand I made one from brass tube, 0.5mm for the smaller size and 0.8mm for the two larger ones, they are all held together with CA. For the radiator mesh I "borrowed" my wife's tea strainer and attacked it with my scalpel, CA holds it well to the plastic. A coat of black then highlighted with aluminium gave me the affect I was after. The mesh is a little too coarse but I like to use what materials I have lying around. Des. http://www.ww1aircraftmodels.com 2 Link to comment Share on other sites More sharing options...
beeza1 Posted July 6, 2010 Author Share Posted July 6, 2010 Here are those little turnbuckles used for the bracing of the fuselage frames, I used 0.1mm smoke coloured invisible (monofilament) thread for the wires, they are looped through the turnbuckle eyelet then threaded back through a 0.4mm brass sleeve. The little brass sleeve has been drilled out to 0.3mm and cut to a length of 0.5mm, it is all secured with a small drop of CA. The remainer of the turnbuckles will be used on the control cables inside the cockpit. Des. http://www.ww1aircraftmodels.com 1 Link to comment Share on other sites More sharing options...
beeza1 Posted July 6, 2010 Author Share Posted July 6, 2010 Three more photos of my progress so far. I was not impressed with the kit supplied priming pump so I made a new one, details are on my website on how I did it. Most of the cockpit is now complete with the rudder and aileron turnbuckles fitted. I made a compass and gimbal from brass bits and pieces and mounted it on a stand on the cockpit floor. This was my first attempt at making a seat cushion, I used Milliput. I used the kit supplied starting magneto but added a small winding handle. The metal plates on the cockpit floor aft of the rudder bar are made from 3mm wide PE fret waste cut to size, bent and fitted between the frames. All the wood work is first base coated with Gunze acrylics then wood grained with artist oils, once dry it is coated with Humbrol Clear Cote (matt). Des. http://www.ww1aircraftmodels.com This is the same as the previous photo except without the arrows and text. 2 Link to comment Share on other sites More sharing options...
darson Posted July 6, 2010 Share Posted July 6, 2010 Bloody hell that's some nice work Des, please keep the updates coming. Darren Link to comment Share on other sites More sharing options...
T-Tango Posted July 6, 2010 Share Posted July 6, 2010 Great work as always Des, keep the updates coming. Link to comment Share on other sites More sharing options...
beeza1 Posted July 10, 2010 Author Share Posted July 10, 2010 Another update. I drilled out all the moulded instruments and replaced them with various size brass tube, CA holds then in place. I punched the instrument faces from an instrument decal sheet and leaving the backing paper on I pushed them into each brass tube, a small drop of CA on the rear side holds them very well. A drop of clear gloss on the instrument faces acts as the "glass". The rest of the bits are ready for assembly, I'm waiting for the seat belt to turn up in the mail. Des. http://www.ww1aircraftmodels.com 2 Link to comment Share on other sites More sharing options...
T-Tango Posted July 10, 2010 Share Posted July 10, 2010 Brilliant job Des, your detail work is simply amazing. Link to comment Share on other sites More sharing options...
beeza1 Posted July 20, 2010 Author Share Posted July 20, 2010 I have added some colour to the aeroplane. All the paints are Humbrol enamels, the masking was done using micro masking tape and once the paint was dry it was coated with Humbrol Matt Cote. I am using scheme No.10 from Pheon Models decals depicting S3301 1 Lt. George Turnure 103rd Aero Sqn, Bonne Maison. April 1918. We know that he had three recorded victories but apart from that there is little known about him, that is why I picked this scheme. I like to highlight little known pilots, all the "aces"and "heroes"have been done many times over, but in my eyes this pilot is as much a hero as any of the "famous"aviators. The lighting I used for the photos has changed the colours slightly, I will try and do better next time. Des. Visit My Website for a full build log. 2 Link to comment Share on other sites More sharing options...
Carts Posted July 20, 2010 Share Posted July 20, 2010 This is epic work,Stunning. Link to comment Share on other sites More sharing options...
beeza1 Posted July 28, 2010 Author Share Posted July 28, 2010 I originally had the metal brackets on each strut painted black, Rowan (Pheon Models) pointed out that most French built Spads had them painted blue, so it was back to the bench for a repaint. The machine gun is now ready to be fitted and the exhaust pipes have been modified and are nearly ready to be fitted. All the upper surfaces are now painted and clear coated, all that is needed now is to paint the bottom of the top wing and under the tail plane. All my painting is done using Humbrol enamels and Humbrol Matt Cote, all brilliant products. I usually thin the paint 50 - 60% and spray at 20psi, all painted parts go into my heat box which not only speeds drying time but keeps the dust off the wet paint. Des. http://www.ww1aircraftmodels.com 2 Link to comment Share on other sites More sharing options...
beeza1 Posted July 31, 2010 Author Share Posted July 31, 2010 I glossed the fuselage using Humbrol Gloss No.35, once dry I applied the Pheon Models decals. The decals went on extremely well and adhered well to the gloss surface, they settled down over all the lumps and bumps and there was no silvering at all. After the decals were dry I sprayed the fuselage with two coats of Humbrol Matt Cote. My photography does not show the true brilliance of these decals. The kit supplied aileron activating linkages are out of scale and bulky, so I made new ones. I used small diameter brass tubing and left over PE frets. The photo shows the initial stages of manufacture with more work to be done before they are completed. These parts are very small which makes them very fiddly to work with. Des. http://www.ww1aircraftmodels.com 2 Link to comment Share on other sites More sharing options...
beeza1 Posted July 31, 2010 Author Share Posted July 31, 2010 I completed the aileron linkages, apart from the painting, and fitted them to the wings. It was a fiddly job but I think well worth it. Des. Visit My Website for a complete build log 1 Link to comment Share on other sites More sharing options...
beeza1 Posted August 13, 2010 Author Share Posted August 13, 2010 The top wing is now fitted and rigging has commenced. The cabane rigging is completed and I also added the four wing bracing rods usunf 0.4mm brass tube, note that the new fuel pipes are fitted. The stagger rigging is nearly done, a bit fiddly as the wings are close together Roden did not include a pitot tube assembly with the kit so I made one from copper wire, the bracket is made from left over PE material. This is a photo of the complicated rigging attachment to the inboard interplane strut. Three tiny eyelets on each side of the strut holds the 0.12mm mono. Des. Visit My Website 2 Link to comment Share on other sites More sharing options...
Doug Rogers Posted August 13, 2010 Share Posted August 13, 2010 Epic work, as usual Des. Fantastic build, really inspiring. Link to comment Share on other sites More sharing options...
T-Tango Posted August 14, 2010 Share Posted August 14, 2010 (edited) Superb build Des, your attention to detail is unbelievable. Edited August 14, 2010 by T-Tango Link to comment Share on other sites More sharing options...
beeza1 Posted August 17, 2010 Author Share Posted August 17, 2010 Thanks guys for your very kind words, they are always appreciated. I finally finished the wing rigging, the rigging connection to the inboard interplane strut was a real headache. I'm pleased with the result so all the extra work was worth it, I think it looks pretty close to the original aircraft. The rest of the rigging was straight forward, the only problem being the small space between the wings. Next step is the undercarriage. Des. Visit My Website 1 Link to comment Share on other sites More sharing options...
CPNGROATS Posted August 17, 2010 Share Posted August 17, 2010 OUTSTANDING !!!! An inspiration to all...[esp. us lesser modellers]... Cheers, ggc Link to comment Share on other sites More sharing options...
Beaconroot Posted August 17, 2010 Share Posted August 17, 2010 WOW! This is a great build! Very nice looking. Can't wait to see it finished. Jim Root Link to comment Share on other sites More sharing options...
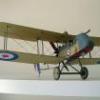
beeza1 Posted August 31, 2010 Author Share Posted August 31, 2010 Here are the photos of my completed Spad VII c.1 Des. 2 Link to comment Share on other sites More sharing options...
T-Tango Posted August 31, 2010 Share Posted August 31, 2010 Lovely build, superb detailing, I like it a lot Des. Link to comment Share on other sites More sharing options...
beeza1 Posted September 1, 2010 Author Share Posted September 1, 2010 I would like to thank everyone who left wonderful comments about my build, they are much appreciated. also a big thank you to all those who took the time to look at my build, I hope it has inspired others to build this great model. The Spad was never very high on my list of favorite aircraft, but since completing this build I now put it up there with the best, it is a lovely little aeroplane and certainly compliments my other WW1 aircraft models. Des. A full build log of this model can be found here http://www.ww1aircraftmodels.com Link to comment Share on other sites More sharing options...
Ian Posted October 23, 2010 Share Posted October 23, 2010 Superb build & pictorial. Outstanding attention to detail throughout. Ian Link to comment Share on other sites More sharing options...
Ray S Posted October 24, 2010 Share Posted October 24, 2010 Stunning finish, well done, and what an inspiration to us! Brilliant, regards from Ray Link to comment Share on other sites More sharing options...

Recommended Posts
Create an account or sign in to comment
You need to be a member in order to leave a comment
Create an account
Sign up for a new account in our community. It's easy!
Register a new accountSign in
Already have an account? Sign in here.
Sign In Now