starflyer Posted December 21, 2009 Share Posted December 21, 2009 (edited) Hi friends, today I start something I never (never say never) expected from me......building a Sptifire. Not because I don't like it, but only because usually I am involved by strong passion for Italian Aircraft and so normally I build that, but when I see this box laying down and forget in "kit warehouse" at home, I was imediately raped from it. I consider the Spitfire the most elegant and beauty propeller airplane of WWII (especially the Vb version), so now I am here.....but sincerly I don't know enough about Spitfire so I start not only to build, but also to learn about. This is the box and some aftermarket were inside.......... As you can see the photoetched set is dedicate to Tamiya kit, but I feel (hope) could be good also for Hase kit....we will discover togheter... The kit provide both propeller (Rotol jablo and De Havilland), since I don't know in advance wich subjetc I will replicate (If you have suggestion please submit me) I start to build both props, it is always a fun.... The spin are quite good but I see in several pics of real Spit, that separation line and screw for fixing is missing.....so I scribe it... The blade painting process....nothing special...... The color of spin I like is the Sky S and I found Humbrol H23 and Gunze H74.....but they don't seems similar......do you have suggestion wich is more correct? Waiting for some answer I "jump" to wings.......very nice detail on Hasegawa kit but I would like to improve much as I can I "play" rivetting little bit....and sincerly I don't like Spitfire with open flaps (the beautiful shape seems corrupted by opened flaps) I decided to keep the flaps closed and move all the other surfaces just a little bit. This means cut also somewhere.... Another very simply improvement regarding munition exhaust, it appear more realistic if you see a real hole...... Edited February 1, 2010 by starflyer Link to comment Share on other sites More sharing options...
Doug Rogers Posted December 21, 2009 Share Posted December 21, 2009 Nice start there Starflyer. As to the spinner colour, if it calls for Sky, of the two I would personally use the Gunze H74. Nice detail touches you've done already, should be a good build for you I think. Watch out! Spitfires can be addictive! Link to comment Share on other sites More sharing options...
starflyer Posted December 21, 2009 Author Share Posted December 21, 2009 (edited) First impact with photoetched is request before assembly the half wings......so check if we ae lucky by Eduard for Tamiya kit..... YES.....it seems..... I am little bit disappointed because Eduard don't put a grid for cooling radiator....so I just paint the kit part Wings are assebled and just small points need putting.... Dryfit test to check.......hummmmm.......I need to solve this giunction.....but later, I already have idea how.... Edited February 1, 2010 by starflyer Link to comment Share on other sites More sharing options...
starflyer Posted December 21, 2009 Author Share Posted December 21, 2009 (edited) Now I am involved in horizontal stabilator, after cutting, it need to be adjusted before gluing together.... that's all for now, I will be back after Christmas..... Edited February 1, 2010 by starflyer Link to comment Share on other sites More sharing options...
AnonymousFO98 Posted December 21, 2009 Share Posted December 21, 2009 (edited) I am contacting the RSPB- as a member of that wonderful organisation i think it despicable that you make that poor little blackbird do all the work while you take the credit and all the glory for the excellent builds. really Starflyer! shame on you Edited December 21, 2009 by walrus Link to comment Share on other sites More sharing options...
starflyer Posted December 21, 2009 Author Share Posted December 21, 2009 I am contacting the RSPB- as a member of that wonderful organisation i think it despicable that you make that poor little blackbird do all the work while you take the credit and all the glory for the excellent builds. really Starflyer! shame on you He (the blackbird) is my favorite unique slave....he he he he he Link to comment Share on other sites More sharing options...
Troffa Posted December 21, 2009 Share Posted December 21, 2009 That's Calimero if I'm not mistaken, an Italian cartoon character I remember from TV in the 1970's (The black Bird, not the Spitfire!) Link to comment Share on other sites More sharing options...
starflyer Posted December 21, 2009 Author Share Posted December 21, 2009 That's Calimero if I'm not mistaken, an Italian cartoon character I remember from TV in the 1970's (The black Bird, not the Spitfire!) Exactly my friend, the smal blackbird name is Calimero from the Italian toon you mentioned.......now you know, I am not so young Link to comment Share on other sites More sharing options...
desmojen Posted December 21, 2009 Share Posted December 21, 2009 I think Calimero is ace, I could do with a little helper like that too! Great thread Starflyer, I am looking forward to seeing further progress Jen. Link to comment Share on other sites More sharing options...
avro683 Posted December 21, 2009 Share Posted December 21, 2009 The best Spitfire kit in the scale in my opinion and you are doing a fine job. Looking forward to the next instalment. Tony Link to comment Share on other sites More sharing options...
starflyer Posted January 5, 2010 Author Share Posted January 5, 2010 (edited) Today I start to detailing interior of Spit, I started from the small door. The kit door is too much thick so I think is better to strachbuild new one from brass foil. .........going on to improve surfaces details...... Meanwile I spry both spins to test Gunze and Humbrol Sky Type S colour......but I still more confused wich is more close to the real color. Can some one help me giving me orientation? The only reference I have are old photos (black and white) of spitfires available on Internet and it seems the squadron code and spin looks quite light, so I am oriented more on the Humbrol that is lighter than Gunze..... Thanks for visiting this thread.... Edited February 1, 2010 by starflyer Link to comment Share on other sites More sharing options...
starflyer Posted January 11, 2010 Author Share Posted January 11, 2010 (edited) Hi there, step by step......detail after detail.... most of detail are strachbuilt since I dont' have resin set or more........ Edited February 1, 2010 by starflyer Link to comment Share on other sites More sharing options...
starflyer Posted January 11, 2010 Author Share Posted January 11, 2010 (edited) Predshading in black/grey was first step in painting process..... Following, all details painted one by one in approprioate color.... Oil washing....... Instruments panel cames from photoetchd Eduar (for Tamyia kit) That's all for now...bye Edited February 1, 2010 by starflyer Link to comment Share on other sites More sharing options...
starflyer Posted January 25, 2010 Author Share Posted January 25, 2010 (edited) ...... the spitfire is running towards painting step. after the "cockpit job" finally I glue togheter fuselage............ and I improve rivets detailing as I did on the wings..... In order to have a good joining between wings and fuselage I fix small sprue in a "strategic" points.... In fact I get a a better result..... Also some littledetail need to be improved on the exterior.... Edited February 1, 2010 by starflyer Link to comment Share on other sites More sharing options...
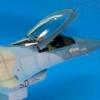
starflyer Posted January 25, 2010 Author Share Posted January 25, 2010 (edited) Also on the canopy I decide to improve a small detail....the window.... Later I will add a small window by acetate. The whole model get a primer coat (Gunze 1200), so I can check if there are imperfections on the surface.... Edited February 1, 2010 by starflyer Link to comment Share on other sites More sharing options...
starflyer Posted January 25, 2010 Author Share Posted January 25, 2010 (edited) Before to go on to paint, I follow in to a decision to follow as always my standard painting technique or try a new one hoping to improve the damage o paint as in the real one. So I decided to follow the new one.....and spry a coat of Aluminimu Alclad on whole model as a base for camuflage paint. Now I stop a little bit to arrange how to go on with camuflage and wich color sould I have to use.... Bye Edited February 1, 2010 by starflyer Link to comment Share on other sites More sharing options...
Alan P Posted January 25, 2010 Share Posted January 25, 2010 Another flawless finish - perhaps you should leave it like that... Link to comment Share on other sites More sharing options...
shamael Posted January 25, 2010 Share Posted January 25, 2010 Ciao, till now you did a great job. Are you going to use alclad for later chipping tecnique? Link to comment Share on other sites More sharing options...
JakeEaton Posted January 25, 2010 Share Posted January 25, 2010 (edited) Brilliant Looking forward to another flawless Starflyer paint job! I really have no idea how you get such beautifully smooth finishes. Great scratchbuilt details too. p.s. Did you finish those 2 Tornadoes? I don't remember seeing them completed Edited January 25, 2010 by JakeEaton Link to comment Share on other sites More sharing options...
perry Posted January 25, 2010 Share Posted January 25, 2010 Excellent work! Link to comment Share on other sites More sharing options...
starflyer Posted January 25, 2010 Author Share Posted January 25, 2010 Ciao,till now you did a great job. Are you going to use alclad for later chipping tecnique? Yes, this my intention.....but I am new to chipping by this technique....I must be creative to go on.....in fact I am thinking lot how to make nice chipping before starting with camuflage. Brilliant Looking forward to another flawless Starflyer paint job! I really have no idea how you get such beautifully smooth finishes. Great scratchbuilt details too.p.s. Did you finish those 2 Tornadoes? I don't remember seeing them completed Tornadoes are in stand by....time to time I switch to simply models to break the tension with tornadoes.....they are very difficult for me.....but very soon you will see progress about. Thank you to every body for comments. Link to comment Share on other sites More sharing options...
gcn Posted January 25, 2010 Share Posted January 25, 2010 Cracking thread with top notch building skills in evidence. I just don't understand how people get such a perfect finish it really is flawless Link to comment Share on other sites More sharing options...
starflyer Posted February 1, 2010 Author Share Posted February 1, 2010 (edited) Thank you to all for nice comments Finally I choose my subject.....it was an airplane of 303 Sqdn RF_M AR335. This airplane flown in the 303 Sqdn between 15-April-1942 and 5-Giune-1942. After that the airplane was in force to others Sqdn until the 24-Sept-1943 when crashed down with the pilot Vladislav Chochin in the 310 Sqdn. I like to give my personal interpretation of wheatering in this subject, imagining the airplane at the end of service in the 303° Sqdn with an quite heavy weathered camuflage. I read often that spitfires camuflage was sometimes with different shades of color (expecially the ocean grey) and lot of spitfires appear with the forward shade of camuflage much darker than in the back. That's why the constantly leakages of oil, dirty, and fluid from the engine keep dark the color of the paint. Instead the wings and back side of fuselage colours suffer a major weathering because sun, rain, and weather condition.......so I like to see my spitfire in this condition after few months of eavy use in fighting. Absolutely I don't want to say it was.....just my interpretation of this subject based upon a "Spit phots watching" until now. I hope you will like it. So, let start to paint this "English Glory", starting with salt technique to have (I hope) a good rappresentation of chipping surface. I put salt in excess where I like to see the chipped area, and when salt dry well I remove the excess that I don't like to have. I see lot fo photos to understand well where Spitfires camuflage was damaged and chipped and it was interesting and helpfull. In the next phas I apply an heavy preshading that help me for the weathered simulation........ For this preshading I use Gunze black and blue (undersurfaces) Edited February 1, 2010 by starflyer Link to comment Share on other sites More sharing options...
starflyer Posted February 1, 2010 Author Share Posted February 1, 2010 (edited) The first painting phase of surfaces...... 1st coat 2nd coat 3rd coat 4th step lightening with white the base color with random spots. Now I wait paint will be dry well. I use Xtracolor Fs 36270 and lightened by white. Edited February 1, 2010 by starflyer Link to comment Share on other sites More sharing options...
shamael Posted February 2, 2010 Share Posted February 2, 2010 What can I say? Bravo!!! Ciao Link to comment Share on other sites More sharing options...

Recommended Posts
Create an account or sign in to comment
You need to be a member in order to leave a comment
Create an account
Sign up for a new account in our community. It's easy!
Register a new accountSign in
Already have an account? Sign in here.
Sign In Now