beeza1 Posted December 17, 2009 Author Share Posted December 17, 2009 One more photo of the rigging so far. Des. Link to comment Share on other sites More sharing options...
Bobs_Buckles Posted December 17, 2009 Share Posted December 17, 2009 sweeeeeeeeeeeet! BVB Link to comment Share on other sites More sharing options...
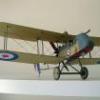
beeza1 Posted December 18, 2009 Author Share Posted December 18, 2009 A couple more photos, she has finally sprouted wings. Des. Link to comment Share on other sites More sharing options...
Julien Posted December 18, 2009 Share Posted December 18, 2009 Man that looks good. I have to ask do all the rigging bits (turnbuckles etc) come with the kit or are you making them? Julien Link to comment Share on other sites More sharing options...
beeza1 Posted December 18, 2009 Author Share Posted December 18, 2009 Thanks Julien for your comments' I am making all the rigging bits, it is a bit fidly and time consuming but well worth the effort. Cheers Des. Link to comment Share on other sites More sharing options...
Julien Posted December 18, 2009 Share Posted December 18, 2009 I am making all the rigging bits, Wow credit to you for that but they do look the part. Julien Link to comment Share on other sites More sharing options...
NickT Posted December 18, 2009 Share Posted December 18, 2009 That's amazing work! The rigging and turnbuckles look fantastic. Nick Link to comment Share on other sites More sharing options...
AnonymousAA74 Posted December 18, 2009 Share Posted December 18, 2009 Absolutely bloody gorgeous! I am in AWE. What an amazing build. Link to comment Share on other sites More sharing options...
AAbshier Posted December 18, 2009 Share Posted December 18, 2009 Just a quickie up-date on whats been happening with my Bristol. After a lot of tedious work, strained eyes, sore back and not so nimble fingers I finally finished the wicker seat. I set it up on the fuel tank just for the photos. The fuel tank still needs more work and the cockpit floor has just been painted with oils so after a few days of drying it will be clear coated.Des. I see it's time once again for me to reconsider changing over to stamp collecting. Holy crap, that's beyond gorgeous work! Andy Link to comment Share on other sites More sharing options...
Phil Posted December 20, 2009 Share Posted December 20, 2009 I was lucky enough to get this today for my birthday. I'd been visiting my parents earlier in the year to coincide with the IPMS nationals held in my home town. I happened to mention to my father about the Wingnut Wings stand at the show and how fantastic the kits looked, so after I left for home he went down to the show and bought this kit! Seeing your efforts have left me wanting to get started on it straight away. Now I'll be faced with rigging it, and given my usual interest in modern jets this will be a first. I'm really impressed by the turnbuckles, can you elaborate on how you've made these as they look fantastic and in 1/32 I think they really need to be there. Also, the instructions talk about the rigging being flat sectioned, does anyone know of a product that would be suitable for this? Link to comment Share on other sites More sharing options...
beeza1 Posted December 20, 2009 Author Share Posted December 20, 2009 (edited) Hi Phil. First off, HAPPY BIRTHDAY. Thank you for your kind words, they are much appreciated. The best way to describe how I make my turnbuckles is illustrated below, I hope it is clear enough for you to be able to see the details. The flat rigging section is available from a couple of suppliers, I don't know who they are but there are a few threads around that have all the details you require. Somebody will see your question and I'm sure you will get an answer shortly. Good luck with your build, the kit is a real pleasure to make, the fit of parts is brilliant which makes assembly very simple. The detail supplied by WNW is very good but there is plenty of scope to add as much detail as you wish. This is my third WNW kit and I have thoroughly enjoyed each of them, I am looking forward to the next releases. Sorry I could'nt help with the flat section. Cheers Des. Edited December 20, 2009 by beeza1 Link to comment Share on other sites More sharing options...
Phil Posted December 20, 2009 Share Posted December 20, 2009 Thanks for the guide on the turn buckles, I hate to think how long it must have taken to make enough little eyelets! Link to comment Share on other sites More sharing options...
Overhaulin Posted December 21, 2009 Share Posted December 21, 2009 Phil Radu sells Aerofoil wire. http://www.britmodeller.com/forums/index.php?showtopic=37343 Link to comment Share on other sites More sharing options...
dahut Posted December 21, 2009 Share Posted December 21, 2009 That is some cracking business, there! Link to comment Share on other sites More sharing options...
pacificmustang Posted December 21, 2009 Share Posted December 21, 2009 holy guacamole!! just caught up to this thread now. Fantastic Phil, what an eye-opening informative thread, do hope you are not a Port supporter though!! Regards Bruce Link to comment Share on other sites More sharing options...
Bobs_Buckles Posted December 21, 2009 Share Posted December 21, 2009 Des, That's the way I do the 2 eyelet buckle. Can be a pain drilling out the tubing but well worth the effort. Cheers, Bob Link to comment Share on other sites More sharing options...
Overhaulin Posted December 22, 2009 Share Posted December 22, 2009 Des Out of interest what did you use for PC10, it looks a really nice shade in the photos. Link to comment Share on other sites More sharing options...
beeza1 Posted December 22, 2009 Author Share Posted December 22, 2009 Thanks guys for your nice words, much appreciated. Overhaulin. The PC10 is Humbrol 155 Olive Drab thinned and airbrushed, then two coats of Humbrol Matt Cote (the one in the bottle, not the tinlet). I always leave the paint at least 24 hours to dry before applying the clear. Bob. Thank you for taking an interest in the way I make my buckles, I experimented a bit before deciding to use the system I now use. To eliminate the need to drill the brass tube, I now use 0.5mm which has a large enough bore to take the two eyelets. Progress on the Bristol has been a bit slow of late due to Christmas parties, family get togethers, shopping, yard work, car cleaning etc,etc,etc, hopefully I will be able to get back into it over the next few days. Cheers Des. Link to comment Share on other sites More sharing options...
Tiger2 Posted December 22, 2009 Share Posted December 22, 2009 H Des, Just read your builds on the Junkers and the Bristol so far, fantastic work, you have a real talent there for the WW1 subject matter. At the start of your Bristol article you mention that this is your 3rd WNW kit, did you document the 2nd and if so what was it? If I'm a good boy I'm getting the SE5a and LVG for Christmas. I'd love to see what you achieved with either of these beauties! Keep up the truly inspiring work!! Link to comment Share on other sites More sharing options...
beeza1 Posted December 22, 2009 Author Share Posted December 22, 2009 Thanks Tiger2 for your comments. My first WNW build was the LVG, I don't have a series of progress photos but here are a couple of the finished aircraft. I then built the Roden DH-2, the WNW Junkers and now the Bristol. I didn't buy the WNW SE-5a because I had just completed the Roden kit of the same aircraft. I'm sure you will get a lot of enjoyment from building your kit, WNW have produced beautiful models which are relatively easy to put together. Cheers Des. (sorry guys for interrupting my Bristol build photos but I like to answer all questions asked of me, more Bristol progress photos soon. Link to comment Share on other sites More sharing options...
Iain Ogilvie Posted December 22, 2009 Share Posted December 22, 2009 Oooh - that's pretty... Love the Brisfit too - really inspired by your control wires Iain Link to comment Share on other sites More sharing options...
Overhaulin Posted December 22, 2009 Share Posted December 22, 2009 Des Thanks for the reply as ever class in platic Ian Link to comment Share on other sites More sharing options...
beeza1 Posted December 23, 2009 Author Share Posted December 23, 2009 A few more photos showing my progress so far. The tail end rigging is now complete apart from the painting of the turnbuckles and all the little brass ends. The double cables made work a lot harder and time consuming but I think it was well worth it. I have also glued all the little eyelets into the lower wing ready for the wing rigging. I didn't notice until after I took the photos but please excuse the dust on the tail surfaces. Cheers Des. Link to comment Share on other sites More sharing options...
perry Posted December 23, 2009 Share Posted December 23, 2009 That is amazing!!!!!!!! Link to comment Share on other sites More sharing options...
crobinsonh Posted December 23, 2009 Share Posted December 23, 2009 Looks absolutely stunning! A real Christmas Cracker. I cannot wait to see more. Regards Link to comment Share on other sites More sharing options...

Recommended Posts
Create an account or sign in to comment
You need to be a member in order to leave a comment
Create an account
Sign up for a new account in our community. It's easy!
Register a new accountSign in
Already have an account? Sign in here.
Sign In Now