Les B. Posted April 6, 2009 Share Posted April 6, 2009 I did the corrections on my B8. I glued the tailplaned in situ and used the upper surface dihedral angle to shape the roots. There is enough meat there to file the stubs back in line with the tailplanes, without breaking through the plastic. Probably still is posted on HS Airfix build. Derek Whilst on the subject of tailplanes Derek, Don't forget that if you are going to model the elevators in the neutral position then you must model the rather prominent elevator locks. If the locks are not fitted then the elevators will assume a full UP position. HTH. LesB. Link to comment Share on other sites More sharing options...
bexwh773 Posted April 6, 2009 Share Posted April 6, 2009 which doors are these? where are they? I'm struggling with this - Bex? Cheers Rick Rick, Airfix have molded the front PR9 camera bays on all 3 kits, when I wrote about it previously (before I got my hands on both the 8 & 9) I assumed theyd molded the extra port side B2 equipment bay. So, to add to the list, if you have a B (i)8 you need to fill both both in, if you have the B2 you only need to fill in the starboard side. Bex Link to comment Share on other sites More sharing options...
Les B. Posted April 8, 2009 Share Posted April 8, 2009 Rick,Airfix have molded the front PR9 camera bays on all 3 kits, when I wrote about it previously (before I got my hands on both the 8 & 9) I assumed theyd molded the extra port side B2 equipment bay. So, to add to the list, if you have a B (i)8 you need to fill both both in, if you have the B2 you only need to fill in the starboard side. Bex Are these the small panels just aft and upwards of the nose wheel bay Bex? Is not the P.R.9 got the lengthened fuselage of the P.R3/P.R7 therefore the forward camera bay will be in the extra lengthened area. For the P.R.9 Airfix should be producing the lengthened fuselage? Is that right Bex? Les.B. Link to comment Share on other sites More sharing options...
Harvs73 Posted April 12, 2009 Share Posted April 12, 2009 Is it just me or do the bomb bay doors not fit??? I have had to carve a fair amount of plastic off the doors to make them fit on the B.2 kit I am in the process of doing. Link to comment Share on other sites More sharing options...
avro683 Posted April 12, 2009 Share Posted April 12, 2009 They fitted fine on my kit although it did take me a while to work out how they were supposed to fit. They are a very tight fit and don't require any cement which is useful as they do take a bit of wangling to get them in. Tony Link to comment Share on other sites More sharing options...
Scimitar F1 Posted April 12, 2009 Author Share Posted April 12, 2009 I started on the beast at a friend's 40th birthday modelling weekend. So far so good. The correction to the leading edge of the fin went well (an XACTO handle wrapped in coarse wet and dry did the trick). The rear of the wingtips were more tricky and I am not fully happy with them yet but will persevere. Does anyone have a close up photo of the starter exhaust outlets (I assume they all look the same on a B(I)8)? Will Link to comment Share on other sites More sharing options...
PHREAK Posted April 12, 2009 Share Posted April 12, 2009 My B2 doors were OK, fitted before closing up the fuselage with no hassle. I had to sand a little on the front end to get a flush it but only a few minutes work. I'm almost ready to put my modded canopy on but still need to simulate the heating element which is fitted inside both port and starboard of the canopy, any ideas from anyone? I'm thinking clear decal sprayed up and cut at the moment. What colour? Link to comment Share on other sites More sharing options...
Les B. Posted April 13, 2009 Share Posted April 13, 2009 My B2 doors were OK, fitted before closing up the fuselage with no hassle. I had to sand a little on the front end to get a flush it but only a few minutes work.I'm almost ready to put my modded canopy on but still need to simulate the heating element which is fitted inside both port and starboard of the canopy, any ideas from anyone? I'm thinking clear decal sprayed up and cut at the moment. What colour? I used decal sheet sprayed a creamy white. LesB. Link to comment Share on other sites More sharing options...
Les B. Posted April 13, 2009 Share Posted April 13, 2009 I started on the beast at a friend's 40th birthday modelling weekend. So far so good. The correction to the leading edge of the fin went well (an XACTO handle wrapped in coarse wet and dry did the trick). The rear of the wingtips were more tricky and I am not fully happy with them yet but will persevere. Does anyone have a close up photo of the starter exhaust outlets (I assume they all look the same on a B(I)8)? Will There are two exhaust outlets per engine on the B.2. Will, at around 2'o'clock and 8' o'clock as viewed from the front. The engines are not handed. The B.I.8 has different engines and have triple cartridge starters and have three exhaust outlets per engine. HTH LesB. Link to comment Share on other sites More sharing options...
Les B. Posted April 13, 2009 Share Posted April 13, 2009 I have just made a start on my B(I)8 and was wondering what tweaks are necessary? It will be be a 3 Sqn machine with white lettering and black undersides. I have been trawling the web and various other builds for any corrections and these are what I have come up with:I have amended these to take into account of all the excellent posts Reshape bottom of leading edge of fin where it meets the fuselage Reshape forward part of wingtip tanks and add detail (i.e. wire on top surface Add MB Mk 2 seat (culled from a CA TT18) Add some cockpit details Change profile of rear of wingtips/ailerons - need to be more square in profile. Sort airbrakes - ideally via decals (I think someone had a scan on here and was going to produce some). Correctly assembly control surfaces to ensure that they fit Fill in trenches on rudder Thin jet pipe walls and rear nacelle walls Add omega antenna (later silver/LAG underside period only?) Add id lights under front fuselage. There is a clear picture of these on p59 of WT340 in the Delve/Green/Clemons book. Control column, use PART 43 and NOT part 8 as per instructions Engine nacelles only have 1 starter cartridge exhaust instead of 3 & exhausts inside the nacelle incorrect. Antennae - DO NOT FIT PARTS 37A, 38A & 39A (Instruction Stage 39) as these were NOT fitted to the RAF Mk8 Fill in the two small "B2" equip bay doors (Thanks Bex for these) Reshape elevator tips see this link http://www.ipmsusa2.org/Reviews/Kits/Aircr...48_canberra.htm (thanks Rick) Scribe details on to tailplanes Remove 'stub' from said tailplanes - I take it that this is on the kit where the tailplanes are attached to the fuselage? Tone down or rescribe fuselage panel lines (particularly longitudinal variety) Edited to take the latest posts into account. Has anyone noted any others? Apparently there is something wrong with the front of the nacelles but it has eluded me to date. Will A point to note on the airbrakes Will is that they were operated by a hydraulic jack rotating a tube to which were attached several bell cranks to the ends of which the airbrake fingers were attached. This means that the upper fingers are further to the rear than the lowers. Also whilst on the ground the ailerons in the neutral position without ground locks fitted both drooped down by two and a half degrees. The elevators without ground locks fitted assumed fully up position. There are three downward ident lights of approx. 5 inch diameter each aft of the nose wheel bay and forward of the bomb bay. (sorry, see you have got those mentioned). There are small manual trim trim tabs fitted to the trailing edge of the ailerons. There is a "T" strip added to the trailing edge of the port elevator outboard of the movable trim tab. Also the "T" piece added to the top of the trailing edge of the rudder. HTH. LesB. Link to comment Share on other sites More sharing options...
AnonymousA667 Posted April 13, 2009 Share Posted April 13, 2009 Is it just me or do the bomb bay doors not fit??? I had a problem with the weapons bay on my PR9. I applied liquid cement down one side, then managed to spring the fuselage halves apart enough to get a reasonable fit down the other side and applied liquid cement onto that joint. Initially it looked OK, but overnight the parts sprang inwards slightly leaving me with sanding to get a fit. Next time (one PR9 won't be enough) I won't try any short cut ideas, but fit a couple of spreader bars inside the fuselage. peebeep Link to comment Share on other sites More sharing options...
AnonymousER99 Posted April 13, 2009 Share Posted April 13, 2009 the bay doors on my B(I)8 didn't for for the life of me either. The were a smidge too long and I also had a tough time getting them lined up in the centerline. Oh well, I have a few more Cranberries to work out the issue with. This one is just a painting exercise for me anyway Link to comment Share on other sites More sharing options...
PHREAK Posted April 13, 2009 Share Posted April 13, 2009 I used decal sheet sprayed a creamy white.LesB. Cheers Les, much appreciated. Onwards and upwards..... Link to comment Share on other sites More sharing options...
Spad Posted April 18, 2009 Share Posted April 18, 2009 No, my bomb doors didn't fit either - fine on length, just too wide to fit together without projecting below on the centreline. Just a bit of sanding needed. Been looking at the nose profile on my finished one though - comparing it to the oldFrog kit and photos - the nose transparency is too bulbous isn't it? Not sure how you would fix that without resorting to vac forming a replacement but it definitely looks wrong to me. Bit of an echo there of the old 1/72 effort from Airfix....but nowhere near as bad! What does anybody else reckon? cheers Rick Link to comment Share on other sites More sharing options...
Les B. Posted April 20, 2009 Share Posted April 20, 2009 No, my bomb doors didn't fit either - fine on length, just too wide to fit together without projecting below on the centreline. Just a bit of sanding needed.Been looking at the nose profile on my finished one though - comparing it to the oldFrog kit and photos - the nose transparency is too bulbous isn't it? Not sure how you would fix that without resorting to vac forming a replacement but it definitely looks wrong to me. Bit of an echo there of the old 1/72 effort from Airfix....but nowhere near as bad! What does anybody else reckon? cheers Rick Seems OK to me Rick. I stuck the glazing on the nose of my B2 then primed over the lot after having used filler on the bomb aimers flat and the pitot tube hole as I am making a T4. With the primer on the nose seems to be of the correct profile. I have also started to cut plastic on my next B2 which I am converting into a PR3. LesB. Link to comment Share on other sites More sharing options...
Spad Posted April 20, 2009 Share Posted April 20, 2009 thanks for the reply Les this is what I was meaning. Maybe its the demarcation point ...it just seems to be too large - maybe I'm just being paranoid but I don't think so. Too late for this one anyway - it's done! cheers Rick Link to comment Share on other sites More sharing options...
andym Posted April 21, 2009 Share Posted April 21, 2009 I agree, the nose cone looks too bulbous and not tapered enough and the flat bomb aiming panel the wrong shape and size. Also the angle of the top edge of the small windows behind it is wrong (I'd spotted that one some time ago and am beginning to wonder if anyone else has noticed it). I suspect the angle of the small navs window is out too. Andy Link to comment Share on other sites More sharing options...
TheModeller Posted April 21, 2009 Share Posted April 21, 2009 (edited) I agree, the nose cone looks too bulbous and not tapered enough and the flat bomb aiming panel the wrong shape and size. Also the angle of the top edge of the small windows behind it is wrong (I'd spotted that one some time ago and am beginning to wonder if anyone else has noticed it). I suspect the angle of the small navs window is out too.Andy I'd noticed the problems with the nose and side windows, and that is the reason my B(I)8 is still on the bench! I corrected the navs porthole by supergluing the kit part in place and then sanding it smooth and flush, I'll correct the shape at painting time by masking... Trying to summon up the courage to slice off the kit nosecone and substitute a spare Aeroclub vac part, if it'll fit! The side windows for the bomb-aimer are a bit of a problem because of the way they've been moulded as slightly recessed, which isn't right anyway, correcting them may more trouble than its worth... C'est la vie... Regards. Edited April 21, 2009 by TheModeller Link to comment Share on other sites More sharing options...
Les B. Posted April 21, 2009 Share Posted April 21, 2009 thanks for the reply Lesthis is what I was meaning. Maybe its the demarcation point ...it just seems to be too large - maybe I'm just being paranoid but I don't think so. Too late for this one anyway - it's done! cheers Rick Sorry Rick I was in the wrong Mark mode. Yes I agree with you and Andy. I think one can get away with the nav's window but the bomb aimer's side windows are certainly at the wrong angle. When I get around to mine I will reshape and try Krystal Klear. With the new angle it hopefully will make the nav's window more acceptable. The bomb aimer's flat is too small . It is at the correct position but needs to be filed flat back to the rear of the glazing. The whole glazing looks a little on the bulbous side as you point out but I am hoping that once I have flattened the flat it will look better. If not then out with the wet and dry. LesB. Link to comment Share on other sites More sharing options...
TheModeller Posted April 26, 2009 Share Posted April 26, 2009 Another issue with the B(I)8 kit concerns the bomb bay and gun pack. The B(I)8 bomb doors were split so that flares and other ordnance could be carried and have the gun pack fitted at the same time, so some sort of demarcation on the bomb doors needs to be scribed in ahead of the gun-pack, or even split at that point with the forward bay opened maybe? That said the gun-pack is pretty poor, the cannon muzzles should be shrouded by the forward fairing, the kit part is inaccurate as it isn't long enough. Model Alliance do a replacement gun-pack which looks very good, the recent Quickboost part looks to be a one piece copy of the kit parts and not worth the pennies in my opinion. Regards. Link to comment Share on other sites More sharing options...
bexwh773 Posted April 26, 2009 Share Posted April 26, 2009 The whole bomb bay doors opened up around the gun pack, as the doors were cut away around it. See Linky Para 2 starting "A Boulton Paul Gun Pack................." Bex Link to comment Share on other sites More sharing options...
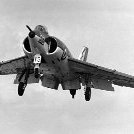
TheModeller Posted April 26, 2009 Share Posted April 26, 2009 (edited) Yes, I know that the aft door sections had cut-outs to fit around the gun-pack, but the doors were split so that the forward section would open independently, this pic was originally posted here I think, not the best but you can make out the forward section of the doors is open while the rear section is closed around the gun-pack. Note that the aft section appears to still be painted in the earlier gloss black finish. When sent for major servicing and repainting the gun-pack and doors were often removed and kept on site and standard doors fitted, as a result the packs and doors could be different colours to the rest of the underside depending on how quickly the squadron personnel could get them repainted to match. There is another, much smaller, pic of WT336 at Les Bywaters site, http://www.bywat.co.uk/gallb8.html which shows the forward doors partially open as well. Hope this clarifies the matter though any other images would be helpful. Regards. Edited April 26, 2009 by TheModeller Link to comment Share on other sites More sharing options...
bexwh773 Posted April 26, 2009 Share Posted April 26, 2009 TheModeller, Well I never knew they could be opened independantly, so, thanks for the correction and the update Cracking photo too Bexy Link to comment Share on other sites More sharing options...
TheModeller Posted April 26, 2009 Share Posted April 26, 2009 (edited) TheModeller,Well I never knew they could be opened independantly, so, thanks for the correction and the update Cracking photo too Bexy Took a while to find out about that but now I have it's a mod I'll be making to my build, the pic was posted here by Bill Clarke I think, but don't quote me, I might have it entirely wrong! Just posted to clarify my notes... Regards. Edited April 26, 2009 by TheModeller Link to comment Share on other sites More sharing options...
Les B. Posted April 26, 2009 Share Posted April 26, 2009 Took a while to find out about that but now I have it's a mod I'll be making to my build, the pic was posted here by Bill Clarke I think, but don't quote me, I might have it entirely wrong! Just posted to clarify my notes...Regards. Yes a very good picture above. Please note that as stated under standard conditions normal bomb doors were fitted. In the three years I served with 16 Squadron at Laarbruch (undersides were black in those days), the gun packs were fitted for about three or four weeks in a year. LesB. Link to comment Share on other sites More sharing options...

Recommended Posts
Create an account or sign in to comment
You need to be a member in order to leave a comment
Create an account
Sign up for a new account in our community. It's easy!
Register a new accountSign in
Already have an account? Sign in here.
Sign In Now