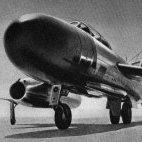
flashlight Posted November 12, 2022 Share Posted November 12, 2022 Hi everybody! Upcoming project will be another unusual soviet russian object, but this time a completely non-fictional one that actually flew. It's an Antonow An-71 AEW/tracking system based on a highly modified airframe of the Antonow An-72 series. This is in the box: 6 sprues of light grey styrene, 1 sprue with clear parts, 1 small PE fret, decals and instructions booklet. The eagle-eyed among you might already have spotted a tiny little amount of flash here and there. I think you know AModel kits, so I don't think that I have to tell you that this won't be an easy going build at all. This will be a slow, very slow build, I'm afraid. Well...I must be masochistic. The build will start soon, first I have to sort some real life things. Any thoughts, comments, encouragements will be very welcome! Thanks for looking. 9 Link to comment Share on other sites More sharing options...
flashlight Posted November 13, 2022 Author Share Posted November 13, 2022 Right, the building fun started today with the assembly of the cockpit as per instructions. All parts had to be cleaned from flash and some from chunky plastic like the crew seat shown below. It took some time until all the cockpit parts were prepared for painting and assembly. Cockpit is done. Now my poor old eyes need a break. That's it for today, thanks for looking! 8 Link to comment Share on other sites More sharing options...
flashlight Posted November 15, 2022 Author Share Posted November 15, 2022 Hi, I had some progress with this build recently. Following the instructions I assembled the main wheel wells, which go inside a separate part that forms the belly of the plane. I painted the insides light grey, but this is completely useless, because it won't be visible at all. Next step in the instruction was the assembly of the auxiliary engine. You can see how the parts fit - the jetpipe had to be sanded down considerably and the hole between the two parts had to be widened to get all parts together. It'll need some filler, as you can see, but no problem at all. Next steps will be preparing of the fuselage halves, glueing the cockpit into the left half, putting some weight inside the halves and then buttoning up the fuselage. This will be funny, I guess. That's it for today, thanks for looking! 11 Link to comment Share on other sites More sharing options...
John_W Posted November 16, 2022 Share Posted November 16, 2022 11 hours ago, flashlight said: It'll need some filler, as you can see, but no problem at all. Having built some A Model kits in the past, you will need a lot of filler. They do some interesting subjects, but the kits can be a little crude in places. 1 Link to comment Share on other sites More sharing options...
roginoz Posted November 16, 2022 Share Posted November 16, 2022 Now there's a subject that cries out...nay, positively shrieks......to be scaled up to 1/48.......or, at a pinch. 1/72 ! What a thoroughly attractive little aircraft of which I was unaware, so I'll be following your build, Nick @flashlight with interest. Perhaps, on completion, you will give us some idea of its size, as against a pot of paint or something. Rog Link to comment Share on other sites More sharing options...
flashlight Posted November 16, 2022 Author Share Posted November 16, 2022 @John_W Hi Jon, thank you very much for your comment. I am quite aware of what I have to expect, but I like to build such kits of objects the main producers won't give us. I don't mind the many long filling and sanding sessions as long as the result seems to be worth it. Let's see if I'll tackle this kit. @roginoz Hi Rog, nice to have you along! I'll be pleased to give you an idea of the model's size at the next occasion! 1 Link to comment Share on other sites More sharing options...
flashlight Posted November 16, 2022 Author Share Posted November 16, 2022 Okay, back to business. Today I put some filler onto the gaps in the auxiliary engine and while it settled, I cut the fuselage halves off the sprue and cleaned them from the partly big and chunky sprue gates and some flash, now they look clean and tidy. A dry fit showed, that the fit is not so bad. Could be worse! Now I did a dry fit of the belly. Hmm... Hmm... Now the auxiliary engine, which was already filled but still not sanded. Hmm... We'll see how the components really fit when the fuselage halves will be joined, but I guess a little bit of trimming and sanding will be necessary... Next I glued the cockpit into the left fuselage half (it's the only one with locating tabs for the cockpit) and after it dried up I filled both sides with weight, I hope it's enough. Joining the fuselage halves and trying to get the belly and the auxiliary engine to fit will be the main task tomorrow. Thanks for looking! 7 Link to comment Share on other sites More sharing options...
flashlight Posted November 17, 2022 Author Share Posted November 17, 2022 Hi everybody, today I glued the fuselage halves together. There are no locating pins, which is okay with me. I usually tape the halves together at the rear end and start glueing from the nose sectionwise back to the rear and, always taking care that everything lines up nicely. Now we have a fuselage - with a few big holes. It's quite okay, I think. I couldn't resist to check the fit of the belly and the auxiliary engine again. Well, not much better. This will be up to my good friends file, filler and sanding paper! While the fuselage was put aside to dry I assembled the vertical stabilizer and the radar disc. No problem at all. This pic is for you, @roginoz rog, not sure if my science fiction thingy is a suitable comparison, but it might give you a slight impression of the dimensions of this kit. That's all for now, thanks for looking! 10 1 Link to comment Share on other sites More sharing options...
roginoz Posted November 18, 2022 Share Posted November 18, 2022 Hmmm, not an unreasonable size. Reckon I could find a bit of space in my rapidly diminishing display cabinet. Thanks Nick @flashlight ! 1 Link to comment Share on other sites More sharing options...
flashlight Posted November 18, 2022 Author Share Posted November 18, 2022 @roginoz You are welcome, Rog! When I work on the wings I will give you another comparison shot. Right, today I fought with the belly part. I had a long session of filing/dry fitting/filing/dry fitting...but after quite a long time I've got it and the part fitted more or less - there were some quite big gaps, but what can you do. After this I glued the auxiliary engine on in a way that the step between the part and the fuselage was minimal, which caused a big gap on the left side. Shame on me that I forgot to take pictures of this status. After the glue had dried I put on the filler everywhere to cover all seamlines and gaps. The fuselage was then set aside and I started working on the engines. These are the parts that build up one of them. From right to left - the exhaust cone has to go inside the combustion chamber (?), the small ring hast to go to the front end of the chamber. Into this small ring the compressor wheel has to slide faceing backwards, the cylindrical part has to be placed between the two compressor wheels and all this has to be placed into the bigger ring. The whole arrangement has to be glued inside the nacelle with the big ring at the visible rim of the nacelle. Nice theory. Now who would have guessed that? No problem at all, out came the big old rough file and after a few minutes of brutal treatment the ring showed signs of obedience to my will. Before (left)/after (right), I think the difference is obvious. Sometimes I wonder how kit designers do their maths or do they just estimate the dimensions of some parts? Now that looks much better! I treated the part of the second engine the same way, so the engines can be assembled tomorrow. That's all for today, thanks for looking! 6 Link to comment Share on other sites More sharing options...
Flankerman Posted November 19, 2022 Share Posted November 19, 2022 It's looking good Nick...... I scratchbuilt one many years ago in 1/72 scale using the Roden (?) An-72 as a basis. Your posts reminded me that I took a load of walkround photos of the 2nd prototype An-71 at Zhulany - during a river cruise to the Ukraine in 2018. I have just uploaded the photos here....... http://www.flankers-site.co.uk/an-71.htm (Scroll down to 'My Walkround Photos' to see them) I hope they are useful to you. Happy Modelling Ken 3 2 Link to comment Share on other sites More sharing options...
flashlight Posted November 19, 2022 Author Share Posted November 19, 2022 Hi Ken @Flankerman , thank you very much, this is extremely useful for the build! What is most interesting for me, is the painting of the radar disc, I'm not sure if the instructions are correct as they call for dark grey overall. Your pics are a great source of information! Edit: As far as I know there was a An-72 by Toko, but I'm not sure either. Link to comment Share on other sites More sharing options...
flashlight Posted November 19, 2022 Author Share Posted November 19, 2022 Hi everybody, today I treated the fuselage with sanding paper, the result is not too bad, it still needs some filler here and there. After the slight exhausting sanding session I went on with the engines and assembled all the inner parts. After the glue has sattled I did some detail painting. Then it was closing time! And yes, they will need a bit of filler too. This will be done tomorrow! That's it for today, thanks for looking! 6 Link to comment Share on other sites More sharing options...
Flankerman Posted November 19, 2022 Share Posted November 19, 2022 44 minutes ago, flashlight said: Edit: As far as I know there was a An-72 by Toko, but I'm not sure either. You are correct Nick - it was the Toko kit (my memory is going) Ken 1 Link to comment Share on other sites More sharing options...
flashlight Posted November 20, 2022 Author Share Posted November 20, 2022 Hi everybody, not very much done today. I put some filler onto the engine nacelles. After that I started the wings, which went together without problems. Before I glued the upper and lower parts together I had to do a bit of a surgery to the upper part to make it fit onto the fuselage. This was no problem at all. The lower parts had a very good fit, but then again I had to sand them down a bit to make the wing fit onto the fuselage. Dryfit and attached. After everything had dried up I sanded the engine nacelles, which still need some filler, but that's no problem at all. Then I did some dryfit - slowly it starts to look like a plane! The nacelles need some surgery to fit properly, this will be done tomorrow. Also the inlet of the auxiliary engine will be closed and I will prepare the horizontal stabilizers. We'll see what else I will achieve tomorrow. A comparison shot now with wings, for Rog @roginoz: That's it for today, thanks for looking! 8 1 Link to comment Share on other sites More sharing options...
flashlight Posted November 21, 2022 Author Share Posted November 21, 2022 Hi all, today I attached four fairings, that I nearly forgot about, to the underside of the wings. You can see how astonishingly nice the wings fit at the fuselage joint. First I closed the intake of the auxiliary engine on the top of the fuselage. Then I started to treat the engines and the empennage to have them fit properly - but it's still a long way to go. A dry fit of all the components shows that the engines' fit is already better, but the fit of the empennage is still rather awful. Still a lot to do until she'll be ready for some paint! Thanks for looking! 5 Link to comment Share on other sites More sharing options...
AnticlockwisePropeller Posted November 21, 2022 Share Posted November 21, 2022 What an unusual looking aeroplane! It's a shame the fit of the kit is so poor in places, but you've done an excellent job wrestling it into shape with your files and filler! Looking forward to seeing this finished! 1 Link to comment Share on other sites More sharing options...
flashlight Posted November 21, 2022 Author Share Posted November 21, 2022 Thanks a lot, Chris @AnticlockwisePropeller ! I like to build kits like these, Amodel-kits are always a nice challenge. I really hope to get this to the finish line, there is still a long way to go! 1 Link to comment Share on other sites More sharing options...
flashlight Posted November 25, 2022 Author Share Posted November 25, 2022 Hi all, the empennage is more or less done now. Might need an additional bit of dissolved putty, but all in all it's done. Vertical fin is butt joined, it was a bit difficult to get it really vertical. The dihedral of the horizontal stabilizers is according to drawings found in the internet, since the instructions only show a three side view but no front view. Next will be the wings. Thanks for looking! 5 Link to comment Share on other sites More sharing options...
flashlight Posted November 26, 2022 Author Share Posted November 26, 2022 Dear all, now the wings are glued to the fuselage and everything is filled and sanded and looking quite good now. After this there was no way out and I had to deal with the part I feared the most: What a pleasant surprise to see that it fits nearly perfectly! Quite unusual for a short run kit like this. Yesterday the paint masks arrived, I decided to put them on before I attach the canopy to the fuselage, I felt that they would be easier to handle this way. Then I attached the canopy with the help of Krystal Klear. Some very careful filling is needed. After finishing the canopy I'll have to treat the engines to make them fit onto the wings. That's it for now, thanks for looking! 6 Link to comment Share on other sites More sharing options...
flashlight Posted November 27, 2022 Author Share Posted November 27, 2022 Hi all, today I spent some time working on the engine nacelles - the usual procedure of sanding and dry fitting. The fit of the nacelles is now okay, at least for me. That'll do. They are not glued on yet, I'll do that later on, the nacelles still need a little bit of sanding and two PE parts have to be attached to each. That's it for today, thanks for looking. 5 Link to comment Share on other sites More sharing options...
John_W Posted November 27, 2022 Share Posted November 27, 2022 Looking good. You are realy beating it in to shape. 1 Link to comment Share on other sites More sharing options...
stevehnz Posted November 27, 2022 Share Posted November 27, 2022 I like the look of what you're doing here, I quite like the look of the kit too. Previously I wouldn't have given it a second glance but now, I could be tempted after seeing this thread. Steve. 1 Link to comment Share on other sites More sharing options...
flashlight Posted November 29, 2022 Author Share Posted November 29, 2022 @John_W, @stevehnz Thank you so much for your kind and encourageing words, gents! Yes, Steve, if you don't mind spending lots of time filling and sanding and slow progress during the build, it is highly recommended. Bringing such a kit across the finish line is rewarding and gives you a model in your showcase that is rarely seen elsewhere! 1 Link to comment Share on other sites More sharing options...
AdrianMF Posted November 29, 2022 Share Posted November 29, 2022 Gosh what a lot of fettling! I guess your review would read “Canopy fits, everything else doesn’t”. Looking forward to a bit of paint… Regards, Adrian 1 2 Link to comment Share on other sites More sharing options...

Recommended Posts
Create an account or sign in to comment
You need to be a member in order to leave a comment
Create an account
Sign up for a new account in our community. It's easy!
Register a new accountSign in
Already have an account? Sign in here.
Sign In Now