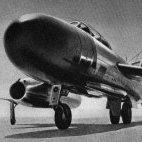
flashlight Posted October 20, 2022 Share Posted October 20, 2022 Good day, everybody! After a nearly two years long modelling hiatus I decided that it was about time to come back to the workbench. Being retired now raises the chance of getting something done enormously, no? During the time before I stopped modelling I stumbled across a kit which at first sight I definitely knew that I had to build it sometimess but I didn’t buy it then. Unfortunately I couldn’t remember the name of it and the company exactly (well – age, isn’t it?) and started a search for this strange thingy. After quite a while I was lucky to find it again and I was happy that it was still available at my favourite retailer and immediately hit the order button. A few days ago it arrived and I started with it right away. Here we have the strange thing – it’s the Pobeda 357 by the company AMP. I really don’t know (and honestly – in this case I don’t care) if this is fact (as the text in the instruction booklet suggests) or fiction, and also if it ever floated or flew or whichever. To me it looks like a US limousine out of the 1950ies but on really hard drugs. So if this isn’t the correct section to post the WIP, please mods move the thread wherever you decide it fits, thank you very much indeed. Inside the box you find an instruction booklet, 4 sprues of light grey styrene, and a small bag with clear parts, decals, photo etch parts, masks and a resin part. The parts seem to be nicely moulded, there is nearly no flash to see. Having a closer look at the small parts one finds the usual moulding seams and moulding misalignment steps which are common in short run kits like this. No problem at all, I wanted it that way. As per instructions I sprayed some blueish grey to the inner sides of the fuselage halves and the main cockpit parts, painted the seats and the other small parts and put everything together. I also gave the sidewalls of the fuselage halves a grey wash. Completely useless though, you won’t see anything of it once the fuselage halves are closed. After dryfitting the completed interior into one of the fuselage halves it was obvious that the pilot’s seats were way too tall. I ripped them off and cut off the lower parts of the legs. After the blood bath it was okay. I also noticed that the cockpit floor was a bit too long to fit in between the locator bars. I sanded it shorter at the rear end until everything fits inside. Now it was time to check if everything fits inside both fuselage halves and – well – as you can see there is a lot of space between them. Obviously the front and rear bulkheads are too wide or too tall or both. Nice filing time ahead! This is the current status, hope to show you some progress soon. That’s it for now, thank you very much for looking. Please feel free to comment and give advice, it’ll be appreciated! Cheers Nick 15 Link to comment Share on other sites More sharing options...
Courageous Posted October 20, 2022 Share Posted October 20, 2022 A very unusual and interesting craft. Stuart 2 Link to comment Share on other sites More sharing options...
flashlight Posted October 20, 2022 Author Share Posted October 20, 2022 @Courageous Hi Stuart, yes indeed, that's why I immediately knew I had to build it sometimes. Best regards Nick 1 Link to comment Share on other sites More sharing options...
Vesa Jussila Posted October 21, 2022 Share Posted October 21, 2022 Now I need to say really strange machine! 1 Link to comment Share on other sites More sharing options...
RidgeRunner Posted October 21, 2022 Share Posted October 21, 2022 As others have said, a strange machine, but it could easily been in the minds of the Soviets! It could almost be French! 1 2 Link to comment Share on other sites More sharing options...
RidgeRunner Posted October 21, 2022 Share Posted October 21, 2022 Link to comment Share on other sites More sharing options...
flashlight Posted October 21, 2022 Author Share Posted October 21, 2022 Hi all, on with the show. After a quite long and exhausting filing time both bulkheads were shaped to the correct dimensions and the fuselage halves go together nicely. In between the filing sessions I built the two floaters - they went together very well, the fit of these parts was excellent. Only a little bit of sanding required, no filler necessary. Current status after all the filing, interior dry fit: Now it's time to figure out how to proceed. The instructions suggest to attach the side windows first: from the outside and second: only at the very last step. Well, I am not so sure. I will have to look deeper into the matter before I continue. That's it for now, thanks for looking. Any comment is very welcome. 8 Link to comment Share on other sites More sharing options...
TonyOD Posted October 21, 2022 Share Posted October 21, 2022 I am going to follow this because it is... weird! 1 Link to comment Share on other sites More sharing options...
flashlight Posted October 21, 2022 Author Share Posted October 21, 2022 @TonyOD nice to have you on board! I agree, this is weird and that's why I had to build it! 😄 1 Link to comment Share on other sites More sharing options...
Courageous Posted October 21, 2022 Share Posted October 21, 2022 1 hour ago, flashlight said: The instructions suggest to attach the side windows first: from the outside and second: only at the very last step. My advice would be to fit the windows before joining the halves, they should be easy enough to mask for painting. Carry on with your weird build good sir. Stuart 1 Link to comment Share on other sites More sharing options...
psdavidson Posted October 21, 2022 Share Posted October 21, 2022 Looks like some sort of flying shark Watching with interest 1 Link to comment Share on other sites More sharing options...
alt-92 Posted October 21, 2022 Share Posted October 21, 2022 Slick Steampunk Soviet Supermachine! Probably runs on diesel as well judging by the boxart. Looks like a fun build, even if it is sorta-short run with all that entails. I might get one, and do it up in a ZZ-Top hotrod paint job 1 1 Link to comment Share on other sites More sharing options...
flashlight Posted October 21, 2022 Author Share Posted October 21, 2022 4 hours ago, Courageous said: My advice would be to fit the windows before joining the halves, they should be easy enough to mask for painting. Carry on with your weird build good sir. Stuart Hi Stuart, thank you very much for the advice, I too think that it would be easier to attach the windows before closing the fuselage. We'll see. 1 Link to comment Share on other sites More sharing options...
flashlight Posted October 21, 2022 Author Share Posted October 21, 2022 @psdavidson Hi Peter, glad that you follow along. Yes, this craft really looks odd, and thinking that it worked also by antigravity makes it even stranger - back to the future! 😄 @alt-92 Thanks for your comment, antigravity-diesel must be fun, but according to the box art to me it seems more like heating oil, but who knows. Yes, I do enjoy the build so far! Surely this would look great in ZZ-Top outfit bound to La Grange! 3 Link to comment Share on other sites More sharing options...
flashlight Posted October 22, 2022 Author Share Posted October 22, 2022 Hi all, after a thorough examination of the situation and following Stuart's advice (thanks again @Courageous) I decided not to follow the instructions, but to attach the windows before closing the fuselage and to attach them from the inside instead. Rebellion! A quick check revealed this: Yes - I knew it - the clear parts are too big. This means making already small parts (4 x 3 mm!) even smaller! So I took my reliable file and on it went. First two windows are in place now, fixed with superglue. Not perfect, but that'll do for me. This took me 2 hours! I need a break now! So not very much to show today, I hope I'll get this done tomorow, then things will speed up again (hopefully). Thanks for looking! 4 Link to comment Share on other sites More sharing options...
AdrianMF Posted October 22, 2022 Share Posted October 22, 2022 You don’t see one of these every day! your interior looks very 1960s space age. Have you chosen a colour scheme yet? Regards, Adrian 2 Link to comment Share on other sites More sharing options...
bigbadbadge Posted October 22, 2022 Share Posted October 22, 2022 What a strange yet appealing machine, looks awesome. Are you going for the polished metal look??? Great work so far Chris 1 Link to comment Share on other sites More sharing options...
flashlight Posted October 23, 2022 Author Share Posted October 23, 2022 Good morning! @AdrianMF Hi Adrian, thanks for stopping by and having a look. According to the instructions, there is only a NMF. I think you could do whatever scheme you like having the artistic license in this case. I will stick to the NMF though, if it doesn't turn out well, I could do something different anyway. @bigbadbadge Hi Chris, thanks for your comment. As stated above, I will go for the metal look. 1 Link to comment Share on other sites More sharing options...
flashlight Posted October 23, 2022 Author Share Posted October 23, 2022 Hi everybody, after hours of very careful filing down the clear parts all six side windows were in place. Now things could speed up and it was time to button up the fuselage. First I attached the interior to the right half. Take a last look at it, you'll never see it again! After that the fuselage was closed and laid aside to rest for a while. Sanding down the seams later on revealed that only a small amout of filler will be needed here and there. Very good! After this I started the "wing" or how ever this could be called. Okay. Did I talk about speeding up? Hah hah... Another nice filing/dryfitting/filing/dryfitting session coming up. It could have been worse though. This is the current status. Thanks for looking! 2 Link to comment Share on other sites More sharing options...
corsaircorp Posted October 23, 2022 Share Posted October 23, 2022 Amazing machine, a very soviet one indeed !! the adjustments look like funny ones... Short run Huh !! Well done Sir !! Sincerely. CC 1 Link to comment Share on other sites More sharing options...
flashlight Posted October 23, 2022 Author Share Posted October 23, 2022 @corsaircorp Hi CC, thanks for the comment. Sure it's short run, but it's what I expected - no complaints about that! It could be worse, and I am having fun building this machine. 1 Link to comment Share on other sites More sharing options...
flashlight Posted October 24, 2022 Author Share Posted October 24, 2022 Hi everybody, today I filed down the lower part of the wings, it wasn't as bad as expected. The fit is quite good now, there is only a tiny step between the fuselage and the forward section of the wing. This will be easily sanded down later. Next up were the upper parts of the wings. Dryfit Looking good! Not so good! A slight shape issue on both sides. The problem was solved quite quickly by sanding down the lower parts a little bit. Looking good now. Before I start to attach the floaters I sanded down the small step between forward fuselage and wing and filled the gaps, using Revell Plasto and Mr. Surfacer 500. It's put to rest over night. This is the current status, it was a giant leap forward! Thanks for looking. 3 Link to comment Share on other sites More sharing options...
Marklo Posted October 25, 2022 Share Posted October 25, 2022 (edited) On 10/22/2022 at 5:51 PM, flashlight said: the clear parts are too big Have you tried Microscale Kristal Klear it’s a PVAtype solution that will fill up to a 1:4 inch square and dries clear and flat. used on my benebato for all bar the windscreen. Edited October 25, 2022 by Marklo 1 Link to comment Share on other sites More sharing options...
flashlight Posted October 25, 2022 Author Share Posted October 25, 2022 @Marklo Hi Marklo, thank you very much for the comment. I know about Krystal Klear but I never have tried it. It would surely have been an easier and faster way to do the windows of my machine. Looks great on your model! I suppose you can only attach the Krystal Klear windows after the painting of the model, I imagine that masking such windows would be difficult if not impossible. Right? Link to comment Share on other sites More sharing options...
flashlight Posted October 25, 2022 Author Share Posted October 25, 2022 Hi all, the first sanding session is done and it shows that in some places there is still some filler needed. After this I did some dryfitting of the floaters to the wings that showed that the fit is suboptimal. On the wings' ends are shapes (red arrow) that have to go into corresponding recesses in the floaters (blue arrow). I am afraid that this causes the fit problems and I think that I will sand down the shape on the wings as far as possible and then see what will happen. Thanks for looking! 3 Link to comment Share on other sites More sharing options...

Recommended Posts
Create an account or sign in to comment
You need to be a member in order to leave a comment
Create an account
Sign up for a new account in our community. It's easy!
Register a new accountSign in
Already have an account? Sign in here.
Sign In Now