GAF Posted June 30, 2022 Share Posted June 30, 2022 (edited) This is a classic build of the Monogram B-26 from 1978. Lately, I haven't had much luck with working out paint. I live in an apartment and I don't have an airbrush. I have to rely on rattle cans and brush painting. Still, I'll do the best I can, but don't expect too much. Some pictures of the sprues. Most old time modelers are familar with its quirks and idiosyncrasies. Since the kit decals are unusable, I picked up two sets of decals to use. The only problem will be deciding which one to build. A set of resin engines, and some photo-etch for the cockpit. I just hope they won't turn out to be a headache. Finally, the instruction sheet and the date of the kit: 1978. If you will excuse me, I have to go give these a good washing before I start assembly. Should be an adventure (and not a good kind)! Gary Edited June 30, 2022 by GAF 14 Link to comment Share on other sites More sharing options...
Mike Posted June 30, 2022 Share Posted June 30, 2022 1 minute ago, GAF said: If you will excuse me, I have to go give these a good washing before I start assembly Don't wash the instructions!!!! Seriously though, I'm utterly gobsmacked that there hasn't been a new tool of this particular aircraft, as it's really cool, even though its handling characteristics could take the unwary pilot by surprise. I've got one in the stash waiting for me some day. Good luck 3 Link to comment Share on other sites More sharing options...
GAF Posted June 30, 2022 Author Share Posted June 30, 2022 No washing the instructions? Well... okay! (runs to laundry) 😊 I do wish Tamiya would come out with a 1/48 scale B-26, but the price now days would be astronomical! 2 Link to comment Share on other sites More sharing options...
Snafu35 Posted July 1, 2022 Share Posted July 1, 2022 Hello Gary, Nice choice, this kit is still really nice to assemble. I built it a few years ago: I would build another one, but it's a bit of a lot of work, especially if you want to detail the interior. If there is one thing to be reviewed, it is the diameter of the engine cowlings which is a little small. Have fun! Regards, Eric-Snafu35 6 Link to comment Share on other sites More sharing options...
stevej60 Posted July 1, 2022 Share Posted July 1, 2022 Welcome Gary,and you've brought along a real beauty too. 1 Link to comment Share on other sites More sharing options...
GAF Posted July 2, 2022 Author Share Posted July 2, 2022 Thanks, Eric and Steve! I do wonder about the engine nacelles. I need to find out by how much. As for progress, after washing I've begun separating the major parts from the sprues. I can report that there doesn't seem to be any warpage, which is good news. Gary 2 Link to comment Share on other sites More sharing options...
Corsairfoxfouruncle Posted July 2, 2022 Share Posted July 2, 2022 Welcome to the build sir, a nice choice with the Marauder. 1 Link to comment Share on other sites More sharing options...
SoftScience Posted July 7, 2022 Share Posted July 7, 2022 This was my favorite model when I was young. I remember oggling it in kit catalogs and FSM issues for a long time before finally getting it for my birthday around 92 or 93. I as$ed it up, or course, but it was fun all the same. 1 Link to comment Share on other sites More sharing options...
Learstang Posted July 7, 2022 Share Posted July 7, 2022 2 minutes ago, SoftScience said: This was my favorite model when I was young. I remember oggling it in kit catalogs and FSM issues for a long time before finally getting it for my birthday around 92 or 93. I as$ed it up, or course, but it was fun all the same. Good Lord! You got it for your 92nd or 93rd birthday! No wonder you as$ed it up! As usual, I'll get me coat... Best Regards, Jason 1 6 Link to comment Share on other sites More sharing options...
SoftScience Posted July 7, 2022 Share Posted July 7, 2022 3 minutes ago, Learstang said: Good Lord! You got it for your 92nd or 93rd birthday! No wonder you as$ed it up! As usual, I'll get me coat... Best Regards, Jason When I was your age, we didn't have models! We slaved in the factories to build the real things. Then at night, they would rain flaming arrows on us. That is until the Turks came over with their steam trains, and their watermellons. It was delightfull. We danced the Charleston with the Pharaoh. What? Why are you looking at me like that? 1 4 Link to comment Share on other sites More sharing options...
Learstang Posted July 7, 2022 Share Posted July 7, 2022 Oh, aye. Reminds me of youth in Yorkshire. Had to stand all day in pits dug into peat moss, neck deep in foetid water, making models out of nowt but sand and industrial rubbish. If we was lucky! Best Regards, Jason 1 3 Link to comment Share on other sites More sharing options...
SoftScience Posted July 7, 2022 Share Posted July 7, 2022 3 minutes ago, Learstang said: Oh, aye. Reminds me of youth in Yorkshire. Had to stand all day in pits dug into peat moss, neck deep in foetid water, making models out of nowt but sand and industrial rubbish. If we was lucky! Best Regards, Jason sand AND industrial rubbish? Well weren't you one lucky BAHSTURD!? All we had was a dull blade. Had to whittle our wee hands into airplanes. Then we'd scamper around the fat rendering plant pretending to dogfight, until all but one of us fainted from the blood loss. Oy, that was play time! 1 3 Link to comment Share on other sites More sharing options...
GAF Posted July 8, 2022 Author Share Posted July 8, 2022 Well, minor delay in production. We had to celebrate getting rid of Boris Johnson... er, King George (or one of those British politicians). 😉 Anyway, the B-26 has had a minor "snag", so to speak. I discovered, much to my chagrin, that instead of an odd mating of the windscreen as I had supposed, the entire rear portion of the tail was missing! I was a bit flabbergasted (not to mention flummoxed). How in the world did that happen? Was it a error on Monogram's part, or did someone miscut the tail section for the earlier model? I present the photo evidence so you can see what I'm talking about. Now I'm not worried, as I have a perfectly good B-26 in the stash, and I can always steal the good half, but first I'm going to try to make a new tail section. I have some plastic sheet, glue, scissors and an X-Acto knife. What did they do about battle damage on the real ones? They built it out of aluminum sheeting and rivets! So, I'm going to attempt it. This is what modeling is all about. Frustration, tears, and perhaps a little blood loss. Wish me luck! Gary 4 1 5 Link to comment Share on other sites More sharing options...
Corsairfoxfouruncle Posted July 8, 2022 Share Posted July 8, 2022 (edited) Might be easier to do the bit out of balsa shaped the coated with C/A to seal. I did part a new kit many years ago and may still have clears floating around ? So if something breaks there I’ll check. Edited July 8, 2022 by Corsairfoxfouruncle Link to comment Share on other sites More sharing options...
SoftScience Posted July 8, 2022 Share Posted July 8, 2022 Looks like this came out of the factory where they pop out airfix kits now. That's a nasty short-shot! 1 Link to comment Share on other sites More sharing options...
Learstang Posted July 8, 2022 Share Posted July 8, 2022 Strange. It looks like it was broken off. Is the plastic brittle? Good luck on the repair! Regards, Jason 1 Link to comment Share on other sites More sharing options...
GAF Posted July 9, 2022 Author Share Posted July 9, 2022 (edited) After a few hours work, I managed to come up with something that will be acceptable. I began by cuting the bad part of the fuselage off until I had a more squared off shape. Then using the good half of the fuselage from another kit and a cardboard tube of approximate size, I cut out a shape that closely matches the other half (after a couple of tries). She looks better in person that the photos show. Next will come some trimming, glue and putty and I think it will at least be okay if you don't look too closely. Still, to finish it I will have to glue the fuselage halves together, and that is still in the future as I have a lot of work to do on the interior. Onward! Gary Edited July 9, 2022 by GAF 12 Link to comment Share on other sites More sharing options...
John Ballman Posted July 9, 2022 Share Posted July 9, 2022 Another awesome repair job, Adapting and overcoming, super!!! I built this many moons ago, and the fit with engine/wheel wells were best dealt with Miliputt fine grain. Very nice, Keep up the good work. Respectfully, JB 1 Link to comment Share on other sites More sharing options...
GAF Posted July 10, 2022 Author Share Posted July 10, 2022 (edited) 8 hours ago, John Ballman said: Another awesome repair job, Adapting and overcoming, super!!! I built this many moons ago, and the fit with engine/wheel wells were best dealt with Miliputt fine grain. Very nice, Keep up the good work. Respectfully, JB Thanks! Now I've got to finish the interior, so probably no updates for awhile. Gary Edited July 10, 2022 by GAF Link to comment Share on other sites More sharing options...
Troy Smith Posted July 11, 2022 Share Posted July 11, 2022 (edited) On 10/07/2022 at 06:11, GAF said: Now I've got to finish the interior, so probably no updates for awhile. Hi Gary, meant to post in the GB chat, but re the kit, first, internal colors, see There are also some areas to watch in construction, I think filler could be reduced with a load careful trimming, scraping and shimming... Having dug the remains out a while back this is what I thought these days, I'd certainly check the fit of the nacelles to the wings, and the wing/fuse joint. I'd suggest NOT gluing the wing leading edge inboard of the nacelle, and add ledge on the fuselage wing section, for the wing to sit on, as otherwise you get a step, and a lot of filling to blend. the other is scrape and adjust the nacelle to lower wing, as that was another troublesome area finally, check the fit of the canopy and nose glazing early on, before joining the fuselage halves, as they might need a shim to fit properly. finally... the turret, is made of sections of clear perspex glued together, like the B-25 Turret, what you sometimes see in photos that look like frame or panel pane lines are the opaque glue joints. There are no frame lines. it's all clear! PS edit see this post, and the subsequent ones on fit, and suggestions https://www.britmodeller.com/forums/index.php?/topic/234921509-148-revell-b-26b-marauder-finished/page/2/#elControls_1081288_menu regarding On 08/07/2022 at 02:42, GAF said: I discovered, much to my chagrin, that instead of an odd mating of the windscreen as I had supposed, the entire rear portion of the tail was missing! is that not the missing bit of tail one of the 3 loose parts between the wings, above the clear part, the top left loose bit?? Edited July 11, 2022 by Troy Smith added a PS link 2 1 Link to comment Share on other sites More sharing options...
GAF Posted July 13, 2022 Author Share Posted July 13, 2022 (edited) Troy, Thanks for the color information. I got most of this from IPMS Stockholm on WWII US Aircraft Colors, but its good to have it confirmed. As for the piece being the missing tail... yes, that's it. It seems to have been a case of a short-shot at the factory, but was broken off either in transit or by someone previously. You can tell by the edges. The lower half is smooth and rounded, while the upper is jagged as you would expect from a broken piece. Good eye! The B-26 is on hold for a bit as I try to finish another Revell kit of more recent vintage. Got some clean-up work to do on this 1/32 Mustang that's giving me headaches about the paint. Gary Edited July 13, 2022 by GAF 10 Link to comment Share on other sites More sharing options...
Shalako Posted August 12, 2022 Share Posted August 12, 2022 Any progress? Link to comment Share on other sites More sharing options...
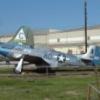
GAF Posted August 13, 2022 Author Share Posted August 13, 2022 5 hours ago, Shalako said: Any progress? Unfortunately, no. Like I said, the B-26 is on hold for awhile as I try to finish the 1/32nd Revell P-51D-15. I must admit that 1/32nd scale is just not my thing, and I prefer 1/48. Its just too big for me (ham-fisted) to handle well. The B-26 is just about as large, and I wonder if it will give me headaches like the P-51. Now I'm working on a hardstand to set it on. Maybe in a week, I'll be back on it. Keep a light in the window for me! 😁 Link to comment Share on other sites More sharing options...
Shalako Posted August 18, 2022 Share Posted August 18, 2022 1/32 is a beautiful scale, but as you go bigger more things/details are becoming apparent and therefore require more work. I have several 1/32 kits in my stock (somewhere in the attic) but these are for much later in my scale modelling "career"!!! Cheers, Bill Link to comment Share on other sites More sharing options...
GAF Posted August 19, 2022 Author Share Posted August 19, 2022 Good timing. I've finished the P-51D and am now back to the B-26. I'm installing PE into the cockpit, so not much to show right now. Will post pictures later. Meanwhile, enjoy this image of this Revell P-51! 😁 2 Link to comment Share on other sites More sharing options...

Recommended Posts
Create an account or sign in to comment
You need to be a member in order to leave a comment
Create an account
Sign up for a new account in our community. It's easy!
Register a new accountSign in
Already have an account? Sign in here.
Sign In Now