e8n2 Posted August 4, 2022 Author Share Posted August 4, 2022 Wouldn't you know it! Here I am getting close to finishing, or at least doing the external paint job on my AJ-2 Savage and Tommy Thomason breaks the news today that Roden is coming out with a 72nd AJ-1 Savage, maybe as soon as September! I hate to think how much it is going to be with all of the inflation going around everywhere right now. Glad to have done my "part" to bring this about! http://tailspintopics.blogspot.com/2022/08/roden-172-north-american-aj-1-savage.html#comment-form Later, Dave 3 3 Link to comment Share on other sites More sharing options...
Jackson Duvalier Posted August 4, 2022 Share Posted August 4, 2022 Your offering was found worthy. Huzzah! 1 5 Link to comment Share on other sites More sharing options...
Learstang Posted August 4, 2022 Share Posted August 4, 2022 Thank you, Dave, for your brave sacrifice! You have appeased the Modelling Gods, All Praise Be Unto Them! Best Regards, Jason 2 Link to comment Share on other sites More sharing options...
Smudge Posted August 5, 2022 Share Posted August 5, 2022 I've been following along and leaving a 'like' here and there as things progress. I enjoy a good vac form build and the Savage has always been a favourite of mine. Regarding the news of the Roden Savage, you can always console yourself if you consider they are doing the early AJ-1, and your's is the later and slightly different AJ-2. I have the Anigrand 1/72 AJ-2 myself. I'll probably still do it, and get a Roden AJ-1 as well. AJ-1 in the dark blue scheme, and the AJ-2 in the gull grey/white. I've always thought it was a fascinating aircraft, so I'll be pleased to have a couple on the shelf. There have been a few comments on the Rumourmonger topic about the price of the Roden kit. I don't suppose it'll be cheap by any means, so at least you will have saved yourself some cash Did you mention which finish you might go for? There is a good decal sheet for the Savage by Xtradecal, and also one by Cut then Add. Cheers. Link to comment Share on other sites More sharing options...
stevehnz Posted August 5, 2022 Share Posted August 5, 2022 Hobby Search, have them priced at US$73.00 (NZ$116.00) to reserve, quite spendy to my mind, but European kits tend to be in Japan anyway, I'll wait & see what they are from the likes of Jadarhobby or similar. Steve. Link to comment Share on other sites More sharing options...
e8n2 Posted August 6, 2022 Author Share Posted August 6, 2022 11 hours ago, Smudge said: Did you mention which finish you might go for? There is a good decal sheet for the Savage by Xtradecal, and also one by Cut then Add. Cheers. It'll be overall GSB with NSSB anti-glare panels as required by the painting directives of that time. I don't remember which unit, but it is the one with the light blue spinners on the Cut then Add sheet. I'll have more to say about the Roden kit in my weekly update post. Later, Dave 3 Link to comment Share on other sites More sharing options...
e8n2 Posted August 6, 2022 Author Share Posted August 6, 2022 6 hours ago, stevehnz said: Hobby Search, have them priced at US$73.00 (NZ$116.00) to reserve, quite spendy to my mind, but European kits tend to be in Japan anyway, I'll wait & see what they are from the likes of Jadarhobby or similar. Steve. I would rather it be more like around $50 US, but anymore what do you expect, and the fact that it is coming out of Ukraine right now I can understand it being a little bit higher. Later, Dave 3 Link to comment Share on other sites More sharing options...
e8n2 Posted August 6, 2022 Author Share Posted August 6, 2022 Time for another weekly update. Only one picture this time. I painted the interior anti-glare panels around the cockpit, and then cut out the canopy. Vac canopies and I don't normally get along well, but took my time with it and with just a little follow up sanding the test fitting turned out nearly perfect! I'll have to use just a little bit of Micro Krystal Kleer and that should take care of it. Normally I would also have started to mask it off, but since it is a vacuum formed piece it wobbles around more than an injection molded piece, so I will wait until after it has been glued in to mask it. Turns out that I did NOT have 0.010" rod, but I still have a lot of steel wire that is about that thickness or less and those look good on the seats. I cut lengths of wire longer than I needed figuring I can shorten them up as needed when I go to install the seats. Checking the photos in the Ginter book I noticed that the seats were painted black when the insides were interior green. I got those finished being painted today. I also sanded out two lenses for the tip tanks. They provide three lenses with each canopy and give you two canopies, so I still have four more lenses I can sand out if need be. I might have to do that. Both lenses are bigger in diameter than the front of the tanks, and the second one is not as long as the first one. I'll sand out the third one tomorrow to see how it turns out. I also noticed that the control column and yoke went AWOL. Fortunately I had another Hasegawa Dinah kit to donate the redundant second control column and yoke. I plan to paint the tires tomorrow and start building the High Planes Models props. Now about that Roden kit. Here is a link to the Roden web site with pictures of most of the parts trees. http://www.roden.eu/HTML/063.html To me, it looks like they have it with the -2 tail, Maybe not, but a number of -1s were retrofitted with the -2 tail. They also show places on the cockpit floor for three seats, but the idea I got from the Ginter book and Tommy Thomason's article on the Savage cockpit was that the -1s only had the pilot and Bomb/Nav in the cockpit while they added the crew chief on the -2s. Tommy was involved in helping them with the kit and looking over the part trees so maybe I'm off a little bit. Later, Dave 7 Link to comment Share on other sites More sharing options...
Jackson Duvalier Posted August 6, 2022 Share Posted August 6, 2022 An incoming injection moulded kit is all well and good, but you're not allowed to give up on the vac build, Dave. Once you've been noted by the all-seeing eye of MSAP you're on the hook, I'm afraid. 1 1 Link to comment Share on other sites More sharing options...
Tailspin Turtle Posted August 6, 2022 Share Posted August 6, 2022 (edited) 9 hours ago, e8n2 said: Tim I also noticed that the control column and yoke went AWOL. Fortunately I had another Hasegawa Dinah kit to donate the redundant second control column and yoke. I plan to paint the tires tomorrow and start building the High Planes Models props. Now about that Roden kit. Here is a link to the Roden web site with pictures of most of the parts trees. http://www.roden.eu/HTML/063.html To me, it looks like they have it with the -2 tail, Maybe not, but a number of -1s were retrofitted with the -2 tail. They also show places on the cockpit floor for three seats, but the idea I got from the Ginter book and Tommy Thomason's article on the Savage cockpit was that the -1s only had the pilot and Bomb/Nav in the cockpit while they added the crew chief on the -2s. Tommy was involved in helping them with the kit and looking over the part trees so maybe I'm off a little bit. Later, Dave With respect to the AJ cockpit, there was only one set of flight controls (they were different between the -1 and -2, however). The bombardier had a collection of electronic boxes and a periscope viewing port in front of him. With respect to the Roden kit, the empennage is definitely the original -1s: rudder, stabilizer dihedral, strake on the side of the fuselage aft of the jet engine tailpipe. The illustration of the floor part on the sprue is misleading with respect to the number of seats on the flight deck itself. There was a third crewman on the -1, but he was located on the lower deck on the left side of the fuselage from the cabin door. The assembly instructions clearly show that the floor part is comprised of both the flight and lower decks. The only nit apparent to me from the instructions was that the nose gear doors were the -2's, not the single door on the -1. Easy fix. The canopy framing was also only on the very early production airplanes but that is another easy fix except maybe for shape if it isn't exactly correct and the modeler cares... Note that I wasn't directly involved with Roden when they developed the kit (it was a surprise to me when it was announced) but I have provided others with information on the AJ and it is pretty well documented in my blogs. Edited August 6, 2022 by Tailspin Turtle Add information about the third crewman position Link to comment Share on other sites More sharing options...
e8n2 Posted August 7, 2022 Author Share Posted August 7, 2022 21 hours ago, Jackson Duvalier said: An incoming injection moulded kit is all well and good, but you're not allowed to give up on the vac build, Dave. Once you've been noted by the all-seeing eye of MSAP you're on the hook, I'm afraid. Don't worry, I'm going to finish it. With all of the time and effort I've put into it so far it will be completed whether it likes it or not! 1 1 Link to comment Share on other sites More sharing options...
e8n2 Posted August 7, 2022 Author Share Posted August 7, 2022 14 hours ago, Tailspin Turtle said: With respect to the AJ cockpit, there was only one set of flight controls (they were different between the -1 and -2, however). The bombardier had a collection of electronic boxes and a periscope viewing port in front of him. With respect to the Roden kit, the empennage is definitely the original -1s: rudder, stabilizer dihedral, strake on the side of the fuselage aft of the jet engine tailpipe. The illustration of the floor part on the sprue is misleading with respect to the number of seats on the flight deck itself. There was a third crewman on the -1, but he was located on the lower deck on the left side of the fuselage from the cabin door. The assembly instructions clearly show that the floor part is comprised of both the flight and lower decks. The only nit apparent to me from the instructions was that the nose gear doors were the -2's, not the single door on the -1. Easy fix. The canopy framing was also only on the very early production airplanes but that is another easy fix except maybe for shape if it isn't exactly correct and the modeler cares... Note that I wasn't directly involved with Roden when they developed the kit (it was a surprise to me when it was announced) but I have provided others with information on the AJ and it is pretty well documented in my blogs. When I posted to the link to Roden's page on the kit there were no instructions shown. I haven't checked to see if they have been added, and of course, until it is released things can always change. Later, Dave Link to comment Share on other sites More sharing options...
Learstang Posted August 7, 2022 Share Posted August 7, 2022 The Modelling Gods would be upset it you did not finish this. Best Regards, Jason 1 Link to comment Share on other sites More sharing options...
e8n2 Posted August 7, 2022 Author Share Posted August 7, 2022 1 minute ago, Learstang said: The Modelling Gods would be upset it you did not finish this. Best Regards, Jason It should be done by the end of this month. I noticed this afternoon that the seats needed a little more flat black, got the replacement column and yoke in, and started painting the tires. The third tip tank lens was sanded out. It is as long as the first one, but still bigger in diameter than the spot on the tank for it. Later, Dave 1 Link to comment Share on other sites More sharing options...
Learstang Posted August 7, 2022 Share Posted August 7, 2022 I, their humble acolyte (with a lot to be humble about!), can report to you that the Modelling Gods are properly propitiated. Best Regards, Jason 1 Link to comment Share on other sites More sharing options...
Jackson Duvalier Posted August 7, 2022 Share Posted August 7, 2022 Are you done yet? 2 Link to comment Share on other sites More sharing options...
Tailspin Turtle Posted August 7, 2022 Share Posted August 7, 2022 8 hours ago, e8n2 said: When I posted to the link to Roden's page on the kit there were no instructions shown. I haven't checked to see if they have been added, and of course, until it is released things can always change. Later, Dave I got the instructions in a heads-up email a month ago from the decal producer, Cut Then Add. Also a few pictures of some of the tooling. 1 Link to comment Share on other sites More sharing options...
e8n2 Posted August 8, 2022 Author Share Posted August 8, 2022 23 hours ago, Learstang said: I, their humble acolyte (with a lot to be humble about!), can report to you that the Modelling Gods are properly propitiated. Best Regards, Jason Wunderbar! 1 Link to comment Share on other sites More sharing options...
e8n2 Posted August 8, 2022 Author Share Posted August 8, 2022 15 hours ago, Tailspin Turtle said: I got the instructions in a heads-up email a month ago from the decal producer, Cut Then Add. Also a few pictures of some of the tooling. It will be interesting to see how it turns out. With some modifications to the toolings they could produce two different tails, two different cockpits, three different bombbay door sets, and two different noses to do the bomber, recon, and tanker versions as well as a-1 and -2. Hasegawa could do the same thing with the Neptune (different noses, tails, bomb bays, tip tanks) and be able to do nearly every version of the P2V. Doubtful it will ever happen though. Later, Dave Link to comment Share on other sites More sharing options...
Ad-4N Posted August 8, 2022 Share Posted August 8, 2022 On 8/6/2022 at 8:35 AM, Tailspin Turtle said: With respect to the Roden kit, the empennage is definitely the original -1s: rudder, stabilizer dihedral, strake on the side of the fuselage aft of the jet engine tailpipe. So if Roden blesses us with a AJ-2. it will mean an entirely new fuselage and canopy. Link to comment Share on other sites More sharing options...
e8n2 Posted August 9, 2022 Author Share Posted August 9, 2022 11 hours ago, Ad-4N said: So if Roden blesses us with a AJ-2. it will mean an entirely new fuselage and canopy. Things can always change, and if they thought ahead about doing an AJ-2, they would only need to supply a new tail, cockpit, and canopy, and also a photo nose and bomb bay doors it they wanted to do an AJ-2P. Time will tell when we finally get to see what's inside the box, but at this late date, I doubt if they have done that. Later, Dave Link to comment Share on other sites More sharing options...
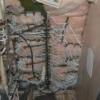
e8n2 Posted August 13, 2022 Author Share Posted August 13, 2022 (edited) Time for more photos and another update. The crew seats and replacement yoke have been installed! It was a real tight fit for the Bomb/Nav seat and I had to end up removing the side rods and sand the sides of the seat in order to get it to fit. I took the Savage to our club meeting in Sacramento this past Tuesday. I had it sitting in a box on the back seat. Traffic on the freeway all of a sudden slowed down and had to push on the brakes, and noticed an opening on the right and swerved over there. Heard a noise from the back and thought it might be something with the rear tires. Get to the meeting and the box is now partway under the front seat on the passenger side. Yikes!!! I had glued in the pilot's seat earlier that day and it was missing and the top portion of the crew chief's seat had come off and was laying at the base of the steps in the cockpit. Wednesday moring I find the pilot's seat under front passenger seat. The top of the crew chief's seat was gone and is somewhere in the bottom of the fuselage and doesn't want to move anymore. Reinstalled the pilot's seat, installed the B/N seat (it wasn't in yet), and made a new top for the crew chief's seat. In the mean time I painted the tires. Yesterday afternoon I painted the outside portion of the wheels on all five tires. I also cut out the resin parts for the props. I painted the prop blades white before I go to paint the tips yellow next week. The spinners needed some filler to build up a flat area. Not sure of the reason, but on most of the AJ-2s the right side of the wheel and tire on the nose gear was painted white. I masked off the left side, gave it a coat of a light gray in the morning and then white this afternoon. Next week I'll go back over the areas of the tire that are still supposed to be black. Here is a photo of the aircraft I am doing. No I will not be doing all of the weathering. But you can see the white on the nose gear wheel, tire, and gear fork. I can also make out a bit of the anti-glare panels. The caption for this photo in the Ginter book says the spinners are red. I don't think so! Painted the replacement top of the crew chief's seat this morning. This afternoon I finally was able to get the canopy on! Next week I will take care of filling any gaps with a combination of Micro Krystal Kleer and filler, if need be. I will also start to mask off the canopy, hopefully having it all done by this time next week. It's getting closer to being done! I have some other projects that I am looking forward to getting started, but need to get this done first. Later, Dave Edited August 13, 2022 by e8n2 Added photo and text. 8 Link to comment Share on other sites More sharing options...
Tailspin Turtle Posted August 13, 2022 Share Posted August 13, 2022 The right side of the AJ's nose wheel tire was painted white as a visual aid to check that the nose wheel was castered aft (it was free swiveling like a shopping cart's wheel) before launch and not forward, which could happen if the Savage was pushed back into place on the catapult. If it was backwards at the start of the stroke, it tended not to center and then jam upon entering the wheel well, preventing a complete retraction. Not a big deal from a safety-of-flight standpoint other than a small reduction in speed and range: it centered upon touchdown. Also see: https://thanlont.blogspot.com/2016/05/power-steering.html 3 2 Link to comment Share on other sites More sharing options...
e8n2 Posted August 14, 2022 Author Share Posted August 14, 2022 13 hours ago, Tailspin Turtle said: The right side of the AJ's nose wheel tire was painted white as a visual aid to check that the nose wheel was castered aft (it was free swiveling like a shopping cart's wheel) before launch and not forward, which could happen if the Savage was pushed back into place on the catapult. If it was backwards at the start of the stroke, it tended not to center and then jam upon entering the wheel well, preventing a complete retraction. Not a big deal from a safety-of-flight standpoint other than a small reduction in speed and range: it centered upon touchdown. Also see: https://thanlont.blogspot.com/2016/05/power-steering.html And now we know! Thanks Tommy! Later, Dave Link to comment Share on other sites More sharing options...
e8n2 Posted August 19, 2022 Author Share Posted August 19, 2022 Just a quick note here. Tommy "Tailspin Turtle" Thomason has added a new item on the Tailspin Drafts section of his highly informative blog. This one concerns the canopies on the AJ Savages, and can be found here: https://tailhooktopics.blogspot.com/2022/08/north-american-aj-savage-canopies.html For the AJ-2 there was a section of the canopy at about the mid point for a sextant to be used by the Bomb/Nav to sight stars for manually updating their navagation systems. I noticed the area where it is supposed to be on the kit canopy so now I will be sure not to mask that one area so it can be painted. More points for Tommy in helping this build along! Later, Dave 2 Link to comment Share on other sites More sharing options...

Recommended Posts
Create an account or sign in to comment
You need to be a member in order to leave a comment
Create an account
Sign up for a new account in our community. It's easy!
Register a new accountSign in
Already have an account? Sign in here.
Sign In Now