Ravnos Posted January 19, 2022 Share Posted January 19, 2022 (edited) Hi Folks, I started this one in the High Wing GB last year, sadly a combination of me biting off more than I could chew and life getting in the way meant I didn't get it over the line before the deadline. I am however determined to finish it so here we go Link to the previous build thread showing the beginning of the build: After the end of the build I got a little more done over Christmas and then made a decent dent in progress in the last week so here's an update to bring the build log up to its current state. Just as a PSA for anyone who hasn't read the first part, I'm NOT going for super accuracy with this kit, I'm mainly using it as a platform to learn some new techniques and push myself a bit beyond what I've done before, that and its practice on a coastal command paint scheme for when I finally get round to my Liberator kit This is the final image in the original build thread, completed so far is the interior, using the White Ensign photo etch kits for the flight deck and the bomb bay. The interior has been painted and the turrets have been painted assembled and masked (badly) using bits of the eduard mask kit, which is designed for the special hobby kit, I bought it in the hope that it would fit anyway.... PSA.... it doesn't. First up was masking the main cockpit canopy and glueing it into place, after touching up the cockpit paint a little. Annoyingly I've lost the PE part for the overhead controls in the cockpit so I'm going to have to leave that out. I had it stuck on a strip of masking tape to keep it safe but its vanished (probably left the room stuck to a cat) I used a couple of spots of PVA glue to stick the bomb bay doors in as to mask the holes, the eventual plan is to display the model with the doors open and the bomb racks out so these will be popped out after painting. Final round of sanding on the fuselage to smooth out the sprue goo used to fill the gaps Final bit of photo etch next, the exterior detail kit from White Ensign including the radar aerials and other greeblies. After spending hours re scribing the panels lines on the fuselage I decided I didn't have it in me to do the whole aircraft and suspected I would end up making a mess of it anyway, the lines on the fuselage are too deep and ended up needing a load of filling to fix the screwups. so I sanded the raised detail down on the flight surfaces (not all the way so there should still be a little detail visible). Wings on and glued, outriggers attached along with the PE bracing wires. Sanded the seam smooth after filling it with some more extra thick. Port side done in the picture. And here she is in her current form, the detail parts around the dorsal turret glued on and the wing seams sanded, there's some other detail parts to be added to to the spine and under the wings then she'll be ready for primer. I'm leaving the engines and cowls off for now, I'll prime them separately before I glue them in place. Thanks for reading folks, hopefully I'll have some more updates soon, I'll get her finished within the KUTA if it kills me 🤣 Edited March 7, 2022 by Ravnos 13 Link to comment Share on other sites More sharing options...
JeroenS Posted January 20, 2022 Share Posted January 20, 2022 That's a biggie! You seem to be well underway now, so I'm sure you'll get her over the line. The comment about the cat almost made me lose my swig of tea. 1 1 Link to comment Share on other sites More sharing options...
MarkSH Posted January 20, 2022 Share Posted January 20, 2022 I'm thinking of trying my hand with this old Airfix kit for the upcoming Big and British GB, so watching your build with interest. Looking good! Cheers, Mark. 1 Link to comment Share on other sites More sharing options...
arfa1983 Posted January 20, 2022 Share Posted January 20, 2022 This is seriously awesome. Can't wait to see the finished article. 1 Link to comment Share on other sites More sharing options...
CliffB Posted January 20, 2022 Share Posted January 20, 2022 It's great to see this one up and running again Cheers 1 Link to comment Share on other sites More sharing options...
Ravnos Posted January 20, 2022 Author Share Posted January 20, 2022 Thanks guys I managed to get most of the small detail parts on to her tonight, I'll get a proper update posted over the weekend but fingers crossed there might be some serious painting in the next one! 16 hours ago, JeroenS said: That's a biggie! You seem to be well underway now, so I'm sure you'll get her over the line. The comment about the cat almost made me lose my swig of tea. You Laugh but its a serious hazard around here, I came back into my office after lunch today to find this little git asleep in the box of parts 😒 11 hours ago, MarkSH said: I'm thinking of trying my hand with this old Airfix kit for the upcoming Big and British GB, so watching your build with interest. Looking good! Cheers, Mark. I'm hoping to enter that one with with a Vulkan kit ive got on the shelf, or the Victor, haven't decided which yet which ever one doesn't make the cut I'll do for the falklands GB. 3 5 Link to comment Share on other sites More sharing options...
JeroenS Posted January 21, 2022 Share Posted January 21, 2022 They do love boxes don't they.... 2 Link to comment Share on other sites More sharing options...
Ravnos Posted January 22, 2022 Author Share Posted January 22, 2022 Short update, glued on the remaining bracing wires for the floats and the final PE antenna under the wing tips. Filled the gap under the wings,, I used some of vallejo's plastic putty this time as it didnt need any structural strength and this meant I could clean off the excess and avoid any more sanding. And that's her ready for paint! I should have a couple of hours tonight so I'm going to clear the decks on the bench and get set up for priming. 7 Link to comment Share on other sites More sharing options...
Ravnos Posted January 26, 2022 Author Share Posted January 26, 2022 (edited) Update from last weekend, works been manic this week so haven't had time to post anything till now. Managed to get a coat of primer on the model on Saturday and Sunday, As there's no easy way to hold the complete model and paint the whole thing in one go, I painted the upper surfaces first and gave it over night to dry, after which I replaced the masking tape on my vise with clean stuff and turned the model over carefully to paint the underside. it looks like its worked pretty well with no obvious seam between the two areas. I'll probably put at least one more coat of primer on, maybe two before any colours go down. Even if it is only primer, a coat of paint really brings everything together! Quite pleased with how its going so far Edited January 26, 2022 by Ravnos 9 Link to comment Share on other sites More sharing options...
Ravnos Posted February 10, 2022 Author Share Posted February 10, 2022 (edited) Quick update, I havent had a lot of time over the last few weeks but I managed to get an afternoon or two recently. First time trying pre-shading, its a little shakey in places, I'm not used to free handing with the air brush yet. First coat of white applied, the shading is still a little dark but its going to have the dark camo pattern on the upper surfaces so that should be toned down a lot, I gave it a second coat of white on the underside so its much more subtle. During drying times I made a start on the engine parts, into which comes the final piece of after market gear, some brass propeller blades from Propblur, I was a little apprehensive about cutting the plastic blades off but the moulding was pretty terrible to begin with, and it looks like I've got away with it. the rest of the 12 holes that needed drilled with a pin vice was somewhat tedious but I managed to get it done while listening to a work call Coat of primer on all the engine parts, I sprayed the tips of the props yellow later but forgot to take a picture so that will have to wait for the next update, That's all for now, with any luck I should have time to make a start on the camo pattern on the upper surfaces over the weekend. Edited February 10, 2022 by Ravnos 6 Link to comment Share on other sites More sharing options...
CliffB Posted February 11, 2022 Share Posted February 11, 2022 Those free-hand lines look good to me and it was nice to see prop-blurs making an appearance too 1 Link to comment Share on other sites More sharing options...
Ravnos Posted February 11, 2022 Author Share Posted February 11, 2022 Thanks Cliff I stumbled across the prop-blurs when I was looking for PE sets for the kit, the intention is for the model to hang from the ceiling when its finished so it seemed like a good subject to try them out on. 1 Link to comment Share on other sites More sharing options...
Ravnos Posted February 17, 2022 Author Share Posted February 17, 2022 Very short update, I'm going to need to get a bend on if this is going to be finished in time. When I got up this morning I noticed two of the props were missing, it took me 10 minutes to find these under the radiator...... The language in the air at the time can't be uttered here so I'll leave that up to your imagination, suffice to say if I knew which cat was responsible it would already have been turned into a sporran. This might actually put the deadline in question as I don't know if I can get replacements in time, Ive ordered a couple more and worst case scenario it might be finished minus a couple of props by the end of the GB. Aside from that I've made a start on masking for the camo pattern. Something tells me I should have done this before attaching the radar antenna 🤪 I'm just going to need to work round it now. Thats all for now folks, with any luck I'll have the base coat for the camo done by the next time you see it. 5 1 Link to comment Share on other sites More sharing options...
CliffB Posted February 18, 2022 Share Posted February 18, 2022 Just as I was reading your last post, one of my cats brought a live mouse in to the house and thoughtfully let it go at my feet! She's obviously showing solidarity with your moggy . 4 Link to comment Share on other sites More sharing options...
PeterB Posted February 18, 2022 Share Posted February 18, 2022 Hi Cliff Our first cat was a prolific hunter but after a few years he started bringing mice in to play with - I found that Wellington boots were great for catching them as they would run into the leg to hide if you laid them on the floor. Then you just had to tip them up so the mouse went into the foot and you could take them outside and release them. Of course some would say that your cat has realised you are a lousy hunter so is trying to help you! So far our current pair have only damaged one kit, having knocked an old P-61 onto the floor where it fell apart. I suppose I could have entered that in the KUTA as well. Pete 2 Link to comment Share on other sites More sharing options...
JOCKNEY Posted February 21, 2022 Share Posted February 21, 2022 Love the Sunderland On the subject of cats, we had a Bengal that would bring rabbits in through the cat flap, he would then eat them overnight so in the morning the kitchen looked like a scene from Reservoir Dogs ! Just be thankful it's only mice ! 1 1 Link to comment Share on other sites More sharing options...
PeterB Posted February 22, 2022 Share Posted February 22, 2022 (edited) Don't know about Reservoir Dogs as I have never seen it, but when our first cat was still young, we would get up in the morning and find that the back garden looked like a WWI battlefield at times - bits of birds and rodents all over the place. That's one of the reasons we decided not to install a cat flap. Pete Edited February 22, 2022 by PeterB Link to comment Share on other sites More sharing options...
Jim Spackman Posted February 22, 2022 Share Posted February 22, 2022 (edited) Did you decide which Liberator you were going to build afterwards? I've replied in your 547 Squadron thread as my grandfather was with them the same time as yours and I've got some serial numbers and IDs for the GRVIs they flew if you need them. Edited February 22, 2022 by Jim Spackman Link to comment Share on other sites More sharing options...
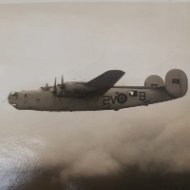
Ravnos Posted February 22, 2022 Author Share Posted February 22, 2022 (edited) 2 hours ago, Jim Spackman said: Did you decide which Liberator you were going to build afterwards? I've replied in your 547 Squadron thread as my grandfather was with them the same time as yours and I've got some serial numbers and IDs for the GRVIs they flew if you need them. Hi Jim, I'm going to do 2V-B, I've been able to confirm that he definately flew it from the ORB's and its the one in all the best photographs we have so I've been able to confirm the serial number. An added bonus is that its included in the Xtradecals coastal command heavies set so that makes getting the markings right easy. Its probably going to be a little while before I work up the nerve to do it though, This one has been a good dry run though for a bigger aircraft and a coastal command paint scheme, I've already learned a few things and identified some new stuff I need for bigger models Edited February 22, 2022 by Ravnos typo Link to comment Share on other sites More sharing options...
Jim Spackman Posted February 23, 2022 Share Posted February 23, 2022 (edited) I want to see it when it's done as my grandfather flew in it too! Weirdly, someone's already done one of his Hampdens (489 RNZAF XA-Y). Edited February 23, 2022 by Jim Spackman Link to comment Share on other sites More sharing options...
Ravnos Posted February 23, 2022 Author Share Posted February 23, 2022 4 hours ago, Jim Spackman said: I want to see it when it's done as my grandfather flew in it too! Weirdly, someone's already done one of his Hampdens (489 RNZAF XA-Y). I'll try and remember to Tag you when I get round to it ^^ I probably wont be doing it as part of a group build as I want to be able to take my time with it but I'll definately have a build thread elswhere in the forum when the time comes. If you want to see another fantastic Liberator build, @Mark Harmsworth posted his recently, his Dad albeit in a different squadron was stationed at Luchers at the same time my grandfather (and probably yours) was. Link to comment Share on other sites More sharing options...
Mark Harmsworth Posted February 24, 2022 Share Posted February 24, 2022 Who can resist a mention like that? This is my first visit to this thread. Some wonderful work going on here. And a cat! This is my build - and thanks for that very kind remark @Ravnos Mark 2 Link to comment Share on other sites More sharing options...
Ravnos Posted February 24, 2022 Author Share Posted February 24, 2022 😄 You're welcome Mark, the build was completely deserving of the praise, if mine is half as good I'll be delighted. Anyway, steering this back to the Sunderland, First coat of colour applied for the upper camo, I forgot to take a picture of the masking before I started but I'm sure you get the jist. I also realised far too late that I forgot to mask the canopy, its supposed to have white struts as far as I can tell, if it looks terrible in grey I'll fix it later. Next up will be the ever controversial Dark Slate Grey, up until now I've never questioned Vallejo's colours before now but looking at the bottle I'm really not sure about this one, I know its a weird colour but lots of people call it a green, some call it an olive drab type shade, I guess this is closer to the latter. I'm going to give it a shot and worst case scenario I can go over it with something else if I hate it. The paint had separated a bit but that picture is taken after it was shaken within an inch of its life, the cracked lid is thanks to my attempt at 3D printing a paint shaker..... which works a little too well That's all for now folks, see you in the next one with a completed camo pattern. 4 Link to comment Share on other sites More sharing options...
Ravnos Posted February 25, 2022 Author Share Posted February 25, 2022 Noodles applied Mixing cup to protect the antenna Masking tape and Paint, you know, the finish looks much nicer in the photos than it does in person >< I think I'm going to start building models strictly for photographic viewing 🤣 Fingers crossed my masking hasn't been too terrible, I'll find out in the morning! 5 Link to comment Share on other sites More sharing options...
Ravnos Posted March 3, 2022 Author Share Posted March 3, 2022 (edited) Ok, so the colours look pretty good after all, Vallejo's dark slate grey looked weird in the bottle but once its on the model it looks spot on, removing the masking really is the most satisfying bit of a build. Next up was the leading edge of all the flight surfaces. I seem to be developing a habit for doing colours in the most difficult order, in hindsight if I had done the black first the masking would have been much easier but hey its done now. The black really does tie everything together though, there are a couple of patches needing touched up but I sorted those later. Pulled the bluetack out of the gun ports and painted the guns again, also pulled the bomb bay doors out prior to hitting the whole thing with a gloss clearcoat. I put that somewhere safe to dry and went back to the engine parts, first up was fixing the props that the cat had mangled, I'd been avoiding this a little. it was made a lot easier though when I got lazy and realised that one of the collets for my rotary tool was small enough to take a pin vice drill. reassembled and repainted with the new propblurs that arrived a few days ago. back to where they were, they will get masked and the final colour sprayed tomorrow. Vallejo "Rust" from their older metalic model air line (not the metal color range) on the front ring of the engine cowling, these came out much nicer than I expected, I'd heard these metallics weren't great but it looks great so far. time will tell if it still looks as nice when its dry. That's all for now folks. The deadlines getting close but I'm fairly optimistic I can get it over the line this time, engines are well on their way and there's just the bomb racks to build and paint over the weekend. Oh and decals of course, that's probably going to take a day all to its self 🤪 Edited March 3, 2022 by Ravnos typo 5 Link to comment Share on other sites More sharing options...

Recommended Posts
Create an account or sign in to comment
You need to be a member in order to leave a comment
Create an account
Sign up for a new account in our community. It's easy!
Register a new accountSign in
Already have an account? Sign in here.
Sign In Now