arfa1983 Posted February 13, 2022 Author Share Posted February 13, 2022 (edited) Another productive Sunday! Got everything primed and also the top colour on. I used Mr Surfacer for the priming with a levelling thinner and thought it actually looked perfect for the bottom colour of the aircraft. So I decided to leave it rather than paint over it with Gunze 308. As I wanted limited contrast between top and bottom I mixed the Surfacer with Gunze 307 in 33:66 ratio and sprayed the top surfaces. The contrast turned out pretty good. (Not much difference in colour) I noticed in many photos the radome looks much lighter than the underside of the aircraft so I mixed a few drops of white with the Mr Surfacer. It turned out a little light but actually it might look ok once all the clear coats are on. I also found a few more "C" versions of the AIM-120s so they will all look the same which is good. I sprayed the noses "very light grey" and also sprayed around the fins where I will spray yellow and mask for the warhead stripes. I must say the mixture of levelling thinner, Surfacer and Gunze Aqueous has given the best finish I have ever done so far! Next weekend is camping but maybe can get a few things done this week if work isn't stupid! Edited February 13, 2022 by arfa1983 11 Link to comment Share on other sites More sharing options...
Sam Posted February 13, 2022 Share Posted February 13, 2022 The Trigger-Happy-Pilot‘s edition! 😀😀😀 2 Link to comment Share on other sites More sharing options...
trickyrich Posted February 14, 2022 Share Posted February 14, 2022 Gee she's come along very nicely! 1 Link to comment Share on other sites More sharing options...
Wings unlevel Posted February 15, 2022 Share Posted February 15, 2022 On 14/02/2022 at 04:11, arfa1983 said: I also found a few more "C" versions of the AIM-120s That’s about the RAAF’s whole inventory of AMRAAMs! 1 2 1 Link to comment Share on other sites More sharing options...
arfa1983 Posted February 15, 2022 Author Share Posted February 15, 2022 2 hours ago, Wings unlevel said: That’s about the RAAF’s whole inventory of AMRAAMs! It's a good percentage of them yes... Though if it was necessary to arm in this way, I'm sure they could get some on a very short lead time! 1 Link to comment Share on other sites More sharing options...
Wings unlevel Posted February 16, 2022 Share Posted February 16, 2022 18 hours ago, arfa1983 said: Though if it was necessary to arm in this way, I'm sure they could get some on a very short lead time! I’m pretty sure during Operation Falconer in Iraq we had to tap into US warstocks for extra AIM-120s. 1 Link to comment Share on other sites More sharing options...
Andwil Posted February 16, 2022 Share Posted February 16, 2022 Given the current climate vis a vis an Asian power, probably best not to be advertising this! AW 1 1 Link to comment Share on other sites More sharing options...
arfa1983 Posted February 17, 2022 Author Share Posted February 17, 2022 They should call this hobby "masking". Ready for a Friday afternoon paint session. Then decals on Sunday when back from camping! 5 Link to comment Share on other sites More sharing options...
coneheadff Posted February 17, 2022 Share Posted February 17, 2022 Good progress! Have you dry fitted the center pylon yet? Mine is a "little" bit off 😳 1 Link to comment Share on other sites More sharing options...
arfa1983 Posted February 18, 2022 Author Share Posted February 18, 2022 (edited) 5 hours ago, coneheadff said: Good progress! Have you dry fitted the center pylon yet? Mine is a "little" bit off 😳 Yes it seems not to fit snugly which is a surprise because almost everything else is quite good. My centre pylon is already attached to the drop tank so filler won't be an option. I think I'll remove the locating pins and try sanding amd shaving it a little maybe. @Bertie Psmith also mentioned the landing gear doors don't fit nicely either. Other than these things, it's a very nice kit to build and i think shape looks good. Edited February 18, 2022 by arfa1983 2 Link to comment Share on other sites More sharing options...
coneheadff Posted February 18, 2022 Share Posted February 18, 2022 15 hours ago, arfa1983 said: Yes it seems not to fit snugly which is a surprise because almost everything else is quite good. My centre pylon is already attached to the drop tank so filler won't be an option. I think I'll remove the locating pins and try sanding amd shaving it a little maybe. @Bertie Psmith also mentioned the landing gear doors don't fit nicely either. Other than these things, it's a very nice kit to build and i think shape looks good. It's really hard to get the shape with sanding. At the end I glued the pylon to the belly and filled the gaps with Tamiya's Epoxy Putty. Made small rolls out of it, pushed it in place with a toothpick and cleaned it up with a brush and water. I'll try to take a photo tomorrow. 2 Link to comment Share on other sites More sharing options...
arfa1983 Posted February 19, 2022 Author Share Posted February 19, 2022 7 hours ago, coneheadff said: It's really hard to get the shape with sanding. At the end I glued the pylon to the belly and filled the gaps with Tamiya's Epoxy Putty. Made small rolls out of it, pushed it in place with a toothpick and cleaned it up with a brush and water. I'll try to take a photo tomorrow. I realised the drop tank wasn't glued because it has the pins. I managed to file down the middle and get an OK fit. Needs a little clean up but it's going to be hard to see the imperfections with the tank in place. I also sprayed the weapons and removed masking. Looks decent. I painted the fins by hand.the beer bottle caps came in handy for this! I mixed Gunze Aqueous, Tamiya X20 and Windsor and Newton Flow improver. It gives an amazingly easy to paint viscosity with a brush. I also sprayed the landing gear and wheel wells white. Today I will give the aircraft a light spray with lighter grey on some panels to break up the grey a little. Camping was cancelled due to all our friends weak untrained immune systems, but will be going to Expo instead. However it looks like I'll get quite close by end of this weekend to finishing. 4 Link to comment Share on other sites More sharing options...
arfa1983 Posted February 19, 2022 Author Share Posted February 19, 2022 Made a start! Some people say they hate decaling. For me it is the best part of the build. 3 Link to comment Share on other sites More sharing options...
Sam Posted February 19, 2022 Share Posted February 19, 2022 4 hours ago, arfa1983 said: Made a start! Some people say they hate decaling. For me it is the best part of the build. It is one of the best parts indeed. The look of the model changes a lot in that phase. The colours interact with each other. A personality begins to appear. 1 Link to comment Share on other sites More sharing options...
coneheadff Posted February 19, 2022 Share Posted February 19, 2022 Great safe on that pylon 👍 should be hard to spot. Oh boy...I can't await to finally start decaling. You see the light at the end of the tunnel and it really gives life to the model. 1 Link to comment Share on other sites More sharing options...
arfa1983 Posted February 20, 2022 Author Share Posted February 20, 2022 Decals all done. Should I do a panel line wash or not? I'm still thinking to leave it clean but what say the BM Masses? 7 Link to comment Share on other sites More sharing options...
modelling minion Posted February 20, 2022 Share Posted February 20, 2022 I think a Light was will help bring it to life, looking really good though. 1 Link to comment Share on other sites More sharing options...
Wings unlevel Posted February 20, 2022 Share Posted February 20, 2022 I’m pretty sure that City of Ipswich crest dates the jet to its delivery flight or soon after, and was short-lived, if that helps? Looks really nice by the way. 1 Link to comment Share on other sites More sharing options...
arfa1983 Posted February 20, 2022 Author Share Posted February 20, 2022 1 hour ago, Wings unlevel said: I’m pretty sure that City of Ipswich crest dates the jet to its delivery flight or soon after, and was short-lived, if that helps? Looks really nice by the way. Yes it was a picture of this aircraft which I was trying to simulate the paint finish on. It's super clean, unlike the usual USN superbug filthyness. https://www.airforce-technology.com/news/newsraafs-fa-18f-super-hornet-fleet-achieves-final-operational-capability/ So I think I will leave it clean. I've applied matt coat and I did a little check with Tamiya grey panel line wash and it can be applied nicely over the matt if I change my mind. I think it would make the model pop a bit more, but I need to get started on the Attack/Bomber GB! The panel lines are also quite crisp and visible on the Meng kit so for now I'm not going to do the wash... I think. 2 Link to comment Share on other sites More sharing options...
exdraken Posted February 20, 2022 Share Posted February 20, 2022 On 2/15/2022 at 2:32 PM, arfa1983 said: It's a good percentage of them yes... Though if it was necessary to arm in this way, I'm sure they could get some on a very short lead time! Question is always , how many could you need in short ... 2/ possible target? 8/ possible shooter aircraft? Either you run out of targets, or of shooters/ pilots... always a compromise .... But luckily most aircraft in the last 75 years were not shot down, and most missiles had to be scrapped It is a different story for aur to ground weapons though... Great work by the way, will be highly impressive! 2 Link to comment Share on other sites More sharing options...
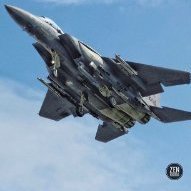
arfa1983 Posted February 21, 2022 Author Share Posted February 21, 2022 (edited) Calling this done... Doh! Had to forget something right...? and it had to be front and centre too! I completely forgot to paint the gun at the front when I had the Alclad Steel in the airbrush yesterday! I'll get to it this weekend hopefully. I'm not going to try brush paint it. Though that could be an option.... hmmm. I think I will give it a slight panel line wash in the future too. The matt coat really dulled down a lot of the grey variation on the top, and it needs some "flavour". The missiles look, frankly, ridiculous! But I guess that was kind of the point! They ended up a little wonky too because the pylons weren't built straight enough. Lesson learned there. I'll put pictures in gallery after I paint the gun! Edited February 21, 2022 by arfa1983 8 Link to comment Share on other sites More sharing options...
DaveJL Posted February 21, 2022 Share Posted February 21, 2022 Looks great! Re the missiles, the pylons on the SH are canted slightly outwards. Looking at your last picture, I'd say they look bang on! 1 Link to comment Share on other sites More sharing options...
Lex77 Posted February 21, 2022 Share Posted February 21, 2022 Nice one! Looking very good. Well done. 1 Link to comment Share on other sites More sharing options...
arfa1983 Posted February 22, 2022 Author Share Posted February 22, 2022 8 hours ago, DaveJL said: Looks great! Re the missiles, the pylons on the SH are canted slightly outwards. Looking at your last picture, I'd say they look bang on! Actually I meant wonky in the up /down direction. If you see the second last picture you can see one missile just popping up a little above the others. Link to comment Share on other sites More sharing options...
Wings unlevel Posted February 22, 2022 Share Posted February 22, 2022 14 hours ago, arfa1983 said: The missiles look, frankly, ridiculous! The citizens of Ipswich can sleep soundly at night knowing they are so well defended! I think it looks fantastic, the load out gives it some great individuality! 1 Link to comment Share on other sites More sharing options...

Recommended Posts
Create an account or sign in to comment
You need to be a member in order to leave a comment
Create an account
Sign up for a new account in our community. It's easy!
Register a new accountSign in
Already have an account? Sign in here.
Sign In Now