Freester Posted December 28, 2021 Share Posted December 28, 2021 Well I hope everyone had a nice addition to their stashes over the holidays. I requested a 'Wolfpack' F14A for a couple of reasons. I have fond memories of building an Airfix version when I was a teenager, and this Tomcat adorns the front of my old and well thumbed 'Encyclopedia of World Air Power' that I have had since I was a teenager. This is the 4th model I've started since rediscovering modelling (only one completion so far but another coming very soon)... Obligatory picture of boxes and sprues... I'll be working with my 10 year old son on this one. This is my second Hobby Boss kit and one of the things I've noticed is the information on colours / details for the cockpit, engine fans other internals etc is a bit lacking. I'll be having a look at other builds and other model make instructions. Plan is straight out of box... Hand brush with thinned enamels. I'm sure I'll be asking questions along the way... Off to the local model shop to pick up a few colours I need and hopefully make a start with a little assembly and painting today... 7 Link to comment Share on other sites More sharing options...
billn53 Posted December 28, 2021 Share Posted December 28, 2021 You and I must have built the same Airfix kit in our youths, mine was also done in Wolfpack markings and it was my favorite model. I have the HobbyBoss in my stash and thus will be watching your build with attention. 2 Link to comment Share on other sites More sharing options...
Desk Flyer Posted December 28, 2021 Share Posted December 28, 2021 3 hours ago, Freester said: Well I hope everyone had a nice addition to their stashes over the holidays. I requested a 'Wolfpack' F14A for a couple of reasons. I have fond memories of building an Airfix version when I was a teenager, and this Tomcat adorns the front of my old and well thumbed 'Encyclopedia of World Air Power' that I have had since I was a teenager. Yes! Great choice! My favourite Tomcat flavour for much of the same reasons! 👏 1 Link to comment Share on other sites More sharing options...
Freester Posted January 3, 2022 Author Share Posted January 3, 2022 Well not a lot of progress to report - and no pictures. That said I've spent a bit of time poring over the instructions, planning my attack. One thing that confused me in the instructions (link to them on Scalemates not sure if it's OK to post a picture from the instructions?) is on Page 4 it states a small part of the upper / lower fuselage has to be 'cut / removed'. After a long time staring at the instructions, dry fitting the parts, I realised (on Page 5) that an extra little part will slot in and make the forward part of the fuselage / wing appear to have an extra 3rd panel. Examination of photos of the F14 also show this, usually just forward of where the ship name is painted. So at least I've worked that out. I'm a little daunted by this as there aren't any very obvious guides or lines to cut this out. So any recommendations / advice on how to go about this gratefully received. Tools? A rasp? Razor blade? Or just take time sanding it down...? Link to comment Share on other sites More sharing options...
Freester Posted January 3, 2022 Author Share Posted January 3, 2022 Well I worked out what this part is. It's called the 'Glove Vane". The instructions don't make it obvious but you could fit them extended out. I'm not going to do that but still need to cut the slots out of the fuselage. Found a video online building this model or the previous version and saw the builder cut the plastic out so I'm feeling a bit more confident about this 👍 Link to comment Share on other sites More sharing options...
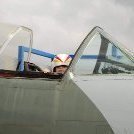
Freester Posted January 15, 2022 Author Share Posted January 15, 2022 OK - slow but steady progress on this model. I've been chipping away trying to hand brush 4 or 5 coats of enamels onto components that need painting pre assembly. I find Hobby Boss instructions aren't the most detailed wrt to colours so you need to use other references (instruction from other brand kits, real life photos etc). I've got a few other plates spinning and may have to focus on one build or another... I got 4 coats on the cockpit components. The 'monocoque' has very little detail so I decided just to put all the decals on. Initially I was toying with the idea of experimenting with a wash and dry brush but there are no real details to 'highlight'. So a dab of Humbrol gloss varnish in the relevant places and the decals were applied last night... They are quite colourful and varied so I'm not disappointed. But as always with the caveat that this work isn't up to some of the amazing detail on the 'aftermarket' cockpits and other modifications to OOB kits that are so regularly posted on this site. Seat dry fitted... Next steps. I'll seal this all in with a clear coat. Probably Humbrol matt on the side consoles, and a gloss Humbrol varnish for the instrument panels in front of the seats as this would replicate the dials / screens etc. I might fashion some belts out of masking tape... 3 Link to comment Share on other sites More sharing options...
Bertie McBoatface Posted January 15, 2022 Share Posted January 15, 2022 This looks neat. It's not a bad cockpit at all for a small scale kit, very impressive. You don't need many straps on these seats as the pilots' end of it was a part of their flight suits. Google a reference photo to see what I mean. 1 Link to comment Share on other sites More sharing options...
Freester Posted January 15, 2022 Author Share Posted January 15, 2022 27 minutes ago, Bertie Psmith said: This looks neat. It's not a bad cockpit at all for a small scale kit, very impressive. You don't need many straps on these seats as the pilots' end of it was a part of their flight suits. Google a reference photo to see what I mean. Brilliant. Thank you for the feedback and the advice about the belts. Much appreciated. Link to comment Share on other sites More sharing options...
Scargsy Posted January 21, 2022 Share Posted January 21, 2022 Hi @Freester pity you only just missed the F14 group build, have a look over here: https://www.britmodeller.com/forums/index.php?/forum/743-f-14-tomcat-stgb/ A few of us built this exact kit, so feel free to look over our build logs for hints and tips, also the group build as a whole for info, etc. I went with the low-vis scheme - one thing that caught me out is the colour callout names/colours seem wrong - the overall colour - the Mr Color number is correct but the English text is not the same name, also the darker area (to show the top where the wings will fold over) should be I think Dark Gull Grey or similar, not Metallic Red as they suggest! 1 1 Link to comment Share on other sites More sharing options...
Freester Posted January 21, 2022 Author Share Posted January 21, 2022 7 hours ago, Scargsy said: Hi @Freester pity you only just missed the F14 group build, have a look over here: https://www.britmodeller.com/forums/index.php?/forum/743-f-14-tomcat-stgb/ A few of us built this exact kit, so feel free to look over our build logs for hints and tips, also the group build as a whole for info, etc. I went with the low-vis scheme - one thing that caught me out is the colour callout names/colours seem wrong - the overall colour - the Mr Color number is correct but the English text is not the same name, also the darker area (to show the top where the wings will fold over) should be I think Dark Gull Grey or similar, not Metallic Red as they suggest! Thanks for the comment. I did spot the group build after it finished. I'm pretty new here and hadn't ventured into the GB area of the forums until recently. Some lovely work and I did get my head around the the Glove Vanes in the end. I've scratched out one side need to do the other (and also update this WIP!). Yes I'd spotted that 'dark' patch behind the wings in the HB paint plan, I'll be honest I'm sticking to painting it more like the cover of my World Airpower book where it's gull grey all over the top, and I'll also put a red tip on the top of the vertical stabilisers (not indicated in the HB scheme), 1 Link to comment Share on other sites More sharing options...
Freester Posted January 30, 2022 Author Share Posted January 30, 2022 I've been focussing on my F-18C group build recently. I've been putting a bit of paint on this model when I've got the right colours out for the F-18 as well. But I decided to focus on the Tomcat today. Made some nice progress actually. Glued the forward cockpit together, did a bit of dry fitting on the main fuselage and wings, and scratched out the other glove vane (I did read somewhere in the old F-14 group build it was unnecessary to do this but I'd done one side so it was too late!). Glove vane cutout - dry fits OK with 2 hands but obviously I needed a hand to take the photo! Cockpit glued and rear fuselage / wings dry fitted. Dry fit of forward and rear fuselage This model appears to come together quite well. Quite a rewarding afternoon. I want to get all coats on the wings before I glue the rear up. I'll start thinking about masking the canopy and ensuring everything else that needs painting before assembly has been done... Link to comment Share on other sites More sharing options...
Cklasse Posted April 4, 2022 Share Posted April 4, 2022 Seeing this post made me think of my Hasegawa Tomcat that I built in my school days; a Wolfpack cat too. I am revisiting my old hobby beginning of the year and yup! Looking to get those model kits that I built long ago for sentimental reasons. I am tempted to get the GWH 1/72 Wolfpack F14A. Maybe I will make the jump if I continue to read this build post….. Link to comment Share on other sites More sharing options...

Recommended Posts
Create an account or sign in to comment
You need to be a member in order to leave a comment
Create an account
Sign up for a new account in our community. It's easy!
Register a new accountSign in
Already have an account? Sign in here.
Sign In Now