Billthebattler Posted December 14, 2021 Share Posted December 14, 2021 Many years ago, before my hair turned grey with worry and age, I made an old Airfix kit of their C-130 Hercules in RAF Air Support Command colours. Life got in the way of model making to a major extent and the Hercules ended up in the attic! A wicked thing to do, but it happened.– Now it’s going to have a new lease of life, reborn as one of the aircraft seen in the James Bond film The Living Daylights. Anyone familiar with the film will remember the “soviet” Hercules take-off scene here: It’s this scene I will model and turn into a diorama. Obviously, I’m starting with a model I made at an earlier time, so it shouldn’t take too long (famous last words) to complete the modifications/improvements. This was the state of play a week ago. I separated the wings, fuel tanks and undercarriage, and have made a set of basic flaps. The model was then given a light rub down and (not shown in the picture) reformed the leading edge of the tail fin which was flat! It’s going to be a fun transformation turning an RAF aircraft into a “Soviet” machine (for the film, a Herc supplied by the Royal Moroccan Airforce with added red stars!) and hopefully it will end up looking animated and exciting in its diorama. And that’s it for part one. Bill 12 Link to comment Share on other sites More sharing options...
k5054nz Posted December 15, 2021 Share Posted December 15, 2021 (edited) My favourite Bond film as a kid and probably still is (Dalton = best book Bond!) so it's so cool to see someone tackling a machine from it. Wonderful idea!! Are you going to do the air-to-air stand-in CASA 212(?) as well? 😇 Also the theme song's now playing on a loop in my head, thanks for that! Edited December 15, 2021 by k5054nz 3 Link to comment Share on other sites More sharing options...
John_W Posted December 15, 2021 Share Posted December 15, 2021 Pay attention during the cargo net scene, and count the engines on the aircraft... 2 1 1 Link to comment Share on other sites More sharing options...
Billthebattler Posted December 15, 2021 Author Share Posted December 15, 2021 (edited) Thank you Zac and John. Zac: I can't decide between Dalton or Connery, but Daylights is my favourite of the films. (hope this doesn't start an off topic debate as to whose best!) The flight fight scene - now there's a modelling thought 😄 I dare say someone one will do it. [so the theme was playing in your head.- Try having "I wanna be Bobby's girl" rattling around without knowing why. That happened to me yesterday!] John: Quite right. - When poor old Necros fell off the net, not only did he take a couple of engines with him, but magically turned a C-130 in to a C-123 ! Edited December 15, 2021 by Billthebattler 2 Link to comment Share on other sites More sharing options...
sroubos Posted December 15, 2021 Share Posted December 15, 2021 9 hours ago, John_W said: Pay attention during the cargo net scene, and count the engines on the aircraft... Major facepalm moment! I've seen that movie at least six times and I've never noticed this. It's not like it's not really obvious too... [hangs head in shame]. 3 Link to comment Share on other sites More sharing options...
Billthebattler Posted December 27, 2021 Author Share Posted December 27, 2021 It would have been better to have started this project from scratch with a new, more accurate Hercules kit, but as I wanted to give my old bird a new lease of life, I have to make the best of what I have. – if only I had the foresight to avoid hindsight. 😊 The underside has now been repainted, but as yet unvarnished. That will come later. This is Humbrol 29 (FS 36375 Ghost Grey) So far as I am aware, (stand to be corrected) the scheme used by the Royal Moroccan Airforce for their Hercules is FS 36375 (as above) FS 33613 (Hum 148 Radome Tan) FS 30219 (Hum 29 Dark Earth – although I think Revell 82 Dark Earth is a slightly richer colour and may use that.) The patchy white strips under the wings will eventually hold the flaps in the right position. I’ve been playing with the wheels, trying to make them look as if they are in motion. I’m not that unhappy with the result, and as they are partial covered by the undercarriage doors, I think they will do. The reason why one undercarriage leg is missing is… It’s going to be replaced by a 2mm screw that will be Araldited in place of the kit leg (and into wheel-well) and that will fasten the model to the base once the base is done. I have chosen a piece of wood for the base, and that will be started in the diorama section soon. Also there will be a couple of figures in the figure section and a modified Dodge WC-51 in the vehicle section! Incidentally, here is my flung together-heavier duty than it needs to be temporary stand, so that I have something to hang onto whilst painting the top surfaces. No Blue Peter badge for that unfortunately. ☺️ 6 Link to comment Share on other sites More sharing options...
Billthebattler Posted January 21, 2022 Author Share Posted January 21, 2022 Hello again everyone. Seem to have had more than my fair share of migraines lately, so progress has been a little slow. The Hercules now has the delicious colour of Mackintosh's Caramac... with additional pencil lines. Then using a small brush to carefully paint in the borders of the darker colour. The last time I did anything like this, it was easy. Now, I realise my eyesight and hands are not as good as they used to be, so everything takes longer to do if I am to be accurate. Oh good grief what's he doing..! Turning the Herc into a mess. Thanks for looking. Bill. 10 Link to comment Share on other sites More sharing options...
Billthebattler Posted March 16, 2022 Author Share Posted March 16, 2022 It’s been way too long since my last update. I have no excuse that members would buy.😊 The painting was finished a while back, much to the amusement of my wife (she of the many craft things) who looked at the camouflage pattern and said could see a baby donkey, a man in a rowing boat, or it could be a camel or a cat, and on the other side of the tail a rabbit! No, I don’t think so. I’ve tried to be as faithful to the pattern seen in the film as I could. The lack of someone in cockpit has been bugging me since the start, so I removed half of the glazing. (it was cracked at the halfway point anyway.) This has enabled me to add crew figures, otherwise the plane would be taking off with no one at the controls (echoes of the Mysterons! 👻) I know this should really be in the figure section, but these are the ones I chose for the characters of Bond and Kara. (And later, Necros and Koskov, but they will be with the vehicle) [ One WW2 German soldier was transformed into Kara. She has Plasto for hair and a tissue paper shawl. Another German crew figure became Bond, but now sports a Plasto eighties hair style. Kara didn’t turn out too bad, though her hair isn’t quite right. Bond looks a little gaunt, but otherwise reasonably ok. I’m just hoping Mr Dalton doesn’t look in otherwise he might take me to the cleaners, and I’ve already had my bath for this month. On the flight deck, they don’t look too bad, but won’t notice that much once the glazing goes back in. At least I will know they are there. Cheers, Bill. 8 Link to comment Share on other sites More sharing options...
Mike N Posted March 16, 2022 Share Posted March 16, 2022 Loving this. One of my favourite Bond films, and often thought of doing the Herc. Keep up the great work, Bill! Mike 1 Link to comment Share on other sites More sharing options...
tonyot Posted March 16, 2022 Share Posted March 16, 2022 Coming on really well this,.... did you notice in the film how the Hercules often becomes a C-123,.... especially during the fight on the cargo net hanging from the tailgate! 1 1 Link to comment Share on other sites More sharing options...
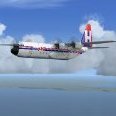
Billthebattler Posted May 3, 2022 Author Share Posted May 3, 2022 Thank you gentlemen. 👍 I’m back for what will probably be the penultimate update on the Hercules. “Shiny, shiny, sh-na-na-na…” Thank you Haysi-Fantayzee, but don’t let me put the song in your head like it got stuck in mine. 😖 All varnished and ready for decals. Red stars of the right size were surprisingly difficult to get hold of, but found some on that well known auction site. I risk the wrath of decal collectors, as I’m about to cut this 1960’s decals sheet into bits! The sheet also contains white backers for the red stars, which I was surprised existed back then. Numbers of the right size for the Hercules, but really intended for 1/48 scale, from Fantasy Print Shop. And any other markings either from scratch using some ancient Aeroclub clear decal sheet or from my old PP Models Sea Fury model. For the red stars, I used a white backing star of slightly larger size to give a white outline. (was supposed to be a yellow outline, but couldn’t find any without having to send overseas). The Fantasy Print Shop decals were a dream to apply. Nice and thin, with no visible carrier film round the edges, or centres of the 8’s. The only silly mistake I made when applying the “18” to the starboard side was getting the numbers round the wrong way, so instead of 18 I had 81! 😖That’ll teach me to line up numbers against panel lines. Door and hatchway markings from scratch, warning markings courtesy of PP models. (How I wish they were still going). The doorway that’s going to get the Hercules into trouble on the diorama. Paint looks rather heavy, but should slim down with matt varnish and weathering. And I can’t wait to get the masking off the windows and see what’s underneath.😃 Applied a matt varnish. Used Revell’s matt acrylic. First coat was alright, but second started hazing over white. Stopped, shook and stirred really thoroughly (the varnish. not myself, ha, ha ) and went over the model again. This time no problems. Think I will go back to Rev 2 enamel in future. Applied the base fixing rod with plenty of Araldite, with the aircraft on its side. Supported by an appropriate book! Looks precariously balanced, but was actually very stable while the Araldite set. Next time should see the final update. Thanks for looking, Bill. 4 Link to comment Share on other sites More sharing options...
Billthebattler Posted June 8, 2022 Author Share Posted June 8, 2022 Hello again. Propellers and aerials: Props made using the plastic disc method. I used 20 thou clear sheet and think that was about right. Spun each disc in the Dremel and used very fine wet & dry paper used wet on the front of the disc to take off some of the shine from the plastic. Then dry brushed black on the centre, simply by holding the brush in place and spinning the disc, moving the brush carefully outward to make a translucent black centre. (I should add the Dremel went too fast for this stage, so I used a variable speed cordless drill instead.) Held the brush on the edge and this time used some trainer yellow to give a faint, but reasonable yellow edge. Once mounted of the aircraft, I think they look pretty good. Only one pitot and one aerial survived from the time the Hercules spent in the attic, so had to make new ones. The towel rail aerials were a bit tricky, but worth doing to keep the aircraft the same as one used in the “Living Daylights” . Lastly, mounted the Hercules on its base. Viewed from the perspective of two mounted Mujahideen (once they are added!) With aircraft now part of its diorama, it’s time for me to make a start on the other elements. The enemies trying to get aboard the Hercules and the friendlies waving it off. That’s it (finally) for the aircraft, so I’m off to get going on the figures and vehicle, before the whole lot comes together in the finished diorama section. Cheers, Bill 12 Link to comment Share on other sites More sharing options...
Mike N Posted June 8, 2022 Share Posted June 8, 2022 I'm not normally impressed by prop blur efforts, but those are very realistic, well done! Can't wait to see the finished diorama. Mike Link to comment Share on other sites More sharing options...
TEXANTOMCAT Posted June 9, 2022 Share Posted June 9, 2022 This is ace - until I googled it I never knew what the 'Jeep' was but apparently it was a modified Defender 90! Link to comment Share on other sites More sharing options...
Billthebattler Posted June 9, 2022 Author Share Posted June 9, 2022 @Mike N I know exactly what you mean, some can look quite staged. The same could be said for mine, but I'm pleased with the outcome. I think the wet and dry rubbing down before painting helped. @TEXANTOMCAT Yes, the "jeep" Kara drove into the rear of the Hercules was indeed a jazzed up Land Rover. The vehicle running alongside the Herc' containing the bad guys is a modified Dodge WC-51 and that is something I will have to add to the diorama once I've started it. Many thanks chaps for your comments, much appreciated. 1 Link to comment Share on other sites More sharing options...

Recommended Posts
Create an account or sign in to comment
You need to be a member in order to leave a comment
Create an account
Sign up for a new account in our community. It's easy!
Register a new accountSign in
Already have an account? Sign in here.
Sign In Now