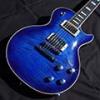
Delayar Posted December 14, 2021 Share Posted December 14, 2021 Hi! Here is my finished Ducati Panigale 1199 S from Tamiya. I also used the Top Studio detail set, Tamiya front fork and Tamiya carbon fiber decals for the front fender. Body Paint is Tamiya Italian Red with a Zero Paint 2K gloss coat. And without cowling: Cheers, Markus 17 Link to comment Share on other sites More sharing options...
Marco F. Posted December 14, 2021 Share Posted December 14, 2021 Stunning,!!!!! It looks like a 1:1 and not like a model. You're sure you didn't posted pics of an original bike?😇🤫 Fantastic result... I love it 😍 Marco F 2 Link to comment Share on other sites More sharing options...
IanC Posted December 14, 2021 Share Posted December 14, 2021 Fabulous! Imagine if there was some magic dust that you sprinkled on and it became 1/1 scale. With working engine and electrics... 😁 1 Link to comment Share on other sites More sharing options...
Stef N. Posted December 14, 2021 Share Posted December 14, 2021 Very nicely done. Great paintwork and photography is really good too. Nice one.👏 1 Link to comment Share on other sites More sharing options...
Ade H Posted December 14, 2021 Share Posted December 14, 2021 That's really pretty good over all. You did very well with the decals on the bodyshell; you made the wheel rim decals fit (I gave up on them); and you had the resoluteness to drill all those disc vent holes (I copped out and used a wash). I see that you got that same gap in the "bird's beak" tail as I did, which is a relief to me because I always thought that it was 100% my error. I mean, Tamiya kits are not supposed to have fit problems, right? I ended up wicking thin CA into it and clamping it very firmly, with only some success. I've just ordered two more 1199s with the intention of, hopefully, improving on my previous shortcomings. If I may give you a tip, though, extreme macros are good at showing overlooked mold seams. 😉 But once again: good work. 1 Link to comment Share on other sites More sharing options...
Delayar Posted December 15, 2021 Author Share Posted December 15, 2021 Thank you all! 7 hours ago, Ade H said: That's really pretty good over all. You did very well with the decals on the bodyshell; you made the wheel rim decals fit (I gave up on them); and you had the resoluteness to drill all those disc vent holes (I copped out and used a wash). I see that you got that same gap in the "bird's beak" tail as I did, which is a relief to me because I always thought that it was 100% my error. I mean, Tamiya kits are not supposed to have fit problems, right? I ended up wicking thin CA into it and clamping it very firmly, with only some success. I've just ordered two more 1199s with the intention of, hopefully, improving on my previous shortcomings. If I may give you a tip, though, extreme macros are good at showing overlooked mold seams. 😉 But once again: good work. Thanks. The rim decals required a lot of Micro Sol. I didn't drill the holes in the brake discs, these are the Top Studio PE parts. The holes in the kit parts looked very soft, so I was afraid the holes would not be very tidy once drilled, therefore I decided to use the aftermarket stuff. The gap on the tail seems to be a minor flaw of the Tamiya kit, but then again, I rather leave it like that than to mess up the paint job. And yes, the macros bring out every flaw, which you don't notice with the naked eye. 😉 Cheers, Markus 1 Link to comment Share on other sites More sharing options...
slippers Posted December 15, 2021 Share Posted December 15, 2021 Really nice finish. Very well done. Has anyone used that Panigale kit with the aftermarket racing decals? I believe that there have been decal sets for Checa and Davies. I've held off as I'm wary of there being discrepancies that would be beyond my ability to find scratch solutions to. I Link to comment Share on other sites More sharing options...
Ade H Posted December 16, 2021 Share Posted December 16, 2021 (edited) Not sure that I've ever seen those @slippers. There is/was a set for Martini, which I think would need different [and probably unavailable] wheels to be accurate, and there's the 1199R set, which would need slicks [also unobtainable, probably] and appears to have one or two detail changes. I've been tempted to buy either, perhaps even both, if I could overlook what can't be altered. Edited December 16, 2021 by Ade H Link to comment Share on other sites More sharing options...
Natter Posted December 17, 2021 Share Posted December 17, 2021 On 12/14/2021 at 8:06 PM, Marco F. said: It looks like a 1:1 and not like a model. You're sure you didn't posted pics of an original bike? It's only the Tamiya micro-screws that give it away as a model, and you have to look hard to see them. Lovely model. On 12/15/2021 at 6:19 AM, Delayar said: I didn't drill the holes in the brake discs, these are the Top Studio PE parts. Oh dear, I may have to invest in some Top Studio parts for future builds, they look so good. 1 Link to comment Share on other sites More sharing options...
gamblor916 Posted December 17, 2021 Share Posted December 17, 2021 Nicely done. I agree the next step is to get of the fairing screws. 1 Link to comment Share on other sites More sharing options...
Delayar Posted December 17, 2021 Author Share Posted December 17, 2021 28 minutes ago, gamblor916 said: Nicely done. I agree the next step is to get of the fairing screws. Thanks. Yes, you are right, I should find some fitting micro-screws. Cheers, Markus Link to comment Share on other sites More sharing options...
Ade H Posted December 17, 2021 Share Posted December 17, 2021 (edited) Are you thinking of those real tiny screws or rivets, the sort of thing which needs a hole drilled if there isn't one already? I think I would prefer flat photo-etch for tiny fasteners because they can fit right into Tamiya's recessed details where decals are usually used and they can sometimes be placed directly over the kit's screws if they are recessed far enough. Raised details are more easily replaced as well. Here are several sets which I've purchased for bikes: Top Studio 0.6mm-1.3mm Photoetched Nuts in two styles -- round TD23041 and hex TD23040 (I was very impressed with these and I'd recommend them). Top Studio 0.7-1.3mm Washers TD23107 Scalelab Models (not to be conflated with Scalelab 24) Dzus Fasteners SLM12003 (Also very impressed, but they have a specific use for racing bikes). Hobby Design 1:12 / 1:24 Hexagonal Bolts HD02-0019 (Not as refined as the others and a bit more fiddly because they use two parts). Edited December 17, 2021 by Ade H typing Link to comment Share on other sites More sharing options...
Delayar Posted December 20, 2021 Author Share Posted December 20, 2021 On 12/17/2021 at 12:44 PM, Ade H said: Are you thinking of those real tiny screws or rivets, the sort of thing which needs a hole drilled if there isn't one already? I think I would prefer flat photo-etch for tiny fasteners because they can fit right into Tamiya's recessed details where decals are usually used and they can sometimes be placed directly over the kit's screws if they are recessed far enough. Raised details are more easily replaced as well. Here are several sets which I've purchased for bikes: Top Studio 0.6mm-1.3mm Photoetched Nuts in two styles -- round TD23041 and hex TD23040 (I was very impressed with these and I'd recommend them). Top Studio 0.7-1.3mm Washers TD23107 Scalelab Models (not to be conflated with Scalelab 24) Dzus Fasteners SLM12003 (Also very impressed, but they have a specific use for racing bikes). Hobby Design 1:12 / 1:24 Hexagonal Bolts HD02-0019 (Not as refined as the others and a bit more fiddly because they use two parts). I ws thinking on replacing the phillips screws with small allen key screws. I dont intend to replace everything with PE parts. Cheers, Markus Link to comment Share on other sites More sharing options...
Ade H Posted December 20, 2021 Share Posted December 20, 2021 Actually, I was just suggesting some items which may be of interest for future builds. If you want to replace Tamiya's screws on this model, I don't know, but I would be a bit wary of that. Surely, it would need screws which happen to be a snug fit for holes which are now worn by the originals, unless you're happy to glue the bodywork where any replacement screws may prove to be too loose. 1 Link to comment Share on other sites More sharing options...
paulyoung666 Posted December 20, 2021 Share Posted December 20, 2021 Stunning 😍, I’ve just bagged one off Amazon for £23 in the warehouse , couldn’t turn that deal down !!!! 1 Link to comment Share on other sites More sharing options...

Recommended Posts
Create an account or sign in to comment
You need to be a member in order to leave a comment
Create an account
Sign up for a new account in our community. It's easy!
Register a new accountSign in
Already have an account? Sign in here.
Sign In Now