arfa1983 Posted November 14, 2021 Share Posted November 14, 2021 I Will try to clear a few of these in this GB. Phantom and Tomcat are part of the on going STGBs. They will get done in time for the end dates. Need to get the Cobra, Ford Mustang and F15 done for sure. But I really want to finish the 787 too. . 12 Link to comment Share on other sites More sharing options...
Alan P Posted November 14, 2021 Share Posted November 14, 2021 I love that you put your part builts in a display cabinet! Good luck clearing the backlog 👍 4 Link to comment Share on other sites More sharing options...
Mjwomack Posted November 14, 2021 Share Posted November 14, 2021 18 minutes ago, Alan P said: I love that you put your part builts in a display cabinet! Good luck clearing the backlog 👍 I was thinking the same thing- very impressive that your shelf of shame is smarter than my display area; my builds are putting in a transfer request! 1 2 Link to comment Share on other sites More sharing options...
Thom216 Posted November 14, 2021 Share Posted November 14, 2021 Yeah, mine just get shoved back into their boxes. 2 Link to comment Share on other sites More sharing options...
arfa1983 Posted November 20, 2021 Author Share Posted November 20, 2021 To be honest, it should be displaying completed models. That's what makes it even more shameful... Got the Ford Mustang out today and gave it a nice paint job ... Just need to do all the little chrome details now which seems really tricky. Any hints would be appreciated. Cars are definitely outside my comfort zone! 5 Link to comment Share on other sites More sharing options...
arfa1983 Posted November 28, 2021 Author Share Posted November 28, 2021 This kittyhawk kit fought me for around 2 years. It is a tough build but can be built up into something nice, for those of us who are capable or so inclined. I on the other hand just needed to get it off my desk! I really lost my mojo with this one when the colours darkened substantially after giving it a clear coat. It made the black undercoat really show through and so the colour is not very accurate. I was thankful, however, that the 5 part canopy fitted quite well. Obviously an awesome looking Helicopter. I would recommend it if you have time and patience and can do maybe a little scratch building. The decals for the armament are no good and the armament in general is kind of meh. It is finished! One down. The colours look even darker in the photos on a white table! 10 Link to comment Share on other sites More sharing options...
ArnoldAmbrose Posted November 28, 2021 Share Posted November 28, 2021 1 hour ago, arfa1983 said: It is finished! One down. The colours look even darker in the photos on a white table! Gidday, congratulations on your completion. 👍 Being a ship modeler most of my builds are greyish and darkish in colour and I've found that a white background for photos can sometimes make it worse. Maybe my camera compensates or adjusts itself and closes up to avoid going snow blind. I use a more neutral background now, sometimes a light brown wood colour, MDF board. And speaking of ships, do I spy a ship model in the cabinet? 🙂 Regards, Jeff. 1 Link to comment Share on other sites More sharing options...
arfa1983 Posted November 28, 2021 Author Share Posted November 28, 2021 8 hours ago, ArnoldAmbrose said: Gidday, congratulations on your completion. 👍 Being a ship modeler most of my builds are greyish and darkish in colour and I've found that a white background for photos can sometimes make it worse. Maybe my camera compensates or adjusts itself and closes up to avoid going snow blind. I use a more neutral background now, sometimes a light brown wood colour, MDF board. And speaking of ships, do I spy a ship model in the cabinet? 🙂 Regards, Jeff. Hi Jeff, thanks for the advice. I was looking to photograph it with my Phantom yesterday on a blue background but it wasn't done in time and I packed the paper away. For the final gallery I will do it. Yes! There is a small 1/700 Japanese destroyer Abukuma. The plan was to make a (completely fictitious and physically improbable) diorama with the photoetched Himeji castle you can see at the back of the cabinet. The idea was to have the castle on a steep forest mountain with then a deep water channel (think fjord) running next to the mountains with the ship moored or steaming past. More as an exercise in practising modelling and creating an interesting scene than depicting any real life event. 1 Link to comment Share on other sites More sharing options...
Thom216 Posted November 28, 2021 Share Posted November 28, 2021 Nice finish on the helicopter. Looks good from here! 1 Link to comment Share on other sites More sharing options...
arfa1983 Posted December 4, 2021 Author Share Posted December 4, 2021 A bit more progress today. Was working on the tomcat for the STGB, and while airbrush was out worked on few more things. I used Gunze Acrysion mixed with lacquer thinner for the brown paint on this F15 originally, and also tried freehanding the camo. Bleh. Definitely do not mix Acrysion with laquer thinners. So I sanded it down and repainted the whole thing brown with the Acrysion and acrylic thinner. I will mask the camo pattern to get a better demarcation. I also primed the second 1/72 IS 3 tank with dark grey primer then painted both with the same Gunze Aqueous green. The colour difference between black base and dark grey is really cool. These were an Italeri double kit where one kit was very simple to build and other one was (for my fat fingers) rather difficult. They need some weathering but more or less they are finished in a semi fictitious scheme. The red stars are from Eduard 144 Mig 21 kit. But I needed red stars on a Soviet tank! Next time I have airbrush out I'll give them some weathering powder with Windex treatment to make them look a little more complimentary. 6 Link to comment Share on other sites More sharing options...
arfa1983 Posted December 11, 2021 Author Share Posted December 11, 2021 Had some fun today with my new toy Tamiya bendy tape for curves. Looking forward to seeing how it looks when done! Worked on this instead of my F14 because we had few too many today for a bbq lunch so didn't want to ruin it. 🍺 So this poor F15 became my victim! Will spray the green first and then another mask job, then the tan colour. Then it will be back to regular Tamiya tape for the grey areas. Certainly I know why 1/48 is my usual choice. 4 Link to comment Share on other sites More sharing options...
Lazy Modeller Posted December 11, 2021 Share Posted December 11, 2021 (edited) Tamyia tape is really a nice stuff, too bad its damn expensive. But I managed to get a very close ones from Dexter and much more cheap, more than half price if we take in account the length, and virtually same pattern and grip. The only difference is the side line that is not so perfect. Of course for bending Tamyia is a must of course... Did some research and its the best I've found. Cheers LM Edited December 11, 2021 by Lazy Modeller 1 Link to comment Share on other sites More sharing options...
arfa1983 Posted December 11, 2021 Author Share Posted December 11, 2021 2 minutes ago, Lazy Modeller said: Tamyia tape is really a nice stuff, too bad its damn expensive. But I managed to get a very close ones from Dexter and much more cheap, more than half price if we take in account the length, and virtually same pattern and grip. The only difference is the side line that is not so perfect. Of course for bending Tamyia is a must of course... Did some research and its the best I've found. Cheers LM Thanks LM I will keep an eye out for it here. In the past I've tried other cheaper stuff before and it's usually not performed well, so I've stuck (no pun intended) with the Tamiya. For large areas I usually just use printer paper though to keep costs down! 1 Link to comment Share on other sites More sharing options...
Lazy Modeller Posted December 11, 2021 Share Posted December 11, 2021 This one is good...if you can find it... here I bought it at Leroy Merlin... of course that maybe difficult in other places... Cheers LM 1 Link to comment Share on other sites More sharing options...
Mjwomack Posted December 12, 2021 Share Posted December 12, 2021 15 hours ago, arfa1983 said: new toy Tamiya bendy tape for curves I didn't know this was thing (apart from when I put it on wrong), but ordered some and look forward to experimenting. 1 Link to comment Share on other sites More sharing options...
arfa1983 Posted December 13, 2021 Author Share Posted December 13, 2021 Well got the second colour and next mask on! Very excited to spray the final colour and do the big reveal! By cutting the tape extremely thinly you can do really bendy bends. 6 Link to comment Share on other sites More sharing options...
arfa1983 Posted December 17, 2021 Author Share Posted December 17, 2021 Well, with the extension granted for the F14 group build, I thought it would be better to work on this and get more practice. This was a long day! And I really know why I cannot switch from 48 to 72! Before masking : Several (painstaking) hours later: Oh almost forgot: Several minutes later: Moment of truth: I then needed the instant gratification of putting decals on. Oh man are these decals bad. Cracking, breaking, even exploding into a million pieces! But anyway, got about 75% of them on. Bedtime now. Is it perfect? Far from it. Are there countless flaws? Oooh yeah. Plenty. Do I love it? Yes! It's so nice to be on the home stretch with this one, and all the elements and colours come together so nicely. I've really learned a lot with this build and paint job. Mostly that 1/48 is my preferred scale! 8 Link to comment Share on other sites More sharing options...
Corsairfoxfouruncle Posted December 17, 2021 Share Posted December 17, 2021 Which Decal set or are they from the kit ? I find a coat or two of Microscale liquid decal film. It works good on questionable or very old decals. The one trick is you need to cut very tight to decal to not have a lit of extra film. That and soak it in hot water to ease the release from the paper. https://www.amazon.com/Microscale-Industries-Micro-Liquid-Decal/dp/B0006O9K5G/ref=mp_s_a_1_3?adgrpid=55500600949&gclid=EAIaIQobChMIpeLlgfXr9AIVBBXUAR0UQAJZEAAYASAAEgKCv_D_BwE&hvadid=274737617990&hvdev=m&hvlocphy=9021610&hvnetw=g&hvqmt=e&hvrand=17152110466178421544&hvtargid=kwd-312477044562&hydadcr=26677_9635608&keywords=microscale+liquid+decal+film&qid=1639781259&sr=8-3 link is for display/demonstration purposes only. 1 Link to comment Share on other sites More sharing options...
arfa1983 Posted December 18, 2021 Author Share Posted December 18, 2021 6 hours ago, Corsairfoxfouruncle said: Which Decal set or are they from the kit ? I find a coat or two of Microscale liquid decal film. It works good on questionable or very old decals. The one trick is you need to cut very tight to decal to not have a lit of extra film. That and soak it in hot water to ease the release from the paper. https://www.amazon.com/Microscale-Industries-Micro-Liquid-Decal/dp/B0006O9K5G/ref=mp_s_a_1_3?adgrpid=55500600949&gclid=EAIaIQobChMIpeLlgfXr9AIVBBXUAR0UQAJZEAAYASAAEgKCv_D_BwE&hvadid=274737617990&hvdev=m&hvlocphy=9021610&hvnetw=g&hvqmt=e&hvrand=17152110466178421544&hvtargid=kwd-312477044562&hydadcr=26677_9635608&keywords=microscale+liquid+decal+film&qid=1639781259&sr=8-3 link is for display/demonstration purposes only. Yes it was kit decals. This kit is probably one of the older ones in my collection but it does make me nervous about some of the other sheets I have. So I will have to get some of the Microscale to be safe on those "more important" kits! I've certainly heard of people having this problem before but I definitely never encountered this myself before. 2 Link to comment Share on other sites More sharing options...
Corsairfoxfouruncle Posted December 18, 2021 Share Posted December 18, 2021 1 hour ago, arfa1983 said: Yes it was kit decals. This kit is probably one of the older ones in my collection but it does make me nervous about some of the other sheets I have. So I will have to get some of the Microscale to be safe on those "more important" kits! I've certainly heard of people having this problem before but I definitely never encountered this myself before. There are other brands so ask around and figure out what may work best/cheapest for you. 2 Link to comment Share on other sites More sharing options...
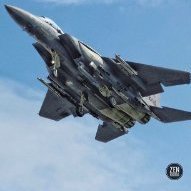
arfa1983 Posted January 27, 2022 Author Share Posted January 27, 2022 Want to get this and the F14 Tophatter done before I do anything more on the F18. And definitely before I start the Attack/Strike/Bomber GB. All decals are on and all undercarriage painted white and worst oversprays have been touched up. It's gloss coated and I'll give a light pinwash then dullcoat. Then finally I'll do the metal sections at the rear end. I'll do it at same time as F14 cans. This build has been one of my longest and most challenging, but also it's given me the most satisfaction. I really like 1/72 jets. When done well they look so good because of their size. I understand when people say the one true scale! However they are fiddly as ____. 7 Link to comment Share on other sites More sharing options...
Corsairfoxfouruncle Posted January 27, 2022 Share Posted January 27, 2022 I do like the Japanese Aggressor’s and am looking forward to the one I have set for the F-15 STGB. I will be doing an F-2A that was supposed to get built in the F-16 build but now will be in the Japanese build. All if them in 1/72 scale. 1 Link to comment Share on other sites More sharing options...
Col. Posted January 30, 2022 Share Posted January 30, 2022 Your DJ aggressor does look great 1 Link to comment Share on other sites More sharing options...
arfa1983 Posted February 6, 2022 Author Share Posted February 6, 2022 Almost finished with this. Just a Matt coat, then the steel/metal areas at the back to do. I did a simplified design on the fuel tank because the decal colours didn't match the camp colours and it also just shattered when put in water. Hopefully can get this finished next weekend! 3 Link to comment Share on other sites More sharing options...
arfa1983 Posted February 9, 2022 Author Share Posted February 9, 2022 Got the matt coat on using Mig lucky varnish. I think it works pretty well. Spray with high pressure at 15-20cm and don't let it pool. I did a teething coat then came back and gave it 6 or 7 thin coats letting it dry for 4 or 5 minutes between each one. Tomorrow night I hope I can spray back end gloss black then alclad it and do final assembly! Woohoo! 4 Link to comment Share on other sites More sharing options...

Recommended Posts
Create an account or sign in to comment
You need to be a member in order to leave a comment
Create an account
Sign up for a new account in our community. It's easy!
Register a new accountSign in
Already have an account? Sign in here.
Sign In Now