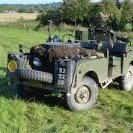
Firebuild Posted October 17, 2021 Share Posted October 17, 2021 (edited) So, I'm fairly new to modelling and this is my third official build. First was a steam train as my 2 yr old son loves them. The second was a jeep 1:72 but I felt it was too small scale, so this was my first serious attempt so I thought I'd give weathering a go. It's the Tamiya British SAS Jeep 1/35. Happy for some thoughts or constructive criticism 😀 Just bought the Airfix M3 Grant tank as my next project. Looks complicated!! Edited October 17, 2021 by Firebuild 16 1 Link to comment Share on other sites More sharing options...
Troy Smith Posted October 17, 2021 Share Posted October 17, 2021 5 minutes ago, Firebuild said: Happy for some thoughts or constructive criticism 😀 Look great, but the background is unflattering, there is this thread up But has some basic photography ideas, daylight is good, and even a bit of pastel paper curved can work. Paint splattered tissue and background clutter is not, in the way a high class meal on paper plate distracts from however good it might be. Presentation counts. Despite years of wittering on here my build completion rate is abysmal, but I do like doing a few pics. I only mention this as my "technique" involves a basic point shoot digital camera (a basic mode 15 years ago...) and whatever outside space that might work for light/background, I found a chucked out baize topped card table, the top is faded and stained, I plonk this on a storage box outside, means I can get low to the subject, and snap away. I do aim to pick a time with a bit of light cloud, as this softens the light https://www.britmodeller.com/forums/index.php?/topic/235071488-airfix-cromwell-72nd-pretty-much-oob/ A bit more creative cropping here, looking at the Cromwell pics now I think some cropping would really help. https://www.britmodeller.com/forums/index.php?/topic/235095700-matchbox-176-morris-c8-mk-ii-17pdr-gun-willys-jeep-set/page/2/&tab=comments#elControls_4151264_menu Posted just as I know how they are done, and while I have certainly seen better models on here, Perhaps if your son has a sandpit, try some pics there, have a think what natural backdrops you have about, and where the light might be good and have a play. 5 minutes ago, Firebuild said: Just bought the Airfix M3 Grant tank as my next project. Looks complicated!! I'm guessing this is the current 1/35th Grant, which is a reboxed Academy kit I think ? (note Airfix did a 1/32nd Grant back in the late 70's is all.) Good chaps for Sherman and related vehicles are @Das Abteilung and @Bullbasket, and could confirm this, and maybe able to give you some pointers and possible pitfalls. HTH T 1 Link to comment Share on other sites More sharing options...
Bullbasket Posted October 17, 2021 Share Posted October 17, 2021 1 hour ago, Troy Smith said: I'm guessing this is the current 1/35th Grant, which is a reboxed Academy kit I think ? Yes, it is the Academy kit, reboxed. It's basically a good kit. The early releases had a problem with the VVSS units being about 1.5mm too high, but Academy corrected this in later issues. There are also some missing rivets on the side of the hull. The best place to get a full rundown on the kit is here; https://www.perthmilitarymodelling.com/reviews/vehicles/academy/acd13212.html Just ignore Terry's remarks about the VVSS units, because as I said, they were corrected. John. 1 Link to comment Share on other sites More sharing options...
Firebuild Posted October 17, 2021 Author Share Posted October 17, 2021 Thanks for this! Looking forward to the Grant kit. Looks like a but more involved than the SAS jeep. Link to comment Share on other sites More sharing options...
Firebuild Posted October 17, 2021 Author Share Posted October 17, 2021 6 hours ago, Troy Smith said: Look great, but the background is unflattering, there is this thread up But has some basic photography ideas, daylight is good, and even a bit of pastel paper curved can work. Paint splattered tissue and background clutter is not, in the way a high class meal on paper plate distracts from however good it might be. Presentation counts. Despite years of wittering on here my build completion rate is abysmal, but I do like doing a few pics. I only mention this as my "technique" involves a basic point shoot digital camera (a basic mode 15 years ago...) and whatever outside space that might work for light/background, I found a chucked out baize topped card table, the top is faded and stained, I plonk this on a storage box outside, means I can get low to the subject, and snap away. I do aim to pick a time with a bit of light cloud, as this softens the light https://www.britmodeller.com/forums/index.php?/topic/235071488-airfix-cromwell-72nd-pretty-much-oob/ A bit more creative cropping here, looking at the Cromwell pics now I think some cropping would really help. https://www.britmodeller.com/forums/index.php?/topic/235095700-matchbox-176-morris-c8-mk-ii-17pdr-gun-willys-jeep-set/page/2/&tab=comments#elControls_4151264_menu Posted just as I know how they are done, and while I have certainly seen better models on here, Perhaps if your son has a sandpit, try some pics there, have a think what natural backdrops you have about, and where the light might be good and have a play. I'm guessing this is the current 1/35th Grant, which is a reboxed Academy kit I think ? (note Airfix did a 1/32nd Grant back in the late 70's is all.) Good chaps for Sherman and related vehicles are @Das Abteilung and @Bullbasket, and could confirm this, and maybe able to give you some pointers and possible pitfalls. HTH T Thanks for the advice. TBH I was excited to take some pics after I just finished it! In the long term I hope to make some desert scenery and have some other accessories to add. 2 Link to comment Share on other sites More sharing options...
vytautas Posted October 17, 2021 Share Posted October 17, 2021 It looks really good! I especially like jerrycans of different colors - many different shades enliven the model. But there could be more shades. For example, the beards of both guys have the same brown color. Why not, both can be brown, but a little different in shade. Subtle small details can also seem interesting - for example, on one of the two spare wheels, one tire can be completely worn. Or damaged fender, and so on. The more different details and shades, the better and more interesting the model looks. And doing so is usually quite straightforward. Vytautas 1 1 Link to comment Share on other sites More sharing options...
Homer Posted October 18, 2021 Share Posted October 18, 2021 Congratulations on a great looking vehicle, well done 👏 . 1 Link to comment Share on other sites More sharing options...
Bertie McBoatface Posted October 19, 2021 Share Posted October 19, 2021 That's a really good start and well done for posting it here. Can I draw your attention to the way that washes and drybrushing both pick up the mould parting lines that you sometimes missed scraping away? Paradoxically, those basic skills are even more important when you plan to weather a kit and it only takes one or two getting noticed to break down the illusion. 1 1 Link to comment Share on other sites More sharing options...
Firebuild Posted October 19, 2021 Author Share Posted October 19, 2021 10 hours ago, Bertie Psmith said: That's a really good start and well done for posting it here. Can I draw your attention to the way that washes and drybrushing both pick up the mould parting lines that you sometimes missed scraping away? Paradoxically, those basic skills are even more important when you plan to weather a kit and it only takes one or two getting noticed to break down the illusion. Thanks so much for your thoughts and tips!! I will definitely work harder at sorting the parting lines! Link to comment Share on other sites More sharing options...
s.e.charles Posted October 20, 2021 Share Posted October 20, 2021 building good looking models is a process. like making a sword: heat, beat, quench - until it's worthy of your efforts. when you compare future endeavors to initial results, you'll be amazed how good you've become at the art. 1 Link to comment Share on other sites More sharing options...

Recommended Posts
Create an account or sign in to comment
You need to be a member in order to leave a comment
Create an account
Sign up for a new account in our community. It's easy!
Register a new accountSign in
Already have an account? Sign in here.
Sign In Now