Bullbasket Posted January 16, 2022 Share Posted January 16, 2022 2 minutes ago, APA said: Thanks john I've always wondered about rattle cans especially non modeling ones. Surely Halford stuff would be too thick and heavy? How do you get into the knooks and cranny? Andrew Just make sure that it's had a good 2 minute shake, that the can isn't stone cold, and then two or three light passes. Covers everything and sticks like s sticks very well. John. 2 Link to comment Share on other sites More sharing options...
NIK122 Posted January 16, 2022 Share Posted January 16, 2022 (edited) This is a great build. Your level of detail is stunning. About the primer, I use 'Ultimate' self leveling grey primer in light coats and it seems to work well. If you are a fan of rattle cans 'etch primer' sticks like the proverbial to plastic and etch. If where it's rubbing off isn't too bad can you use a brush and turn it in to chipping? Just a thought Edited January 16, 2022 by NIK122 1 Link to comment Share on other sites More sharing options...
robgizlu Posted January 16, 2022 Share Posted January 16, 2022 Every time I Look in I'm thoroughly impressed - some exquisite detail evident and a very fine paint job What paint did you use for SCC15 ? Lovely!! Rob 1 Link to comment Share on other sites More sharing options...
APA Posted January 17, 2022 Author Share Posted January 17, 2022 On 1/16/2022 at 9:58 AM, NIK122 said: This is a great build. Your level of detail is stunning. About the primer, I use 'Ultimate' self leveling grey primer in light coats and it seems to work well. If you are a fan of rattle cans 'etch primer' sticks like the proverbial to plastic and etch. If where it's rubbing off isn't too bad can you use a brush and turn it in to chipping? Just a thought Thanks Nick. Yes painting the scuff marks as rust / metal / undercoat etc is exactly what I'm going to do 👍🏻😉 On 1/16/2022 at 10:08 AM, robgizlu said: Every time I Look in I'm thoroughly impressed - some exquisite detail evident and a very fine paint job What paint did you use for SCC15 ? Lovely!! Rob Thanks Rob SCC15 = 70.924 Russian Uniform + 70.888 Olive Grey 50/50 blend (Been around for a while. Not sure if it's an M Starmer mix or not) Cheers all Andrew 1 1 Link to comment Share on other sites More sharing options...
THEscaleSHOW Posted January 18, 2022 Share Posted January 18, 2022 On 15/01/2022 at 20:34, APA said: Managed to grab a quick couple of hours this evening as I was eager to get this thing whole. Have to say this was a bit of a pain. Tracks are link and length and fit beautifully but since they are so small and the upper section is so tight in the grooves it took a bit of brute force. They eventually went in but still need adjusting slightly. Bit of inadvertent weathering on the side there 🙄 You've probably noticed the paint rubbing off the PE. I did expect that but not to that extent. More worrying is the paint rubbing of the styrene. Along the top edge of the sides. The Vallejo never did that. Hmmmm. It was very easy to scrape off to glue the side skirts on as well. Too easy. I know Vallejo paints are more 'rubbery' and others are more 'chalky' but I expect a primer to do its job better than that!! Very oddly the spare wheel and can painted black are gloss!! How the hell!! Hopefully that should be it for the manhandling and I can be a bit more delicate with her. Hope to get a couple of hours in during the week and a solid few sessions next weekend. Cheers Andrew Hello Andrew As I said at the beginning-a lot of parts for such a small model and a full workbench 😁 Your accessories enhance it even more and make it even better than it already is. I don't get along well with the Vallejo paints from AB, so interesting to read how you did it. Keep up the good work! MD Link to comment Share on other sites More sharing options...
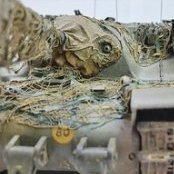
APA Posted January 18, 2022 Author Share Posted January 18, 2022 Much appreciated @THEscaleSHOW Vallejo is fine for brushing it's just that plasticy feel you can get with it. Trick is to really thin it down to at least 50/50 for airbrush and very thin layers at a time. So shes starting to bet a bit of colour in her cheeks 😊 Did some more basic colours and added the pin wash. I don't do it 'properly'. Pin wash goes straight onto the matt base colour, no varnishes. I wash the surface with Odourless thinners then apply the Tamya black wash. The thinners provides the capillary action and allows the excess to be brushed off. The aim is to avoid as many paint layers as possible. She only has two but if I did it the proper way with varnishes etc she could end up with four! The wash does end up very subtle which I like but you can get a slight shadow in places but once the pigments are on it all gets broken up and disappears. Decals all went on well and appear to be nice and thin. The star is perfect but I think they may be a pit stiff as the front mudguard ones seem to be a bit proud. On to the detailing next but I may take a break from the main build and crack on with the accessories so that they can go straight on once shes finished. Cheers all Andrew 15 Link to comment Share on other sites More sharing options...
NIK122 Posted January 18, 2022 Share Posted January 18, 2022 It just gets better and better. Will you put it on a base or diorama? 1 Link to comment Share on other sites More sharing options...
APA Posted January 18, 2022 Author Share Posted January 18, 2022 12 minutes ago, NIK122 said: It just gets better and better. Will you put it on a base or diorama? Thanks Nik It will go on a plain black base like all my others. I like the effect which emphasises the model. Andrew 1 Link to comment Share on other sites More sharing options...
echen Posted January 18, 2022 Share Posted January 18, 2022 If I hadn't followed the WIP on this I'd be convinced you'd found a way to shrink a real one! Terrific demonstration of modelling skills, very impressed! 1 Link to comment Share on other sites More sharing options...
APA Posted January 19, 2022 Author Share Posted January 19, 2022 20 hours ago, echen said: If I hadn't followed the WIP on this I'd be convinced you'd found a way to shrink a real one! Terrific demonstration of modelling skills, very impressed! Thanks Echen. Much appreciated. SHe's going to disapear for a bit while I crack on with all the 'stuff' thats going to fit in her. 😁 Andrew 1 Link to comment Share on other sites More sharing options...
Tigerausfb Posted January 19, 2022 Share Posted January 19, 2022 That top view could be the real thing. Super bit of modelling there. Well done. Andrew 1 Link to comment Share on other sites More sharing options...
APA Posted January 20, 2022 Author Share Posted January 20, 2022 22 hours ago, Tigerausfb said: That top view could be the real thing. Super bit of modelling there. Well done. Andrew Thanks Andrew must be the light 😁 Andrew Link to comment Share on other sites More sharing options...
Lazy Modeller Posted January 20, 2022 Share Posted January 20, 2022 Very nice! The top view really shows the work done! Cheers LM 1 Link to comment Share on other sites More sharing options...
zigster Posted January 26, 2022 Share Posted January 26, 2022 Looks great! I just had a look at my 35017- 3 inch mortar. No radiator there, as far as I can see. So, they went cheapskate on that part in all, but basic vehicle. Big "Thank You", to alert me / us on that issue! Easy to do, if one knows beforehand. easy to overlook, if one does not know. zig 1 Link to comment Share on other sites More sharing options...
APA Posted January 26, 2022 Author Share Posted January 26, 2022 Thanks LM Your welcome Zig 👍🏻 Quick update as it's been a while That's the basic layout. Lots more to add. Just got the ammo boxes to finish and it's on to the final hurdle of weathering and assembly Huzzar!! Andrew 18 Link to comment Share on other sites More sharing options...
THEscaleSHOW Posted January 27, 2022 Share Posted January 27, 2022 14 hours ago, APA said: Thanks LM Your welcome Zig 👍🏻 Quick update as it's been a while That's the basic layout. Lots more to add. Just got the ammo boxes to finish and it's on to the final hurdle of weathering and assembly Huzzar!! Andrew Very beautiful sight 👍 The box with the screws must not be missing-top! MD 1 Link to comment Share on other sites More sharing options...
APA Posted January 27, 2022 Author Share Posted January 27, 2022 12 hours ago, THEscaleSHOW said: Very beautiful sight 👍 The box with the screws must not be missing-top! MD Aaah! And I thought I was done with all the bits. But your right. The No2 will need somewhere to put all the other nuts and bolts and springs and washers etc 😉 Andrew Link to comment Share on other sites More sharing options...
Bertie McBoatface Posted January 28, 2022 Share Posted January 28, 2022 This is gorgeous. Link to comment Share on other sites More sharing options...
APA Posted January 28, 2022 Author Share Posted January 28, 2022 1 hour ago, Bertie Psmith said: This is gorgeous. Tah very much Bertie old bean 😊 Andrew Link to comment Share on other sites More sharing options...
APA Posted February 5, 2022 Author Share Posted February 5, 2022 This one is done -Phew!! RFI here: Cheers all Andrew 11 Link to comment Share on other sites More sharing options...
vytautas Posted February 5, 2022 Share Posted February 5, 2022 Wow, looks great, a top job! Vytautas 1 Link to comment Share on other sites More sharing options...
edjbartos Posted February 5, 2022 Share Posted February 5, 2022 Looks amazing, so many things to see and take in, fabulous work.... Ed 1 Link to comment Share on other sites More sharing options...
Bullbasket Posted February 6, 2022 Share Posted February 6, 2022 So very small, so much detail. Great build Andrew. John. 1 Link to comment Share on other sites More sharing options...
Milan Mynar Posted February 6, 2022 Share Posted February 6, 2022 Looks great, top work. 1 Link to comment Share on other sites More sharing options...
APA Posted February 6, 2022 Author Share Posted February 6, 2022 Thanks all 👍🏻 It was a great kit to build. Andrew 1 Link to comment Share on other sites More sharing options...

Recommended Posts
Create an account or sign in to comment
You need to be a member in order to leave a comment
Create an account
Sign up for a new account in our community. It's easy!
Register a new accountSign in
Already have an account? Sign in here.
Sign In Now