APA Posted June 14, 2021 Author Share Posted June 14, 2021 Right! I've been doing some extensive, exhaustive and in depth research (desparitly thinking of a plausible excuse for my cock up 🙄) and there are two reasons one of the Enfields is a Mk1. a) The colour scheme will be SCC2 which means its not a new vehicle and so the unit has not been freshly re equipped before shipping over to Europe. b) This is a rear line support unit and so would not be given the latest equipment or be upgraded unless necessary. You see, its all about attention to detail and adding points of interest that enriches the viewers experience 😎 (Phew! I think I might have got away with it.👀) Andrew 1 2 Link to comment Share on other sites More sharing options...
APA Posted June 18, 2021 Author Share Posted June 18, 2021 Just a quicky, primed and SCC2'd. My own mix. A couple of lighter coats to add contrast and fading etc. Also dabbed a spot of au dneal on the engine block Looks a tad green in these pics but not so in real world. Next is the other main colours, tyres, pipework, woodwork etal. Cheers all Andrew 14 Link to comment Share on other sites More sharing options...
vytautas Posted June 18, 2021 Share Posted June 18, 2021 Great work Andrew! Vytautas 1 Link to comment Share on other sites More sharing options...
Bullbasket Posted June 19, 2021 Share Posted June 19, 2021 11 hours ago, APA said: Next is the other main colours, tyres, pipework, woodwork etal. That's when it will really stand out. It's looking good so far. John. 1 Link to comment Share on other sites More sharing options...
karly Boy Posted June 20, 2021 Share Posted June 20, 2021 Always good when you start putting on the paint, brings it to live 1 Link to comment Share on other sites More sharing options...
APA Posted June 21, 2021 Author Share Posted June 21, 2021 Your 'avin a laugh ain't yah! 😳 Andrew 3 1 1 Link to comment Share on other sites More sharing options...
robgizlu Posted June 21, 2021 Share Posted June 21, 2021 Suffer for your art I think the SCC2 looks great I've really enjoyed this build Rob 1 Link to comment Share on other sites More sharing options...
APA Posted June 22, 2021 Author Share Posted June 22, 2021 12 hours ago, robgizlu said: Suffer for your art I think the SCC2 looks great I've really enjoyed this build Rob Thanks Rob. I was worried it was too light but I think once it's weathered and washed it might be OK. And yes we do don't we! 🙄 Andrew Link to comment Share on other sites More sharing options...
APA Posted June 28, 2021 Author Share Posted June 28, 2021 Finally managed a couple of hours this evening and got to the stage I wanted. All kit bits added, all extra canvas etc added, basic painting done and decals on. I'll leave it now, not through choice, and add a clear silk varnish coat. Then it's on to the weathering. I've also got quit a few bits of kit to scratch which will be real fun. Scratched the tie down spring clips along with the kit PE end hooks and eyes. I'm very please with the kit decals. Very thin and nicely printed. (Yes the 62 on the rear door is wonky!!🙄) Thats it for now Cheers all Andrew 12 Link to comment Share on other sites More sharing options...
Lummox Posted June 28, 2021 Share Posted June 28, 2021 Very nice work Andrew, especially like the spring tie down clips 👍 It may well be a dumb question (my specialty) but what's the meaning of the different coloured wheel nuts? Link to comment Share on other sites More sharing options...
APA Posted June 28, 2021 Author Share Posted June 28, 2021 4 minutes ago, Lummox said: Very nice work Andrew, especially like the spring tie down clips 👍 It may well be a dumb question (my specialty) but what's the meaning of the different coloured wheel nuts? I think the reason is; Britain used split rims during ww2 which means the outer nuts (red) hold the wheel halves together 😳 and the inner (white) are the conversational nuts holding the wheel on the hubs. I stand to be corrected as this is an educated guess 😊 Andrew 2 1 Link to comment Share on other sites More sharing options...
Pig of the Week Posted June 29, 2021 Share Posted June 29, 2021 20 hours ago, APA said: I think the reason is; Britain used split rims during ww2 which means the outer nuts (red) hold the wheel halves together 😳 and the inner (white) are the conversational nuts holding the wheel on the hubs. I stand to be corrected as this is an educated guess 😊 Andrew This is quite correct. I have though, if I remember correctly, come across regulations, (somewhere!) stating that only the split rim nuts be painted red and the normal wheel nuts left in vehicle colour, this would likely be on active service as a safety measure ( you Really don't want to undo split rims on an inflated tyre! ) .....I have of course seen the red and white on real vehicles, but I suspect this is more likely a peacetime parade ground "bull" thing ! r 2 Link to comment Share on other sites More sharing options...
APA Posted June 30, 2021 Author Share Posted June 30, 2021 19 hours ago, Pig of the Week said: This is quite correct. I have though, if I remember correctly, come across regulations, (somewhere!) stating that only the split rim nuts be painted red and the normal wheel nuts left in vehicle colour, this would likely be on active service as a safety measure ( you Really don't want to undo split rims on an inflated tyre! ) .....I have of course seen the red and white on real vehicles, but I suspect this is more likely a peacetime parade ground "bull" thing ! r Very good point. I too have seen both options on restored vehicles and agree that white is probably a parade ground thing. I've had a good look round and while it's difficult to spot red nuts in B&W I cannot find any pics showing white nuts. I think I'll get rid of the white 😊 Andrew 1 Link to comment Share on other sites More sharing options...
Pig of the Week Posted June 30, 2021 Share Posted June 30, 2021 5 hours ago, APA said: Very good point. I too have seen both options on restored vehicles and agree that white is probably a parade ground thing. I've had a good look round and while it's difficult to spot red nuts in B&W I cannot find any pics showing white nuts. I think I'll get rid of the white 😊 Andrew I think that's the safest bet 👍 1 Link to comment Share on other sites More sharing options...
APA Posted July 2, 2021 Author Share Posted July 2, 2021 Another quick update as it steadily moves along. A couple of hours to re do the canvas. I wasn't happy with the originals. The aluminium foil I used was too thick. Had a yogurt last night and that foil was more like it 😁. Got the silk varnish on and another round of detail painting. Also took off the masking of the windows and mirrors and got rid of the white wheel nuts. Thanks all Andrew 13 Link to comment Share on other sites More sharing options...
Pig of the Week Posted July 3, 2021 Share Posted July 3, 2021 That's looking really stunning now 👍.. just needs a bit of dust and muck ! 1 Link to comment Share on other sites More sharing options...
APA Posted July 3, 2021 Author Share Posted July 3, 2021 26 minutes ago, Pig of the Week said: That's looking really stunning now 👍.. just needs a bit of dust and muck ! Tah Yes it's nearly ready for all that 🤗 Other than all the accessories to do there's just a couple things: I'm redoing the gasket on the bowser hatch as it's rubbish! Adding the windscreen opening mechanism from the PE set as that had to wait until the masks were off. Next is the pin wash and a few little details like cleaning up the wing mirrors and paint details like metal gun bits and brass knobs. Andrew 1 Link to comment Share on other sites More sharing options...
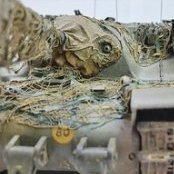
APA Posted July 5, 2021 Author Share Posted July 5, 2021 (edited) Another update and steady progress. A few more detail painting done, pin wash and a couple of mucky washes plus some washes and dry brushing of rubber pipes and canvas bits. I had a stab at galvanised steel in the bowser hatch which didn't work out so Ill strip that off and start again. I have a better idea for it. Next will be the underside with pin wash and oily stuff. Then its the wear such as metal, chipping and rust. Wont be too much as this would have had a relatively easy life. I need to crack on with the extras! Inspiration is from this remarkable video on YouTube showing exactly what these things did including the testing. So pretty much everything you see in this vid from 10:30 up until 28:00 will be on this kit. (This is an early oval bowser version but the kit and basics didn't change) One thing that is slightly frustrating is the plaques on the inside of the left rear door. These were actually brass with engraved instructions for the pumps and filters. Now you would have thought that would have been perfect for PE. Unfortunately not. Geko missed a trick there. Trying to simulate engraved brass on a bit of styrene is a little above my pay grade I'm afraid but I have a cunning plan............ I'm going to make a pair of these and drape them over the door to cover the plaques 😉 Thanks all Andrew Edited July 5, 2021 by APA 5 Link to comment Share on other sites More sharing options...
Geo1966 Posted July 6, 2021 Share Posted July 6, 2021 Hi Andrew, I think the galvanised steel looks good. What do you use for your washes, as this is something i need to try/experiment with? George Link to comment Share on other sites More sharing options...
APA Posted July 6, 2021 Author Share Posted July 6, 2021 Hi george Thanks about the galvanised but it needs to be duller. The washes for the body are a random blend of grey, brown and green if you want. Anything that makes a mucky dirty grey colour. (Think poster paint brush washing jar in school). Add a spot or two of matte glaze which stops it drying too fast. use a cheap spray bottle or brush to wet the area first then dab on the wash and blend, remove at will. All my stuff is Vallejo btw. Check out any of Laser Creation World videos on YouTube. He uses it for everything and is very effective. It's a technique I've been wanting to do for a while and this is my firt real do. I really like it. Can be used instead of a pin wash as well. Andrew 1 Link to comment Share on other sites More sharing options...
Geo1966 Posted July 7, 2021 Share Posted July 7, 2021 Thanks Andrew, I have watched a few of the Laser Creation videos. Was amazed how much water he was spraying on the Winter camoflaged T-34 when he used that method. You definately seem to have mastered it as the effect looks great. Think i will try it on an old model for starters, to be on the safe side. George 1 Link to comment Share on other sites More sharing options...
karly Boy Posted July 11, 2021 Share Posted July 11, 2021 looking good Andrew really come along since I had chance to look in. 1 Link to comment Share on other sites More sharing options...
APA Posted July 11, 2021 Author Share Posted July 11, 2021 Thanks karly. Hows yours doing? The vehicle is now officially finished and it was on to the accessories. A few packs of sterilizer, a bottle of something, the testing kit and the waders. They all need painting and are dry fitted for now. I've changed the original placement of the test kit. Originally it was going to be on a plank sitting on the rear fender but since most of these seem to have had an additional storage box fixed there I'm putting it on the bonnet. I think I've got a better galvanised effect on the hatch and a neater rubber gasket I think. The water effect is a bit rough but hopefully will look ok. The tissue decided to stick to the Kristal coating 🙄 First set of stuff. I've got a few more to do yet! (The open tin is filled with Kristal fluid which was still wet. It will be coated with white pigment to represent the powder.) The cups where difficult to do. I wanted them more flared. I tried pushing the copper pipe over a tapered rod but it doesn't seem to have done much. Next set of stuff is the pipes and filters that go into the water. Cheers all Andrew 9 Link to comment Share on other sites More sharing options...
vytautas Posted July 12, 2021 Share Posted July 12, 2021 Wow! And I say it sincerely... Andrew, how did you make the boots? Vytautas 1 Link to comment Share on other sites More sharing options...
Bullbasket Posted July 13, 2021 Share Posted July 13, 2021 Looking at those boots, I'd say that the driver is a fly fisherman, 'cos those boots definitely ain't made for walking! Great work Andrew. John. 1 Link to comment Share on other sites More sharing options...

Recommended Posts
Create an account or sign in to comment
You need to be a member in order to leave a comment
Create an account
Sign up for a new account in our community. It's easy!
Register a new accountSign in
Already have an account? Sign in here.
Sign In Now