s.e.charles Posted May 30, 2021 Share Posted May 30, 2021 can never go wrong with an ancillary/ support vehicle. Link to comment Share on other sites More sharing options...
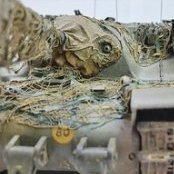
APA Posted May 30, 2021 Author Share Posted May 30, 2021 (edited) Thanks @Pig of the Week 😁 Damn right @s.e.charles 👍🏻😉 It was all about the rear over the last couple of days. I've made a couple of doors. Using yorgart pot lids pressed over the kit parts I've also added some water effects on the PE to go into the bowser. This has now been closed up so no going back on this one!!😳 What the kit says the rear should look like What it should look like My efforts A lot of the above is taken from an excellent film on Youtube of an earlier 'oval' version being used. It's been invaluable along with a couple of real life restorations although those need a bit of salt included as they don't seem totally accurate. Looking at the pics I think I'll redo the two long 'doors' again. They're a bit too thick and those eyelets on the end are way over sized. I'll sort them tomorrow. I've also realised I've made a right pigs ear of the PE on the rear mudguards. I'll have to re do them as well!! Cheers all Andrew Edited May 30, 2021 by APA 9 Link to comment Share on other sites More sharing options...
Pig of the Week Posted May 30, 2021 Share Posted May 30, 2021 Love the "water"... Looks like it's just come out of your Gin and Tonic !.. 1 Link to comment Share on other sites More sharing options...
karly Boy Posted May 31, 2021 Share Posted May 31, 2021 Great scratch work Andrew, really enjoying your build 1 Link to comment Share on other sites More sharing options...
APA Posted May 31, 2021 Author Share Posted May 31, 2021 That's a bit straighter and in scale 😊 Andrew 13 Link to comment Share on other sites More sharing options...
echen Posted May 31, 2021 Share Posted May 31, 2021 Great seeing how this is developing. 👍 1 Link to comment Share on other sites More sharing options...
Lummox Posted May 31, 2021 Share Posted May 31, 2021 Some lovely work going on there Andrew. The yoghurt lid embossing technique looks interesting - stored in the memory banks for future reference 👍, Link to comment Share on other sites More sharing options...
s.e.charles Posted May 31, 2021 Share Posted May 31, 2021 the camera is definitely a cruel mistress! bet there's more time and detail spent on the aft end than anyone but you will ever know. Link to comment Share on other sites More sharing options...
APA Posted May 31, 2021 Author Share Posted May 31, 2021 On 5/30/2021 at 7:47 PM, Pig of the Week said: Love the "water"... Looks like it's just come out of your Gin and Tonic !.. Ah! Thanks. I need one after this build! 😂 7 hours ago, karly Boy said: Great scratch work Andrew, really enjoying your build Cheers Karly. Hows yours doing? 4 hours ago, echen said: Great seeing how this is developing. 👍 Cheers glad you're liking it 👍🏻 1 hour ago, Lummox said: Some lovely work going on there Andrew. The yoghurt lid embossing technique looks interesting - stored in the memory banks for future reference 👍, It's a very effective method. The only drawback is it's very, very delicate. One touch and it will distort! Well it is a yoghurt pot lid afterall. I've tried using copper sheet even at 0.08mm but it's still too thick to get into the grooves at all. Copper sheet is fine for big stuff but not the really intricate things. 18 minutes ago, s.e.charles said: the camera is definitely a cruel mistress! bet there's more time and detail spent on the aft end than anyone but you will ever know. Tell me about it!! I'm all well chuffed with my efforts but as soon as I hit 'Submit' I can see what a dogs dinner I've made of it all!! To look on the positive side it's an excellent way of judging your work and I often, as in this case, go back and redo a lot of work. Andrew Link to comment Share on other sites More sharing options...
robgizlu Posted June 1, 2021 Share Posted June 1, 2021 I'm loving the detailing - really super work. Making me hanker after doing some some AFV modelling Rob 1 Link to comment Share on other sites More sharing options...
APA Posted June 1, 2021 Author Share Posted June 1, 2021 2 minutes ago, robgizlu said: I'm loving the detailing - really super work. Making me hanker after doing some some AFV modelling Rob Ha ha thanks 👍 Go for it, get your plimsolls dirty 😉 Andrew Link to comment Share on other sites More sharing options...
APA Posted June 13, 2021 Author Share Posted June 13, 2021 I think it's about done and on to the painting. I've added a few extras like the drain pipes just in front of the filters, a proper pipe 'bumper' on the front, replacement clips for the rifles, a rough cut seal on the tank cover which by the looks of period images were hand cut and a bit of filling on the doors and cab frame where the kit windows would locate. It's a busy little kit, I'll give it that. Rera all done with doors in place The Jerry Can holder will be painted separately then mounted. Bit scruffy but thats how they were. I'm guessing any bit of gasket rubber would do. New clips for the rifles. I didn't use the kit ones as the clips were moulded on. A couple of aftermarket ones which apparently are Mk1 and Mk4 Lee Enfields. Even managed to get the rear mud guards to line up nicely Next stop is the airbrush, do some basic stuff on the engine and radiator so I can mount the cab then add the remaining bits like gear stick, bonnet spring clips and radiator canvas cover. Cheers All Andrew 12 Link to comment Share on other sites More sharing options...
Bullbasket Posted June 13, 2021 Share Posted June 13, 2021 How to turn a nice kit into and exceptional model. Great work Andrew. John. 1 Link to comment Share on other sites More sharing options...
karly Boy Posted June 13, 2021 Share Posted June 13, 2021 Very nice Andrew, great detailing and looking forward to your paint, not done any of mine live has got in the way as it doe's 🙁 1 Link to comment Share on other sites More sharing options...
vytautas Posted June 13, 2021 Share Posted June 13, 2021 5 hours ago, Bullbasket said: How to turn a nice kit into and exceptional model. Great work Andrew. John. Seconded, looks really cool Vytautas 1 Link to comment Share on other sites More sharing options...
Lummox Posted June 13, 2021 Share Posted June 13, 2021 Lovely job Andrew. Did the water level trick work by the way? There looks to be a suggestion of water in a couple of photos (especially the last one) but it's hard to tell for sure. 1 Link to comment Share on other sites More sharing options...
APA Posted June 13, 2021 Author Share Posted June 13, 2021 Cheers all Yes Lummox the water is in there. You have to catch it as a certain light to actually see it and these pics don't show it. It's stuffed with tissue at the mo for spraying 😁 Andrew 1 Link to comment Share on other sites More sharing options...
robgizlu Posted June 14, 2021 Share Posted June 14, 2021 18 hours ago, Bullbasket said: How to turn a nice kit into and exceptional model. Great work Andrew. John. My thoughts exactly - looking tremendous!! Rob 1 Link to comment Share on other sites More sharing options...
Pig of the Week Posted June 14, 2021 Share Posted June 14, 2021 Brilliant stuff !.. One thing occurrs, very small detail, but not sure they'd mix the old SMLE and the new No4 rifles within a unit, what period during the war are you setting it? 1 Link to comment Share on other sites More sharing options...
APA Posted June 14, 2021 Author Share Posted June 14, 2021 Bugger! I knew this would happen 🙄 To be honest I just cut two rifles of the sprue. Wasn't until I was cleaning them up I noticed they were different. This is a 44 onwards setting in NE. I know this is lazy and not how it worked but "excuse me Sarge I've lost me old rifle can I have one of those new ones please" Am I a bad modeller? 😔 Andrew 1 Link to comment Share on other sites More sharing options...
Pig of the Week Posted June 14, 2021 Share Posted June 14, 2021 (edited) I'd think most who went over on D Day and thereafter would've been toting a No4 tbh. As a point of interest, tho only really relevant to SE Asia theatres of op. I believe the Aussies kept the SMLE and never adopted the No4 ( if I remember correctly....) The No4 is the one with the more "pointy" barrel at the sharp end, stowed on the passenger side ! Edited June 14, 2021 by Pig of the Week 1 Link to comment Share on other sites More sharing options...
APA Posted June 14, 2021 Author Share Posted June 14, 2021 1 hour ago, Pig of the Week said: I'd think most who went over on D Day and thereafter would've been toting a No4 tbh. As a point of interest, tho only really relevant to SE Asia theatres of op. I believe the Aussies kept the SMLE and never adopted the No4 ( if I remember correctly....) The No4 is the one with the more "pointy" barrel at the sharp end, stowed on the passenger side ! Interesting to know. Well they're well and truly stuck in now. It will be our secret, I won't tell if you don't 😉👍 Andrew 1 Link to comment Share on other sites More sharing options...
Pig of the Week Posted June 14, 2021 Share Posted June 14, 2021 Yep we'll keep that strictly "shtum" mate.. 👍 1 Link to comment Share on other sites More sharing options...
AndyTAZ Posted June 14, 2021 Share Posted June 14, 2021 2 hours ago, APA said: Interesting to know. Well they're well and truly stuck in now. It will be our secret, I won't tell if you don't 😉👍 Andrew Might just be what was in the armory! The No. 1 was manufactured in Australia and India after the war, finally in .308. No. 4s were rebuilt, repainted in black and kept in service until the SLRs came into service. Link to comment Share on other sites More sharing options...
Pig of the Week Posted June 14, 2021 Share Posted June 14, 2021 21 minutes ago, AndyTAZ said: Might just be what was in the armory! The No. 1 was manufactured in Australia and India after the war, finally in .308. No. 4s were rebuilt, repainted in black and kept in service until the SLRs came into service. India was another country that liked the SMLE and may have stuck with it like the Aussies. Certainly the No4s went on and on, even in the SLR era they were still in use for drill with cadets and ATC in my day, I could no doubt remember how to strip one even now ! Link to comment Share on other sites More sharing options...

Recommended Posts
Create an account or sign in to comment
You need to be a member in order to leave a comment
Create an account
Sign up for a new account in our community. It's easy!
Register a new accountSign in
Already have an account? Sign in here.
Sign In Now