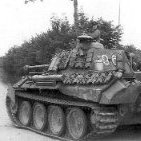
Plovdiv Posted April 26, 2021 Share Posted April 26, 2021 (edited) 29042021: update pics on the painting proces. Work done so far on the Amusing Hobby Panther II kit. Not quite a 'Paper Panzer"as there were several 'Schmaltürme"made and tested and there is a Panther II hull with the Tiger II running gear and wheels in Fort Benning. But a work of fiction nonetheless as the two components were never 'mated'so to speak. As for the kit itself: I found it to be rather crude. I think it benefitted from adding the Voyager detail set, MasterClub metal tracks and an Aber aluminium barrel. The pics show the model primed with MRP grey primer (fantastic laquer based stuff). I reapplied the existing weld beads with Tamiya 2 part epoxy putty and added at least a 100 extra on places where they should have been included (for example the tool racks). Before that the surface was roughened up a bit using a brush and Tamiya's grey putty thinned with Mr S cement. Yesterday I started painting. for the 'dunkelgelb' basecoat I used Tamiya Acrylics (which really are laquer paints). I mixed the basecoat from Buff and Desert yellow. From that I mixed a darker color with NATO brown and A lighter color with Deck Tan and amounts of White. The reason I do this is that I paint an armor model like a figure. So for the hull the vertical parts are painted in the base color, the horizontal surfaces are done in the highlight color and the parts that are furthest away from the light receive a shwadow color. I also include a pic of a 65 mm Roman Legatus Legionis. I applied the yellow basecoat mixed from Tamiya Buff and Desert Yellow. That was mixed with 60% Gunze levelling thinner. The comtrast between the horizontal surfaces (which catch most of the light) and the areas further away from it is enormous. After applying the basecoat I started to 'merge' the highlight and base color by applying a brown filter (very thin). As you can see the contrast lslowly loses its intensity but will reamin noticable. Next will be the painting of an 'Olivgrün' camouflage pattern with an hard edge. This will be done with Lifecolor olive green but since this color needs several applications to become opaque I will first sketh the basic pattern with MRP olovegreen applied with an airbrush. The final layer will be done with Life Color applied by brush ( in my opinion the most effective way to get an smooth hard edge. When all that is done a second darkbrown filter will be applied. And after that I will seal the paintcoat with Tamiya satin laquer in prepartion of the next step. Edited April 29, 2021 by Plovdiv Update painting process 8 Link to comment Share on other sites More sharing options...
vytautas Posted April 26, 2021 Share Posted April 26, 2021 Looks really great, will be fun to watch you build! 👍 Question about the kit - is there any interior in the tower? I also liked the Roman tanker very much, he was well painted. But anyway, the Romans were not very good tankers (there is a theory that they were very interfered with by helmets). 2 Link to comment Share on other sites More sharing options...
Plovdiv Posted April 26, 2021 Author Share Posted April 26, 2021 Hi, Paldies! The actual build is over its all about painting now. The kit has no interior except for the periscopes in the commander's cupola. Roman tanker? You have a good sense of humor. In my introduction to the forum (saying hello) I mentioned being a member of Planet Figure. This is to illustrate what I do there. But also because I paint armor models according to the same priniples as I would paint a figure. Cheers Paul 1 Link to comment Share on other sites More sharing options...
vytautas Posted April 26, 2021 Share Posted April 26, 2021 What paint do you use for figures? Vytautas 1 Link to comment Share on other sites More sharing options...
Plovdiv Posted April 26, 2021 Author Share Posted April 26, 2021 (edited) It's a white metal figure from Alexandros models first of all. After it is primed in grey I start to block in the basic colors. For the flesh parts I use Tamiya flesh applied with an airbrush. The clothing (tunica, cloak and leathers) I block them in with Vallejo using a brush. After that the real work starts using oil paints (Old Holland & Winsor & Newton) that I mix to the colours needed. The muscle cuirass is painted with printers ink. This comes in a jar as a thick pastewhich can be tinted with oil paints. So you can create any iron/steel colour imaginable. To that mix a oilpainting medium (Liquin Fine Detail) is added. this speeds up the drying time. As you paint the shading and highlighting can be done wet. The advantage that silver coloured printers ink has above all other metal colours is that is has absolutely no grain. But it can only be applied by brush. I will also use it for the Eureka tow cables on the Panther II. Cheers Edited April 26, 2021 by Plovdiv 1 1 Link to comment Share on other sites More sharing options...
Model Mate Posted April 26, 2021 Share Posted April 26, 2021 oh this is really useful stuff! Fantastic figue painting tips (I'm too scared as a figure newbie to venture onto the hallowed turf of planet figure). I love the "super Panther" too... looking forward to see how this develops. 1 Link to comment Share on other sites More sharing options...
Model Mate Posted April 26, 2021 Share Posted April 26, 2021 ...that Roman is 28mm right? Link to comment Share on other sites More sharing options...
Model Mate Posted April 26, 2021 Share Posted April 26, 2021 oh, 65mm - just seen it.... well, not bad then (joking - it's brilliant!) 1 Link to comment Share on other sites More sharing options...
Plovdiv Posted April 29, 2021 Author Share Posted April 29, 2021 Paintingprocess update with new pictures! Link to comment Share on other sites More sharing options...

Recommended Posts
Create an account or sign in to comment
You need to be a member in order to leave a comment
Create an account
Sign up for a new account in our community. It's easy!
Register a new accountSign in
Already have an account? Sign in here.
Sign In Now