Michael Church Posted March 23, 2021 Share Posted March 23, 2021 Hi all, First off, I've been lurking here for years and have learned an incredible amount from the builders who post at Britmodeller. I've been building plastic kits off and on (mostly off) for years, then recently discovered 1/43 resin and white metal kits. I appreciate that they're easy to store, don't take up much space while under construction, and offer cars overlooked by the 1/24 kit companies. The challenge also gives me something other than work and pandemics to think about. This Tameo Brabham isn't my first 1/43, but it is the first I've posted while under construction in public and my first 1/43 kit this complex. My learning process has included considerable time spent trying to figure out how to hold parts the size of a gnat. Anyway, I'm a slow builder, so this may be a work in progress for several months. To ensure that parts fit cleanly, I'd found all the mold lines, and I'd drilled all the right holes, I built about 90 percent of the kit without paint. Getting to this stage took from late December to mid February. The engine and transmission. Many small suspension components are yet to be installed at this point. Looking dangerously unroadworthy with bizarre toe in, toe out, and camber. When I looked at this photo I began to worry about how to airbrush paint deep into the rear wheels. But I'm amazed at how well engineered this kit is--despite the small size and complexity, things are going together nearly as well as a Tamiya 1/24 kit. Then I bathed the car in acetone to destroy the CA bonds, spent many hours cleaning off the remaining bits of glue, and created this forest of bits on sticks ready for primer. This is where things stand now. With luck, I can apply Tamiya primer this weekend. 5 Link to comment Share on other sites More sharing options...
klubman01 Posted March 23, 2021 Share Posted March 23, 2021 Welcome to the world of 1/43. Tameo kits have a good reputation, so I think you will find building this quite enjoyable. Nice work so far. Trevor Link to comment Share on other sites More sharing options...
Spiny Posted March 23, 2021 Share Posted March 23, 2021 Nothing wrong with taking your time over a build - far better to build at a pace which you enjoy than to rush for an imaginary deadline. Kit was looking good before it was disassembled, will eb good to see it come back together. Link to comment Share on other sites More sharing options...
Kitkent Posted March 24, 2021 Share Posted March 24, 2021 Welcome aboard! Looking good so far,I've never thought of a 'dry build' but it's a good idea. Tameo kits are the best engineered but some of them are very complicated with a large amount of photo etch. Enjoy,there's an unlimited choice of cars in 1/43.All the best,Chris. Link to comment Share on other sites More sharing options...
Michael Church Posted March 26, 2021 Author Share Posted March 26, 2021 Thanks all for the welcome! I found some time to apply primer, which of course revealed surface flaws. I've never built a model with a rear wing, and looking at it in primer I realized it will be incredibly prominent in the finished product. This photo shows nearly an hour of correcting pits in the rear wing and carving off excess CA glue. One of the reasons I got back into modeling was as a healthy, non-work outlet for perfectionism. What I'm finding nice about 1/43 is that there isn't TOO much to obsess over--I'd be paralyzed building the Italeri Alfa Romeo 8C 2300!, 4 Link to comment Share on other sites More sharing options...
Michael Church Posted April 5, 2021 Author Share Posted April 5, 2021 Hi all, A small but important milestone: the 24 pieces, 4 decals, and 10 wires in the 2.5 cm long engine and transmission are assembled and painted. I need to tone done the solder coolant lines and velocity stacks with a little Tamiya smoke. I also need to figure out how and whether to fix the upside down Ford labels, or if I just leave them as is as a lesson to my future self. The ignition wires could be tidier, but while adding them I realized there's something seriously strange about how my eyes process .25 mm semi-gloss black wires over a semi-gloss black header--there's no depth or contrast to focus on! But looking at this blown up image five times life size of my first-ever 1/43 engine, I'm pretty happy with the results. For next time, though, does anyone here have suggestions for lighted magnifying lamps or headbands? 4 Link to comment Share on other sites More sharing options...
silver911 Posted April 5, 2021 Share Posted April 5, 2021 This is what I use.... https://www.ebay.co.uk/itm/Lightweight-Magnifying-Glasses-Head-Light-Adjustable-2-LED-Magnifier-with-5-Lens/274519920343?_trkparms=aid%3D1110006%26algo%3DHOMESPLICE.SIM%26ao%3D1%26asc%3D20201210111314%26meid%3D22774fc0fe4b4f3590de09d8ca2cb7f6%26pid%3D101195%26rk%3D6%26rkt%3D12%26mehot%3Dpf%26sd%3D203283668477%26itm%3D274519920343%26pmt%3D1%26noa%3D0%26pg%3D2047675%26algv%3DSimplAMLv9PairwiseUnbiasedWeb%26brand%3DUnbranded&_trksid=p2047675.c101195.m1851 Ron 1 1 Link to comment Share on other sites More sharing options...
Michael Church Posted April 5, 2021 Author Share Posted April 5, 2021 21 minutes ago, silver911 said: This is what I use.... Ron Thanks Ron. Are you happy with the lights? Is it comfortable? Link to comment Share on other sites More sharing options...
silver911 Posted April 5, 2021 Share Posted April 5, 2021 Light is good and bright...I wear mine over glasses and have no issues with comfort as long as you don'y have the strap too tight. My only criticism is battery life...although I do use them a hell of a lot...and would suggest you invest in a couple of sets of rechargeable batteries...then you won't get caught out when you need them most. Ron Link to comment Share on other sites More sharing options...
Kitkent Posted April 5, 2021 Share Posted April 5, 2021 Mine's an old Optivosr,think they are still available and 2 different strength lenses can be slotted in. They're comfortable but no light,I use an anglepoise light with an old fashioned 100watt 'daylight ' bulb. Chris. Link to comment Share on other sites More sharing options...
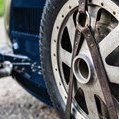
Michael Church Posted April 12, 2021 Author Share Posted April 12, 2021 More slow progress. The three-part wheels are assembled and painted and the tires have had their mold lines removed and a slight flat spot added at the mold release point. Primer and this first coat of white paint were more labor than I expected. The kit has bulges on the outside of the body near the cockpit opening on the opposite side of the screw holes, and they took repeated sanding and reprimering to vanish. Sort of like swirls in silver plastic. I'll get a solid coat of gloss white on this weekend then move to decals. Meanwhile, my magnifying visor arrives tomorrow. Thanks to @Kitkent and @silver911 for the suggestions--these visors are much less expensive than I expected! 4 Link to comment Share on other sites More sharing options...
Spiny Posted April 12, 2021 Share Posted April 12, 2021 Great work, especially at such a small scale. I can't imagine having the patience to do some of that wiring. Just to add to the visor debate, this is the one I use (which has the advantage of being able to take two lenses at once for extra magnification!) although it has more than doubled in price since I got it - obviously pay rises all round in China since 2019 https://www.amazon.co.uk/gp/product/B01M2442NR/ref=ppx_yo_dt_b_search_asin_title?ie=UTF8&psc=1 I did have once of the lightweight ones before this, but unfortunately the arm snapped which wrote it off - even trying to glue and tape that together didn't do any good. 1 Link to comment Share on other sites More sharing options...
Sabrejet Posted April 16, 2021 Share Posted April 16, 2021 Looking good! Slow progress is perfect - it's about whatever brings a smile to your face. I like to think I'm a slow modeller (I prefer the 'modelling' bit to the final reveal) but since lockdown I seem to have become faster and I think I need to follow your example: Zen and the Art of Modelling. So please take your time and keep up the great work! Link to comment Share on other sites More sharing options...
Michael Church Posted April 16, 2021 Author Share Posted April 16, 2021 Thanks @Sabrejet. It's funny, posting here makes me both want to finish sooner because everything seems to move faster online than in reality, but also to be happy with a few slow steps because it's easier to see your own progress when you can what you've done over time. Next time I start a build thread I'll include photos of parts straight out of the box. 1 Link to comment Share on other sites More sharing options...
Michael Church Posted May 3, 2021 Author Share Posted May 3, 2021 Finally, some progress to report. Two weeks ago, the body looked great, with smooth white paint ready for decals. This is the first time I've prepared Tamiya acrylic paint, thinner, and retarder in a separate bottle rather than trying to mix everything in the airbrush cup. The Tamiya retarder is amazing for airbrushing. I'll spare you the photos, but my next step was to make a mess of both of the large nose decals Tameo supplied. I have a replacement on the way, but meanwhile I discovered that Tameo decals don't budge once applied and I made a mess of the paint. So back to the spray booth. While waiting for the replacement decals, I tidied up the engine and spent some time trying to figure out how to hold the parts to ensure everything is at right angles when built. In a review of a different vice I saw this idea to cover the metal pins in silicon tube to make them grippier and softer. Some more adjusting and I should be ready to glue the rear suspension together. I also made strides on the cockpit. The photoetch gear shift and linkage was replaced with bits of nested aluminum tube and a gear shift I borrowed from a kit in my backlog. On the dash, the aftermarket switches and bezel aren't fully accurate, nor are the wires, but I think it will look better in the end than the plain kit interior. Vallejo tire black saved the steering wheel rim from looking too shiny and too black. This is by far the most fiddly work I've ever done on a kit and I'm genuinely surprised how well it turned out. When I first moved to 1/43 kits I found sites like Frederick Suber's. He clearly has time, equipment, and skills I'll never match. But seeing amazing works in progress at Britmodeller from builders who (unlike Suber) do not sell their work for huge piles of money has inspired me to push my own envelope. The seat will come next. The seven seat belt parts had me stumped and I scratched the paint badly while trying to figure out which tiny bit of PE goes through which slot to make a tiny PE knot. 3 Link to comment Share on other sites More sharing options...
klubman01 Posted May 3, 2021 Share Posted May 3, 2021 Looking good. Sorry to hear about your problems with the decals. Hope you get them sorted at the next attempt. Trevor Link to comment Share on other sites More sharing options...
Michael Church Posted May 3, 2021 Author Share Posted May 3, 2021 Thanks @klubman01. I think my problem is simple lack of experience with decals that aren't license plates and dashboard details. I have new respect for people who work with incredibly elaborate Le Mans and rally schemes, especially in larger scales. Link to comment Share on other sites More sharing options...
Bengalensis Posted May 3, 2021 Share Posted May 3, 2021 Looking very nice. Decals can be a challenge, but Tameo's are usually of high quality so I'm sure you will get to grips with them soon. Link to comment Share on other sites More sharing options...
Malc2 Posted May 3, 2021 Share Posted May 3, 2021 Bloomin amazing, I struggle at 1/20, no idea how you do this at 1/43. Keep posting progress! M. 1 Link to comment Share on other sites More sharing options...
Michael Church Posted May 19, 2021 Author Share Posted May 19, 2021 Hi all, A few more steps forward! First, the current state of the engine and rear suspension assembly. The clamps for the cooling lines are simply painted .6 mm aluminum tube. I can't remember where, but I have seen a photo on a builder's blog saying he files tube into hexagonal nuts then cut out bits of individual clamps. I tried to do something similar, but at some point the parts get too small to hold. They all flew off to hide somewhere between the floorboards or in the weave of the carpet. So round hose clamps it is. I have also learned through trial and error and more trial and error that touching up photetch and white metal parts is a waste of time until the assembly won't be touched again. Some of these parts get scratched just by looking at them. Touchup is also challenging because I can't seem to keep semi-gloss black paint from going fully glossy when I brush it. Along the same lines, I stopped re-gluing the velocity stacks after I realized they break off almost every time I add another part. I've also made progress on the decals. Looking at these in photographs makes me appreciate how good Tameo decals are--the detail is incredibly crisp and the carrier film is almost invisible. Any edges should disappear with a really thin clear coat. I won't lie--I have had many moments of frustration with the size of the parts, but it's been incredibly satisfying to see this tiny Brabham come together. I credit Tameo's engineering, which has made this kit not any more difficult than, say, the 1/24 Fujimi 246GT Dino Enthusiast Series kit I built a few years back. 5 Link to comment Share on other sites More sharing options...
klubman01 Posted May 19, 2021 Share Posted May 19, 2021 Looking really nice. Trevor 1 Link to comment Share on other sites More sharing options...
Kitkent Posted May 19, 2021 Share Posted May 19, 2021 Good progress,its nice to see a Tameo kit built! 1/43 sports cars are easier,well mostly..looking good so far.Chris. 1 Link to comment Share on other sites More sharing options...
Michael Church Posted June 14, 2021 Author Share Posted June 14, 2021 This build hasn't been abandoned yet! The replacement decals took a long time to ship from Italy, but they're now applied, clear coated, and mostly polished. This amount of zoom is always humbling, and even more so on white paint, but it also helps for spotting sections of paint that could be smoother. The cat hair on the nose is fortunately not stuck to the paint. This is the first time I've used Gunze Mr. Masking Sol R, when I painted the interior and underside of the body black. it's great stuff and much easier and less nail-biting that masking tape for things like the edge of the cockpit. At the power end, the engine and rear suspension are fully assembled other than final attachment of the wing and wheels. I'll do that last to see if I can get the stance right, although I'm not excited to bend anything at this stage. I may sand the tires (er "tyres") a bit--they're a little glossy, but less so under normal light. I decided to build this Brabham partly to get more experience with 1/43 open-wheel metal kits so I can tackle something from Model Factory Hiro. I have Hiro's Lancia D50 and Bugatti Type 35 waiting, and they seem less intimidating now that I've managed to assemble this puzzle of a 1970s F1 suspension! Thanks for watching and thanks to all the posters who share their builds and expertise here. 7 Link to comment Share on other sites More sharing options...
klubman01 Posted June 14, 2021 Share Posted June 14, 2021 That is coming together nicely. Great work. Trevor Link to comment Share on other sites More sharing options...
Kitkent Posted June 16, 2021 Share Posted June 16, 2021 Looking very smart already! I've never heard of the Sol R masking fluid,I'm now going to get some for myself. Thanks! Chris. Link to comment Share on other sites More sharing options...

Recommended Posts
Create an account or sign in to comment
You need to be a member in order to leave a comment
Create an account
Sign up for a new account in our community. It's easy!
Register a new accountSign in
Already have an account? Sign in here.
Sign In Now