Steben Posted April 13, 2021 Share Posted April 13, 2021 Great build. Really love your paint work. And the fact you stuck to scc15 instead of post war DBGreen. 1 Link to comment Share on other sites More sharing options...
APA Posted April 13, 2021 Author Share Posted April 13, 2021 5 hours ago, Steben said: Great build. Really love your paint work. And the fact you stuck to scc15 instead of post war DBGreen. Thanks Steben. I'm thinking this would about 46,47 and if the war continued in what ever form the change to DBG may not have happened. That's my excuse anyway 🤣😉 Andrew 1 Link to comment Share on other sites More sharing options...
Steben Posted April 13, 2021 Share Posted April 13, 2021 (edited) 1 hour ago, APA said: Thanks Steben. I'm thinking this would about 46,47 and if the war continued in what ever form the change to DBG may not have happened. That's my excuse anyway 🤣😉 Andrew As distilled from report of veterans and repeated by some here, even in Korea a tactical "rather flat green" finish was used. No doubt a lot this was scc15. No one on the ground really would prefer a nice shiny dark workhorse in the paddies if asked ... Edited April 13, 2021 by Steben 2 Link to comment Share on other sites More sharing options...
APA Posted April 17, 2021 Author Share Posted April 17, 2021 (edited) All stating to come together nicely today. My first go at dry decals from Archer. One the one hand I really like them as they have no backing at all and are a good representation of paint. One of my pet hates is thick backing on decals. On the other hand they are rather fiddly especially in tight areas. They are just like the old skool fake tatoos you had as a kid and I'm sure they were used for something else as well back in the day but can't remember what exactly. Anyway heres some pics..... The blue is airbrushed on and the yellow circle is a blank transfer from another kit. The dry decals are applied on top. Slight cock up on the second '3' The TINKERBELL went on ok A dark wash applied over the whole thing, tracks applied and the skirting on. I know the lettering is a bit wonky which is annoying. I did use a straight edge but hey ho! However it does give a slightly more natural feel to the old girl. (Another excuse 😎) I'll let her rest for the night and start on the detailing and weathering tomorrow 😁 Andrew Edited April 17, 2021 by APA 16 Link to comment Share on other sites More sharing options...
vytautas Posted April 17, 2021 Share Posted April 17, 2021 Beautiful work, Andrew ! I am really enjoying following your thread. Vytautas 1 Link to comment Share on other sites More sharing options...
Bullbasket Posted April 18, 2021 Share Posted April 18, 2021 If you hadn't pointed out the "3", I would never have seen it. Nice work with the decals. I actually like the dry rub type, and wish that there were more of them. John. Link to comment Share on other sites More sharing options...
Hamden Posted April 18, 2021 Share Posted April 18, 2021 Your work on the markings has certainly paid off, I wouldn't worry about the slight misplaced numeral as that would/could have happened in real life, not all markings are text book aligned or colour matched, sometimes not even in the correct position. Great work looking forward to the next update now Stay safe Roger Link to comment Share on other sites More sharing options...
Cerberus Posted April 18, 2021 Share Posted April 18, 2021 Tinkerbell is looking very good Matt Link to comment Share on other sites More sharing options...
APA Posted April 18, 2021 Author Share Posted April 18, 2021 Thanks Chaps 👍🏻 much apprecited. @Bullbasket Yes I think I'll be using them more in the future. Even doing this model I'm now all out of white medium size 'L's 🙄. @Cerberus Loving the winky new avatar, @vytautas has done a cracking job 😁👍🏻 Now on to days doings..... Well I'm calling this 99% finished for the actual model. I'm a pigment weatherer so it's all pigments with the odd dash of enamel wash for oils etc. This is also my first serious effort at chipping with a brush. Sould have added a few more with a spong. Most are covered with weathering thankfully. The top ones ate a bit OTT me thinks. But there's more...... The finishing touch will be some camo netting draped over her. Hmm should have called her the Queen of Shiba or Matahari or some such if she's seductively covered in vails 🤔 Anyway here are the key ingredients. The plasterers scrim kindly donated by @Das Abteilung Cheers All Andrew 17 Link to comment Share on other sites More sharing options...
Bullbasket Posted April 19, 2021 Share Posted April 19, 2021 13 hours ago, APA said: Sould have added a few more with a spong. Most are covered with weathering thankfully. The top ones ate a bit OTT me thinks. No,I disagree with you. I think that you've got it just about right. I especially like the effect that you've achieved with the exhaust. But watch out for those spongs. They can be deadly. John. 1 Link to comment Share on other sites More sharing options...
APA Posted April 19, 2021 Author Share Posted April 19, 2021 (edited) 11 hours ago, Bullbasket said: No,I disagree with you. I think that you've got it just about right. I especially like the effect that you've achieved with the exhaust. But watch out for those spongs. They can be deadly. John. Thanks John. Here's a better pic of the top. Never done the sponge thing so I will be careful. That's for the next one 😉 Andrew Edited April 19, 2021 by APA 12 Link to comment Share on other sites More sharing options...
Hamden Posted April 19, 2021 Share Posted April 19, 2021 Looks spot on from here. Stay safe Roger 1 Link to comment Share on other sites More sharing options...
M3talpig Posted April 19, 2021 Share Posted April 19, 2021 Tinkerbell........for an absolute unit like that Beautifully done though 2 Link to comment Share on other sites More sharing options...
Cerberus Posted April 19, 2021 Share Posted April 19, 2021 On 18/04/2021 at 17:52, APA said: The top ones ate a bit OTT me thinks. The top ones are from a bridge collapse, lol They dragged old Tinkerbell out with concrete and steel still on the roof... And you just know thing's are getting serious when the old Evo Stik and Rizla's come out to play Matt Link to comment Share on other sites More sharing options...
APA Posted April 20, 2021 Author Share Posted April 20, 2021 On 4/19/2021 at 11:34 AM, Hamden said: Looks spot on from here. Stay safe Roger Cheers Roger 👍🏻😁 On 4/19/2021 at 12:05 PM, M3talpig said: Tinkerbell........for an absolute unit like that Beautifully done though Those Tankers had a keen sense of irony didn't they 😉😂 and Tah 👍🏻 19 hours ago, Cerberus said: The top ones are from a bridge collapse, lol They dragged old Tinkerbell out with concrete and steel still on the roof... And you just know thing's are getting serious when the old Evo Stik and Rizla's come out to play Matt I'm liking the scenario Matt and since this is a 'What If' there is no one to prove you wrong. In fact I remember talking to an old boy who drove one of these around the Rhine in 48. He said the RE boys used to call them Bridge Busters 😉 Ah what can't one do with a tub of wood glue, a packet of Rizlas and some scrim. Lets just say the Missus is in for a treat tonight 🤓 Andrew 2 Link to comment Share on other sites More sharing options...
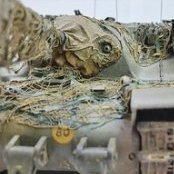
APA Posted May 3, 2021 Author Share Posted May 3, 2021 (edited) So were on the home stretch. I added a bit more dirt and a sprinkle of lighter dust to the tracks to give them a bit more life and that was it. for the model itself. I then moved on to the camo netting. First off I cut a load of Rizla papers into 1 -2mm wide strips and pinned the scrim onto the cutting matt With the patience of a saint I threaded them through the scrim an a similar pattern to the those that I have seen. Not bad if a little simplified however it was all pretty much for nought as you will see in the final result. I mixed a PVA / Water / dark green acrylic paint concoction which I was hoping to mean I wouldn't have to paint it however it didn't really soak it up and the result is, well, a rather washed out result. This scrim is a tricky thing to work with. I usd the same process as with a tissue tarp. You have to be very careful with how long you leave it in the glue mix, a little too long and it disintegrates. You also have to be quick with placement because as you pull it out any hesitation will result in it curling up on itself which is a real pain. Once on though I do like the result. As you can see the side nets are the very carefully threaded ones as above which you cannot see at all! The one draped over the front is a simplified version with just straight sections. The barrell and top nets are the same Rizla but cut into shorter strips and payed over. Rizlas are an excellent paper to use as they remain strong after soaking. I then painted the cloth strips in three colours, gave them all 3 coats of dark brown wash to blend them in and finally a dry ducting with a light sienna pigment to take the 'painted' look off the cloth. The result is below. So Tinkerbell is done and the RFI is here..... Thanks for following along 👍🏻😁 Andrew Edited May 3, 2021 by APA 16 Link to comment Share on other sites More sharing options...
vytautas Posted May 3, 2021 Share Posted May 3, 2021 The tank looks great, and I don’t remember seeing such a well-done camouflage net. Everything together looks really impressive, the colors and shades are also very good, there is something to learn. Vytautas 1 Link to comment Share on other sites More sharing options...
Cerberus Posted May 3, 2021 Share Posted May 3, 2021 I agree with Vytautas, the camo netting has turned out very nice indeed, old Tinkerbell looks good in her new clothes Matt 2 Link to comment Share on other sites More sharing options...
Steben Posted May 3, 2021 Share Posted May 3, 2021 This model oozes Britishness. Love it. 1 Link to comment Share on other sites More sharing options...
Hamden Posted May 4, 2021 Share Posted May 4, 2021 Great result, particularly like the cam netting it's most affective. Stay safe Roger 1 Link to comment Share on other sites More sharing options...
Bertie McBoatface Posted February 12, 2022 Share Posted February 12, 2022 Wow! I say that with due consideration because I built mine two years ago or more, just straight OOB, and it's still in my cabinet and still boring AF. I did make a little story about someone crushed underneath but that was just a one liner really. I may well close the hatches and do something a bit more original with it now I've had more practice. How did you do the mantel cover, Rizzlas and glue? Link to comment Share on other sites More sharing options...
Model Mate Posted February 12, 2022 Share Posted February 12, 2022 The camo netting, as others have said, is superb - the most convincing I’ve seen and it sets off what is an excellent job all round. Link to comment Share on other sites More sharing options...
APA Posted February 13, 2022 Author Share Posted February 13, 2022 12 hours ago, Bertie Psmith said: Wow! I say that with due consideration because I built mine two years ago or more, just straight OOB, and it's still in my cabinet and still boring AF. I did make a little story about someone crushed underneath but that was just a one liner really. I may well close the hatches and do something a bit more original with it now I've had more practice. How did you do the mantel cover, Rizzlas and glue? Thanks Bertie. The mantel cover is from that paper you get in things like new shoes. It's a bit stiffer, smoother and more resilient than tissue. The model and 99% of pics are of the prototypes in thier bare state. If in action they would have such a cover just like all other British tanks of the era. I think it really finishes the old girl off nicely. There are a couple of pics of one prototype wearing such a cover. 10 hours ago, Model Mate said: The camo netting, as others have said, is superb - the most convincing I’ve seen and it sets off what is an excellent job all round. Thanks MM 😊 Andrew 3 1 Link to comment Share on other sites More sharing options...
Bertie McBoatface Posted February 13, 2022 Share Posted February 13, 2022 11 hours ago, Model Mate said: The camo netting, as others have said, is superb - the most convincing I’ve seen and it sets off what is an excellent job all round. I thought so too. It looks like a sniper in a ghillie suit! I've ordered some scrim to have a play with it myself. I found that it is available in cotton, which I think APA uses and also in jute, which looks a bit shaggier. It's not expensive really, less than a tenner for a lifetime supply (and also useful in diorama making for plastered groundwork). Next time I show a model tank, you probably won't be able to see it at all. 1 Link to comment Share on other sites More sharing options...
APA Posted February 13, 2022 Author Share Posted February 13, 2022 3 minutes ago, Bertie Psmith said: I thought so too. It looks like a sniper in a ghillie suit! I've ordered some scrim to have a play with it myself. I found that it is available in cotton, which I think APA uses and also in jute, which looks a bit shaggier. It's not expensive really, less than a tenner for a lifetime supply (and also useful in diorama making for plastered groundwork). Next time I show a model tank, you probably won't be able to see it at all. You'll have to ask @Das Abteilung as he kindly sent me what I used. I found it quit tricky to use. Don't soak it too long as it breaks up quickly. Has a habit of sticking together when lifted from the pva and can't be worked too much when placed as it, again, will break up easily. It's glued together not woven and the glue must be water based. Andrew 1 Link to comment Share on other sites More sharing options...

Recommended Posts
Create an account or sign in to comment
You need to be a member in order to leave a comment
Create an account
Sign up for a new account in our community. It's easy!
Register a new accountSign in
Already have an account? Sign in here.
Sign In Now